
This is just a very quick blog post because I got the question from a couple of people. In this blog post want to show you how you can enable ping (ICMP) on a public IP address of an Azure virtual machine (VM). First, just let me say that assigning a public IP address to a virtual machine can be a security risk. So if you do that, make sure you know what you are doing. If you need admin access to virtual machines only for a specific time, there are services like Azure Just-in-Time VM Access (JIT) and Azure Bastion you should have a look at. Now back to the topic, Azure by default denies and blocks all public inbound traffic to an Azure virtual machine, and also includes ICMP traffic. This is a good thing since it improves security by reducing the attack surface.
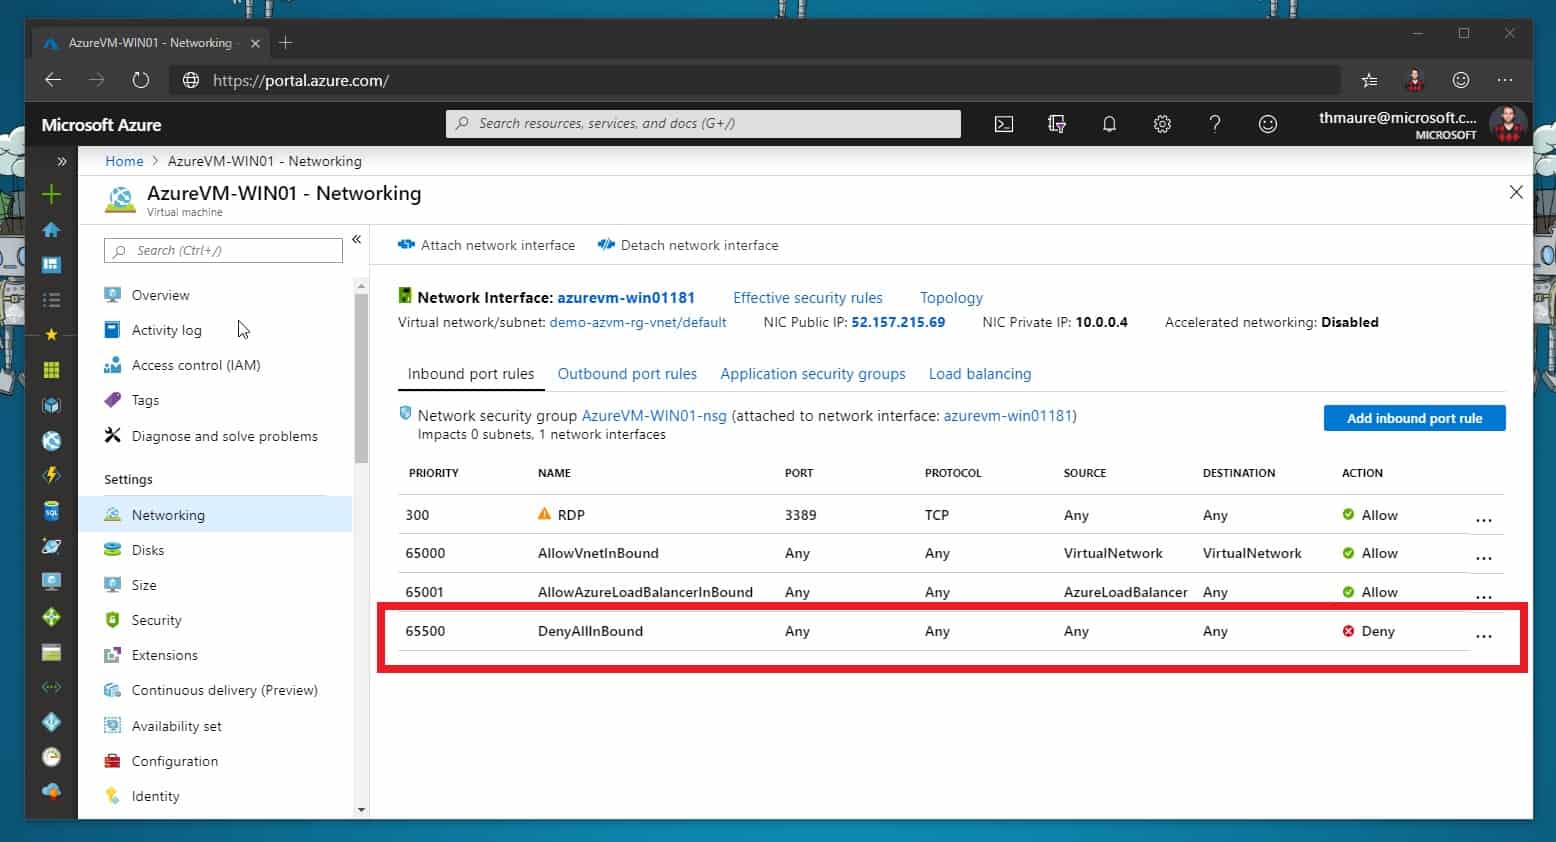
Azure Network Security Group Port Rules Deny All Inbound Traffic to Azure VM
This also applies to pings or ICMP echo requests sent to Azure VMs.
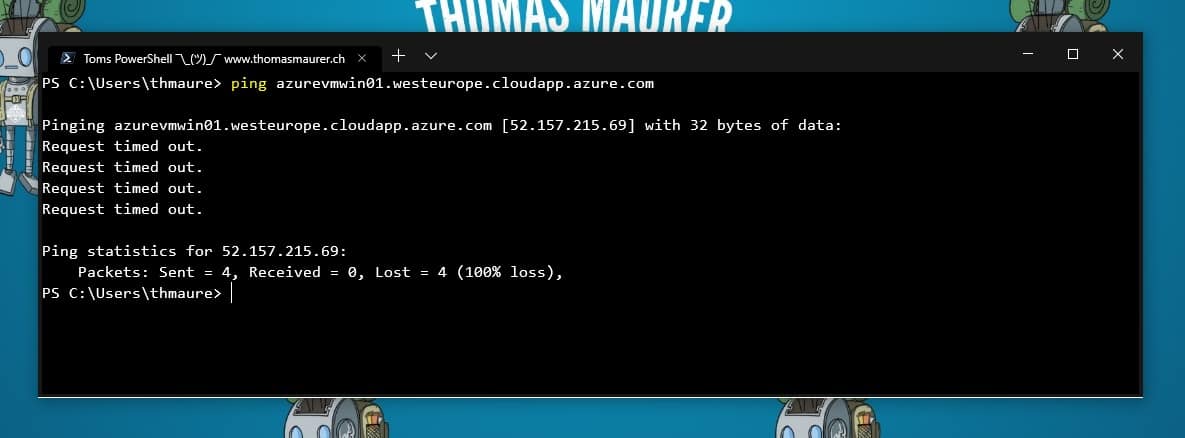
Ping Azure VM failed
However, if you need to access your application from a public IP address, you will need to allow the specific ports and protocols. The same applies to the ICMP (Internet Control Message Protocol) protocol. The ICMP protocol is typically used for diagnostic and is often used to troubleshoot networking issues. One of the diagnostic tools using ICMP is ping, which we all know and love.
What do I need to do to be able to ping my Azure virtual machines (VMs)
Overall we need to do two main steps:
- Configure the Network Security Group (NSG) to allow ICMP traffic
- Set up the operating system to answer to Ping/ICMP echo request
Configure Network Security Group (NSG) to allow ICMP traffic
So here is how you enable or allow ping (ICMP) to an Azure VM. Click on add a new inbound port rule for the Azure network security group (NSG).
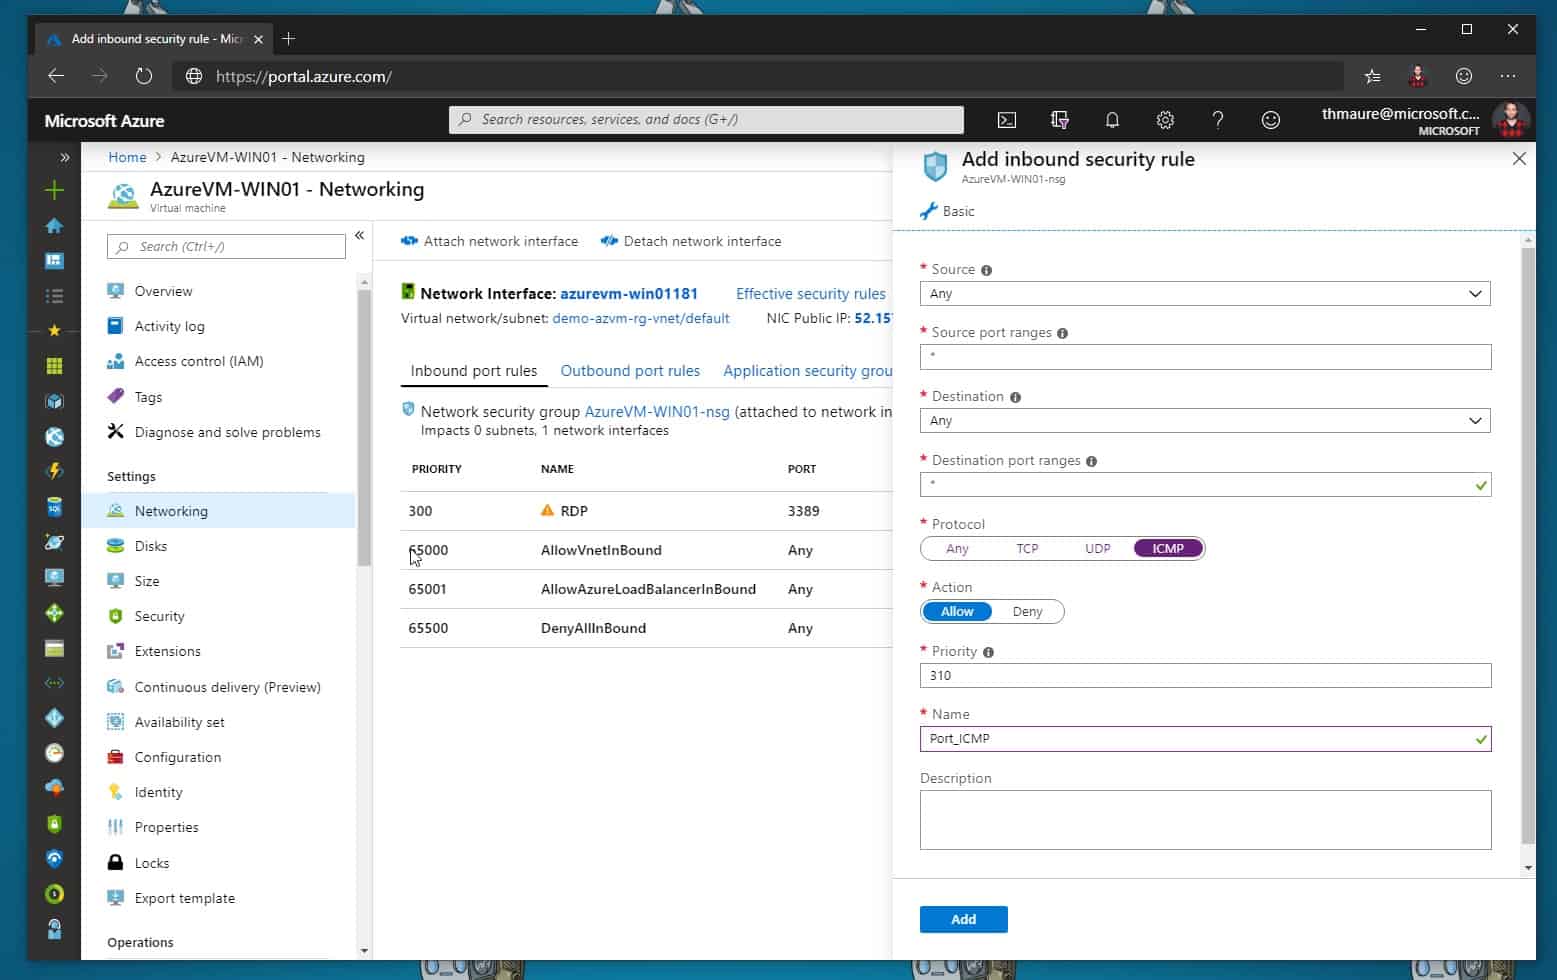
Enable Ping ICMP in an NSG on an Azure VM
Change the protocol to ICMP. As you can see, you can also limit the sources which can make use of that rule, as well as change the name and description. You can also use the following Azure PowerShell commands to add the inbound security rule to your NSG.
Get-AzNetworkSecurityGroup -Name "AzureVM-WIN01-nsg" | Add-AzNetworkSecurityRuleConfig -Name ICMP-Ping -Description "Allow Ping" -Access Allow -Protocol ICMP -Direction Inbound -Priority 100 -SourceAddressPrefix * -SourcePortRange * -DestinationAddressPrefix * -DestinationPortRange * | Set-AzNetworkSecurityGroup
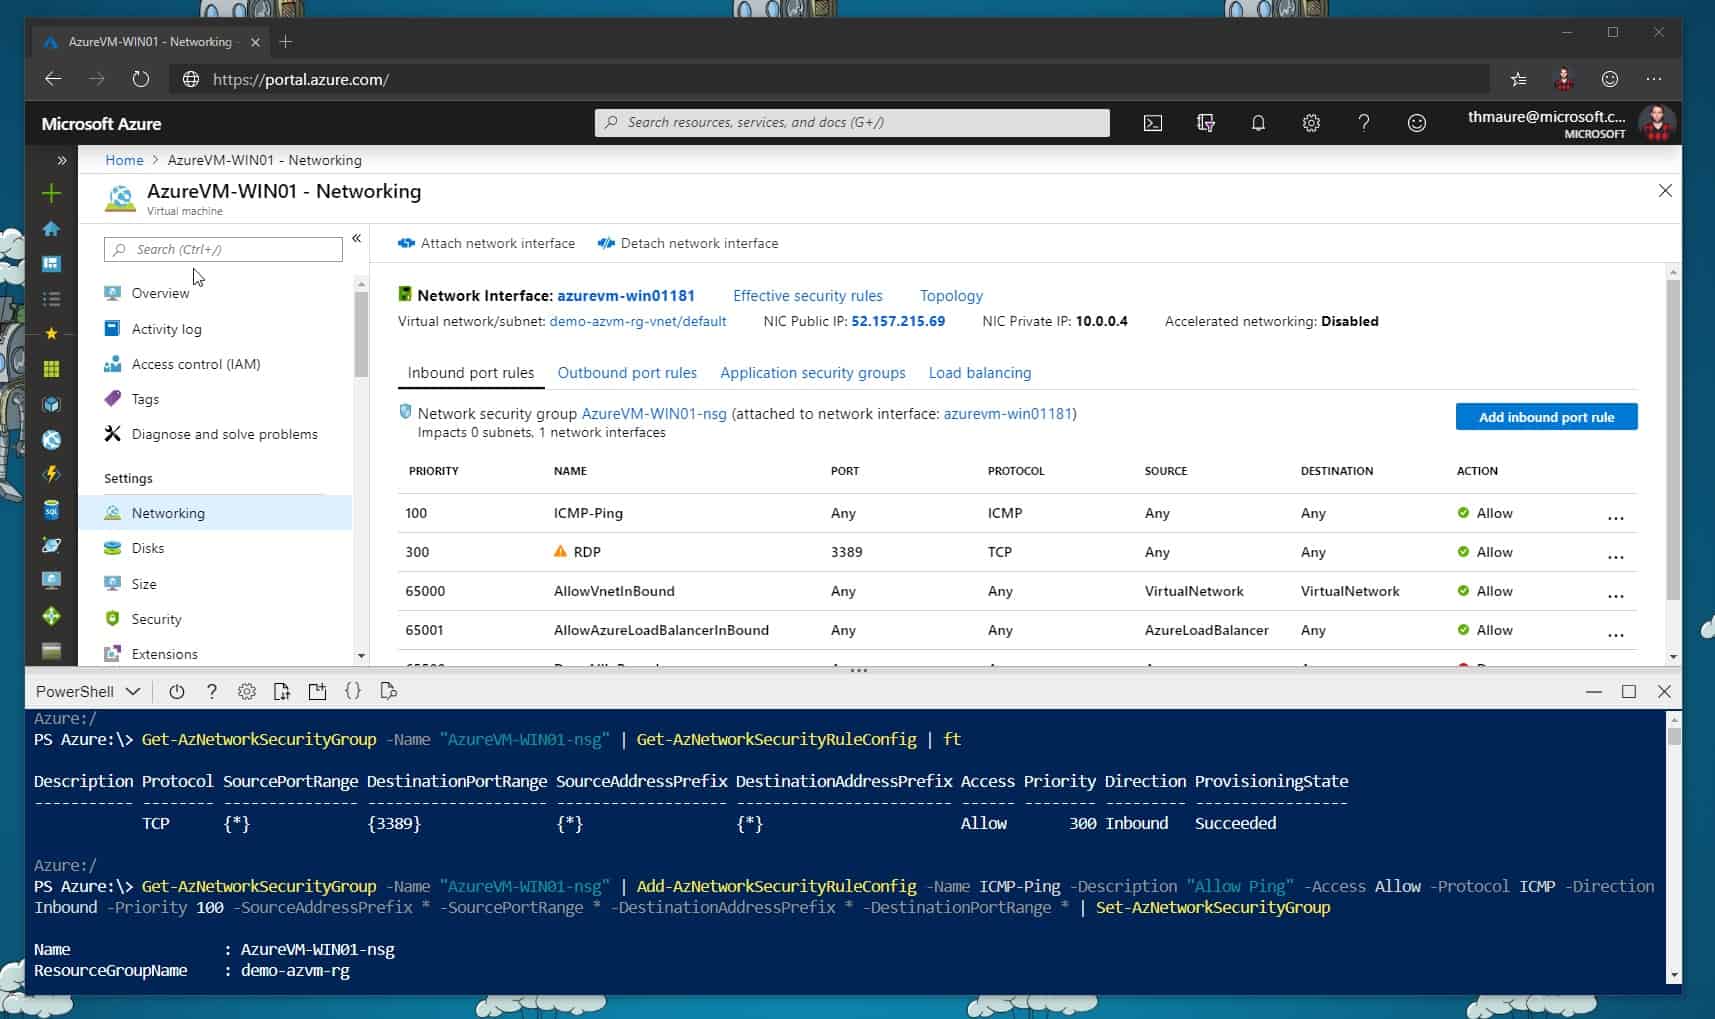
Configure Network Security Group PowerShell
Set up the operating system to answer to Ping/ICMP echo request
If you haven’t already configured the operating system that way, you will need to allow ICMP traffic, so the operating system response to a ping. On Windows Server, this is disabled by default, and you need to configure the Windows Firewall. You can run the following command to allow ICMP traffic in the Windows Server operating system. In the Windows Firewall with Advanced Security, you can enable the Echo Request – ICMPv4-In or Echo Request ICMPv6-In rules, depending on if you need IPv4 or IPv6.
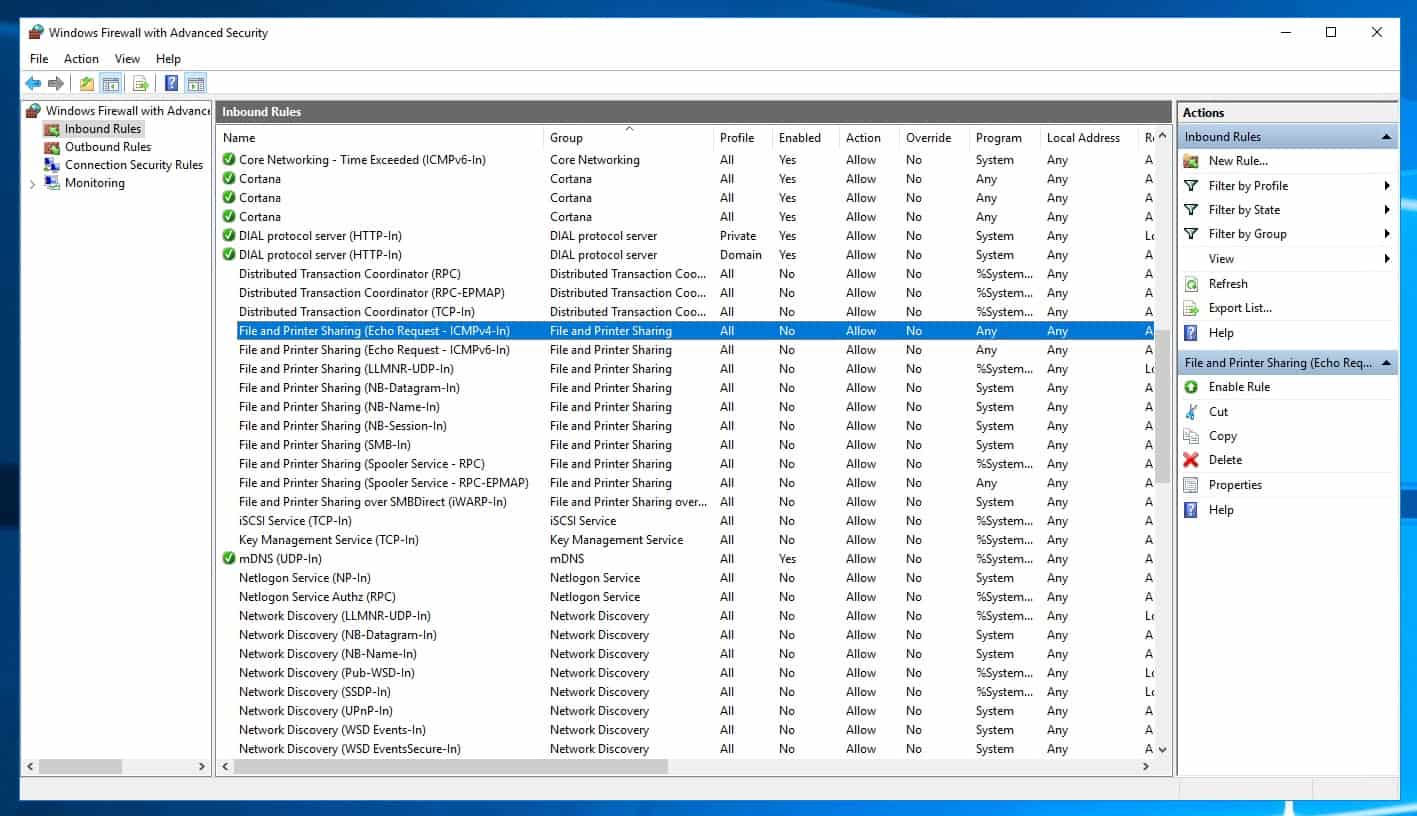
Windows Firewall Enable Ping
You can also run the following command to do that:
# For IPv4
netsh advfirewall firewall add rule name="ICMP Allow incoming V4 echo request" protocol="icmpv4:8,any" dir=in action=allow

#For IPv6
netsh advfirewall firewall add rule name="ICMP Allow incoming V6 echo request" protocol="icmpv6:8,any" dir=in action=allow
After doing both steps, you should be able to ping your Azure Virtual Machine (VM) using a public IP address.
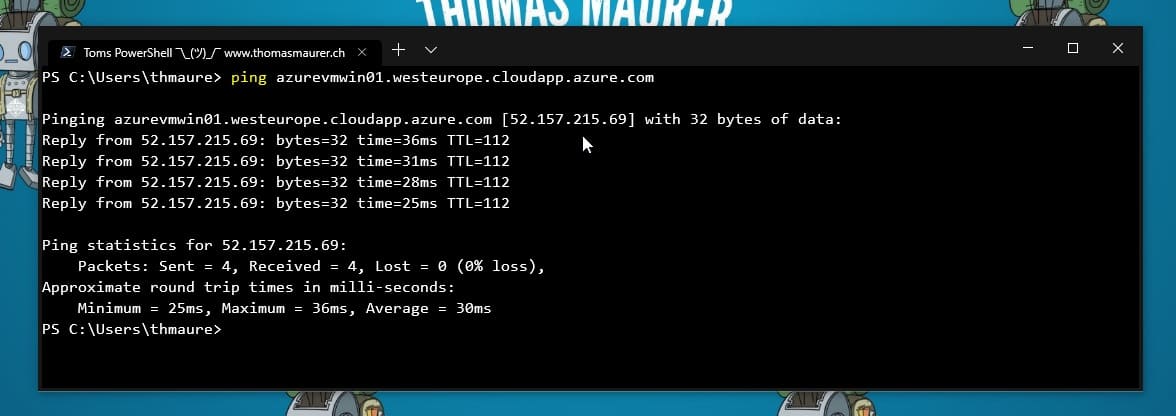
Ping Azure VM Public IP address
I hope this helps you be able to ping your Azure VMs. If you have any questions, please let me know in the comments.
Tags: Allow Ping, Azure, Azure Virtual Machine, Azure VM, Enable Ping, ICMP, Microsoft, Microsoft Azure, Network Security Group, Networking, NSG, Ping, PowerShell, Protocol, Traffic, Virtual Machine, VM Last modified: September 17, 2019


hi thomas, I was create a site to site vpn from azure to my on premise network, I can comunicate from azure to my local network but
I can’t do viceversa, I am using a mikrotik to make the conecction to azure, Maybe yo can helpme. thanks
It looks like a routing problem on your local network. Make sure your router/VPN device is aware of the IP subnets in Azure.
Not able to ping Azure VMs
I have created two VMs in Azure and which are in same region and same vnet. I am able to ping From Server 1 – to – Server 2 But unable to ping From Server 2 – to – Server 1.
I am getting the error as request timed out.
Can you please assist me on this issue?
(Both VMs are in same VNET and having same inbound and outbound Rules. No changes in network end)
I already followed above two steps. firewall allow ICMPV4 allow and NSG inbound ICMPV4 allow. still not able to ping from server 2 – to – server 1
Not able to ping Azure VMs
Hi Team,
I have created two VMs in Azure and which are in same region and same vnet. I am able to ping From Server 1 – to – Server 2 But unable to ping From Server 2 – to – Server 1.
I am getting the error as request timed out.
Can you please assist me on this issue?
(Both VMs are in same VNET and having same inbound and outbound Rules. No changes in network end)
I am curious as to why the port for the ICMP rule can be configured. I am under the impression that ICMP does not use ports.
Esto funciono para mi, gracias por el articulo
2021 – Simply add allow ICMP inbound/outbound call on port 0 in NSG rules.
Worked !! Thank you!
you’re welcome!
I got both of my vms on Azure to talk to each other. Now, how do I reverse this? I tried the command line and got an OK. However, when I went to the server on the Azure platform and attempted to change it from ICMPv4 to Any (what it was originally) and delete the vms I can’t. What do I do?
I got both of my virtual machines on Azure to talk to each other. Now, how do I reverse this? I tried the command line and got an OK. However, when I went to the server on the Azure platform and attempted to change it from ICMPv4 to Any (what it was originally) and delete it I can’t. What do I do?