In Windows Server 2008 R2 we had some really simple configurations and best practices for Hyper-V and network configurations. The problem with this was, that this configurations were not really flexible. This had two main reasons, first NIC teaming wasn’t officially supported by Microsoft and secondly there was no possibility to create virtual network interfaces without third party solution.
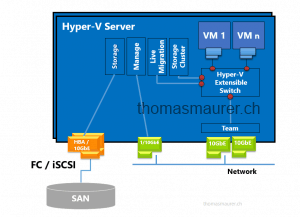
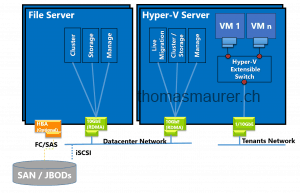
Here is a example of a Hyper-V 2008 R2 host design which was used in a cluster setup.
Traditional Design
Each dedicated Hyper-V network such as CSV/Cluster communication or the Live Migration network used a own physical network interface. The different network interfaces could also be teamed with third party software from HP, Broadcom or Intel. This design is still a good design in Windows Server 2012 but there are other configurations which are a lot more flexible.
Microsoft MVP Adian Finn and Hans Vredevoort did a already some early work with Windows Server 2012 Converged Fabric and you should definitely read their blog posts.
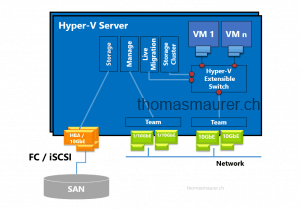
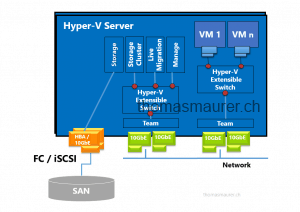
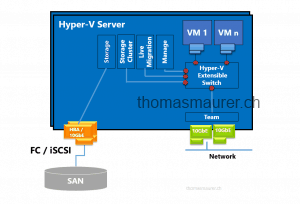
In Windows Server 2012 you can get much more out of your network configuration. First of all NIC Teaming is now integrated and supported in Windows Server 2012 and another cool feature is the use of virtual network adapters in the Management OS (Host OS or Parent Partition). This allows you to create for example one of the following designs.
Virtual Switch and Dedicated Management Interfaces
This scenario has two teamed 10GbE adapter for Cluster and VM traffic.
Virtual Switch and Dedicated Teamed Management Interfaces
The same scenario with a teamed management interface.
Dedicated Virtual Switch for Management and VM Traffic
One Virtual Switch for Management and Cluster traffic and a dedicated switch for VM traffic.
One Virtual Switch for everything
This is may favorite design at the moment. Two 10GbE adapter as one team for Virtual Machine, Cluster traffic and management. It is a very flexible design and allows the two 10GbE adapters to be used very dynamic.
This design solutions will also be very interesting if you us SMB 3.0 as a storage for Hyper-V Virtual Machines.
There are at the moment not a lot of official information which designs will be unsupported and which will be supported. You can find some information about supported designs in the TechEd North America session WSV329 Architecting Private Clouds Using Windows Server 2012 by Yigal Edery and Joshua Adams.
Configuration
Now after you have seen these designs you may want to create such a configuration and want to know how you can do this. Not everything can be done via GUI you have to use your Windows PowerShell skills. In this scenario I use the design with four 10GbE network adapters 2 for iSCSI and to for my network connections.
- Install the Hyper-V Role
- Create NIC Teams
- Create a Hyper-V Virtual Switch
- Add new Virtual Network Adapters to the Management OS
- Set VLANs of the Virtual Network Adapters
- Set QoS Policies of the Virtual Network Adapters
- Configure IP Addresses of the Virtual Network Adapters
Install Hyper-V Role
Before you can use the features of the Virtual Switch and can start create Virtual Network Adapters on the Management OS (Parent Partition) you have to install the Hyper-V role. You can do this via Server Manager or via Windows PowerShell.
Add-WindowsFeature Hyper-V -Restart
Create NIC Teams
Now most of the time you will create a NIC Teaming for fault tolerance and load balancing. A team can be created over the Server Manager or PowerShell. Of course I prefer the Windows PowerShell. For a Team which will not only be used for Hyper-V Virtual Machines but also for Management OS traffic I use the TransportPorts as load balancing algorithm. If you use this team only for Virtual Machine traffic there is a algorithm called Hyper-V-Port. The Teaming Mode of course depends on your configuration.
New-NetLbfoTeam -Name Team01 -TeamMembers NIC1,NIC2 -LoadBalancingAlgorithm HyperVPort -TeamingMode SwitchIndependent
Create the Virtual Switch
After the team is created you have to create a new Virtual Switch. We also define the DefaultFlowMinimumBandwidthWeight to be set to 20.
 New-VMSwitch -Name VMNET -NetAdapterName Team01 -AllowManagementOS $False -MinimumBandwidthMode Weight
Set-VMSwitch "VMNET" -DefaultFlowMinimumBandwidthWeight 3.
After you have created the Hyper-V Virtual Switch or VM Switch you will find this switch also in the Hyper-V Manager.
Create Virtual Network Adapters for the Management OS
After you have created your Hyper-V Virtual Switch you can now start adding VM Network Adapters to this Virtual Switch. We also configure the VLAN ID and the QoS policy settings.
 Add-VMNetworkAdapter -ManagementOS -Name "Management" -SwitchName "VMNET"
Add-VMNetworkAdapter -ManagementOS -Name "LiveMigration" -SwitchName "VMNET"
Add-VMNetworkAdapter -ManagementOS -Name "CSV" -SwitchName "VMNET"


Set-VMNetworkAdapterVlan -ManagementOS -VMNetworkAdapterName "Management" -Access -VlanId 185
Set-VMNetworkAdapterVlan -ManagementOS -VMNetworkAdapterName "CSV" -Access -VlanId 195
Set-VMNetworkAdapterVlan -ManagementOS -VMNetworkAdapterName "LiveMigration" -Access -VlanId 196


Set-VMNetworkAdapter -ManagementOS -Name "LiveMigration" -MinimumBandwidthWeight 20
Set-VMNetworkAdapter -ManagementOS -Name "CSV" -MinimumBandwidthWeight 10
Set-VMNetworkAdapter -ManagementOS -Name "Management" -MinimumBandwidthWeight 10
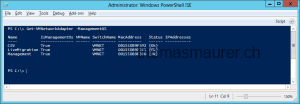
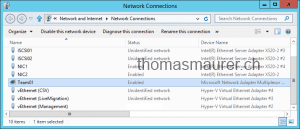
Your new configuration will now look like this:
As you can see the name of the new Hyper-V Virtual Ethernet Adapter is vEthernet (NetworkAdapaterName). This will be important for automation tasks or configuring IP addresses via Windows PowerShell.
Set IP Addresses
Some months ago I wrote two blog posts, the first was how to configure you Hyper-V host network adapters like a boss and the second one was how to replace the netsh command with Windows PowerShell. Now using Windows PowerShell to configure IP addresses will save you a lot of time.
# Set IP Address Management
New-NetIPAddress -InterfaceAlias "vEthernet (Management)" -IPAddress 192.168.25.11 -PrefixLength "24" -DefaultGateway 192.168.25.1
Set-DnsClientServerAddress -InterfaceAlias "vEthernet (Management)" -ServerAddresses 192.168.25.51, 192.168.25.52

# Set LM and CSV
New-NetIPAddress -InterfaceAlias "vEthernet (LiveMigration)" -IPAddress 192.168.31.11 -PrefixLength "24"
New-NetIPAddress -InterfaceAlias "vEthernet (CSV)" -IPAddress 192.168.32.11 -PrefixLength "24"

# iSCSI
New-NetIPAddress -InterfaceAlias "iSCSI01" -IPAddress 192.168.71.11 -PrefixLength "24"
New-NetIPAddress -InterfaceAlias "iSCSI02" -IPAddress 192.168.72.11 -PrefixLength "24"
There is still a lot more about Windows Server 2012 Hyper-V Converged Fabric in the future, but I hope this post will give you a quick insight into some new features of Windows Server 2012 and Hyper-V.
Tags: Cluster, Converged Fabric, CSV, Fabric, Hyper-V, Hyper-V Converged Fabric, iSCSI, Live Migration, Microsoft, Networking, NIC, PowerShell, Storage, Teaming, vEthernet, Virtual Machine, Virtualization, Windows Server, Windows Server 2012 Last modified: January 7, 2019












Thank you for posting this info! I came across your site while searching google with the query: “windows server 2012 unable to create team adapter state faulted reason not found” (Without quotes) and your article was the fourth result ;)
I tried using the PowerShell command you provided in order to setup a team, except I specified Hyper-V-Port instead of TransportPorts. I received an error that Hyper-V-Port was not a recognized value, and that the available values under LoadBalancingAlgorithm were:
TransportPorts, IPAddresses, MacAddresses, HyperVPort.
Just in case anyone else comes across this, use HyperVPort instead of Hyper-V-Port.
Well, after entering the correct combo, I still see the same warning in the nic teaming gui, and powershell reports that the status of the team is degraded.
I have Hyper V 2012 installed, and then a management server running full 2012. However, I am trying to figure out how to use iSCSI on Hyper V server 2012 – I cannot find anywhere to manage this.
To configure the iSCSI you can use PowerShell or the “iscsicpl” (Just type “iscsicpl” into the console on your Core Server). This will launch the iSCSI Initiator GUI.
Nice write-up. Be very careful not to use only “Hyper-V Port” as LB algorithm if your guest VMs are clustered, we hade some major issues with our clusters because of this.
Hi Thomas, nice post.
We are running a 4 nodes hyperv 2012 cluster all based on converged fabric. My hyperv nodes have 12x1Gbps nic each. 2 nics for iscsi, 2 nics for management and 8 nics for converged fabric.
I create a team of 8x1Gbps NIC’s per node, divided over 2 switches for redundancy. 4 nic in switch-A and 4 nic in switchB.
With this team I create the vSwitch.
On the vSwitch I created the vNIC for LM, CSV, etc. with VLAN-ID’s.
Everything is working, the cluster is running and the clients can connect to the VM’s running on the cluster.
The only thing that is not working is live migration. When I live migrate a VM from one node to the other, I get no errors, the VM goes to the other node but I get 10+ timeouts and the connection to the VM is lost for a couple of seconds, resulting in angry users. When I not use a vNIC for LM and use a dedicated 1Gbps nic, live migration goes fine and the VM keeps online.
My question: Which teaming mode do you use and how do you configure you ports on both switches? I tried LACP on the team and LACP trunk per node on the switch, I uses switch independent for the team and just trunking on the switch site, nothing solves my problem.
I use HP procurve 3500-48G switches and used the lasted NIC drives for my HP DL 380 G7.
Hope someone can help me in the right direction, its driving me crazy.
Thanks everyone!
Hallo Thomas, welche Maschine wird auf dem Abbildung “your configuration should Look like this” gezeigt? Ein VM?
Ich komme hier bei der Konfiguration nicht mit. Mit add-vmnetworkadapter, adde ih eine Netzwerkkarte in eine VM, diese sehe ich aber doch nicht auf dem Host….
Great Post! Like vSphere 5, it’d be better if they integrated all the configuration into the GUI for simplicity, but you’ve helped me a great deal! Thanks
Hi a post how you do this in System Center Virtual Machine Manager is coming in the next days :)
I am trying to wrap my head around this new “converged” networking. Let me start by saying I came from VMware and moved to 2008 R2 SP1 Hyper V2.
In VMware you create the team and then you dropped switch port types on the team, like a vm switch, service console (management), vmkernal for storage….all done via the GUI. Simple. I would use 2 – 10gig NIC’s into trunk ports on the switch for all of my VM VLAN’s and mgmt VLAN.
In 2008 R2 teaming was not officially supported but most of us do it by using third party software. Anyhow you create the team of 2 NIC’s, gave it a purpose (mgmt, VM’s, LM, cluster/csv). This was into access ports on a switch with a single VLAN on those ports.
If you got really crazy and un-supported in 2008 R2, you could use the VMware model above, and use 2-10gig NIC’s teamed and then in Windows with your Broadcom or Intel software create VLAN’s/Virtual NIC’s at the OS level, and then give Hyper V one or more of those VLAN’s for VM’s, the rest would be used for mgmt, LM, cluster/CSV. However if you did not use QOS you could run into some big time problems when it came to clustering. Again ALL DONE AT THE GUI LEVEL.
In 2012 teaming is supported by MS. So now we team say 2-10gig NIC’s and at the OS level (into trunk ports on the switch) then I could do the same thing in the crazy un-supported 2008 R2 model, VNIC’s at the OS level for each purpose, mgmt, LM, csv/cluster, VM’s…again with QOS and again via the GUI, just now fully supported. Lets call this the standard/old way.
New in 2012 you create the team in the OS, 2-10gig NIC’s into trunk ports on the switch and the you stop at the OS level. You then install the Hyper V roll and from Power Shell only I create a blank virtual switch? Also from power shell ONLY, you set some type of QOS?? The from Power shell only I create and attach virtual NIC’s to that switch? Then I use those VNIC’s for mgmt, LM, cluster/csv, VM’s??? No GUI support for these critical network foundation operations from Microsoft Windows 2012 but from VMware? FAIL!!!!! Lets call this the converged method.
Now please explain why I would use new converged method? Further confusing all of this is now on top of that you have SCVMM 2012 SP1 which also can do some or all of this and its called different things (network site, logical networks etc). In fact I have read that if you do some of this at the host level you lose some ability at the SCVMM level…..confusing at best.
People wonder why Admins like VMware so much.
We I think your are mixing somethings up.
First of all using the integrated vendor teaming vNICs was most of the time a really bad idea. Especially if you created a “vendor” vNIC for each VLAN and created a Virtual Switch for each vNIC. First of all you lose a lot of flexibility, if you add a new VLAN you had to create a new Virtual Switch on every host. The second problem was that a lot of people tried to do VLAN tagging on the Virtual network Adapter as well as on the “vendor” vNIC, so you had this kind of double tagging/untagging which basically disconnected your VM.
In Windows Server 2012 it is always recommended to use the vNICs from the Hyper-V Virtual Switch and not the tNICs in the Windows Server NIC teaming. Otherwise you lose VLANs before they can pass the Virtual Switch.
The other thing here about the GUI: First by using Windows Server 2012 you can do everything also in the GUI except add multiple vNICs for the Management OS. But there is PowerShell and if you have more than 2 hosts you will enjoy doing the configuration with PowerShell because it’s the fastest way to get things done. If you work in IT and you don’t work with Windows PowerShell I really recommend that you start with it otherwise you going to miss a lot in the next years. Anyway System Center 2012 SP1 brings a GUI solution for configuring the Hyper-V networking which will allow you to do exactly the same thing I did here with PowerShell.
Btw post about Converged Fabric with System Center 2012 SP1 – Virtual Machine Manager is coming in the next week :)
In 2008 R2 I would create a team of say 2-1gig NIC’s with Intel teaming software, a switch fault tolerant team. These NIC’s would go into Nexus 2000 switches and the switch ports are in access mode with a specific VLAN on them, so no tagging is needed at all.
This works fine, except Microsoft would not support the teaming from Intel. Each set of NIC’s would have a functions 1st set Management, 2nd CSV/Cluster, 3rd LM, 4th VM’s. By doing this at the Host and using Access ports on the switch, I never tagged anything in Hyper V or SCVMM 2008 R2.
I do have a cluster where I have 2-10gig NIC’s (Intel) teamed agin in a switch fault tolerant team. These NIC’s go into two different Nexus switches and the switch ports are in Trunk Mode. I then create VNIC’s in the Intel Teaming software assigned to different VLAN’s (say VLAN 4 and VLAN 5), which you see in the networking of Windows 2008 R2..or the host in question. Then in Hyper V manager I would create 2 VM (only) networks one assigned to the NIC (Intel VNIC) on VLAN 4 and another on VLAN 5. Again no tagging is needed in Hyper V manager or SCVMM 2008 R2 because to these software products they see a real NIC plugged into a single VLAN. Any VM assigned to those virtual switches would ride that VLAN, so no tagging in VM either.
To me doing this at the host and letting the software above it thinks its is seeing multiple real NIC’s is easier or less complicated then doing it in Powershell? Then adding it to Hyper V manager/SCVMM 2012?
I guess its just semantics? I wish, like VMware, there was one GUI based tool to create the team, and the virtual switches.
I look forward to your SCVMM 2012 SP1 article!
You should write a book about all of this because sadly there is not any real training or conclusive books with real world examples out there today. Just a collection of blog posts by many people….and not always on the same page.
Larry,
contrary to what you think you read/comments: all of the steps above can be done at the GUI level, it’s sometimes just simpler to do it in powershell on the host especially if you follow the best practice of installing core (otherwise you have to enable remote management and connect via the management shell from another system).
For your specific breakdowns: of course you can’t create a virtual switch before you install the Hyper-V role … I shouldn’t have to explain why. But you can absolutely use the MMC to create virtual switches if you’d prefer … again sometimes it’s just simpler to do a fast import-module hyper-v in powershell and then create all lbfoteam and vswitch teams in one spot.
Also, as an aside note, when you run new-netlbfoteam in powershell, a default vNIC is automatically created with the same name and assign the Default vLAN. This is no different behavior from Intel Pro Tools Or Broadcom BASP. You can then create additional vNICs with new-netlbfoteamnic and the -vlanid switch to do _exactly_ what Larry seems to be wanting to do.
I honestly think the complaints in the comments section come from someone not actually _trying_ the configuration. In practice it’s literally no different than in VMware… just a bit of confusion and worry because cmdlets were used instead of GUI.
From the blog post…
“Not everything can be done via GUI you have to use your Windows PowerShell skills.”
I dont have a problem with Powershell. It is great when scripting the setup for many hosts. However for just one host I would rather the use the GUI. I am ramping up on server 2012 now that SCVMM 2012 SP1 is out and you can finally support server 2012 in SCVMM. That is why I came to this blog, to learn more.
The quote above was in the blog post. If its not true then great! However Microsoft has done this before. One GUI aspect I used a lot with Exchange 2003 was showing mailboxes listed from large (size) to small the other way around. In 2007 and 2010 you can now only do this via Powershell. Same goes for administering POP settings for all of Exchange 2007 and most of 2010.
And yes I know you cant create a virtual switch before the Hyper V role is installed. Not sure why you thought that?
Hi,
would it be recommended to have the live migration with the iscsi network. Currently I have 2 10g dedicated for the iscsi and 4 gigabit NIC planned for the cluster, management and vm’s
Yes you can mix them, but there is no real recommendation. For Example you could use the 2 10G nics for iSCSI, Live Migration, CSV and Management and the 4 1G for VM traffic
Hi Thomas,
I have followed your posts with great interest and have setup a 2-node cluster with a fully converged network as per your example.
I’m using a LACP / Address Hash team for maximum performance with x4 1Gbps Intel NICs and have tested with JPerf though the VSWITCH proving I can get about 3.8Gbps between hosts.
I’m having a problem though with VM’s dropping off the network for short periods when I do live migrations or backups etc.
Specifically, if I Live-Migrate a VM, the other VM’s on the host that I’m migrating from drop packets during a ping and users lose access to them temporarily.
Or, if I backup a VM (using a seperate backup server), the other VM’s on that host drop packets in the same way.
Both the live-migration and backup seem to fully utilise 1 NICs bandwidth (1Gbps) which I’d expect and the CPU used for RSS runs at about 25%, but I wouldn’t expect it to affect other VM’s on the host.
I’ve tried the following to attempt to resolve the issue but none have made any difference:
1. Disabling both RSS and VMQ on the physical NIcs
2. Disabling all “Offload” settings on the physical NICs
3. Disabling STP on the switch ports and LAGs
4. Increase the DefaultFlowMinimumBandwidthWeight of the VSWITCH
Any idea’s?
Ben
Hi Thomas
I am looking for some help on the best way to use may 2x 10Gb Nics and 2x 1 Gb Nics on may server this is a green field site windows 2012.
I have 2 servers with 2x Switches one for redundancies and a SAN. I was thinking of teaming both 10Gb Nics for Production (VM network Access) and Storage ( ISCSI SAN) and teaming the 2x 1Gb for the management , CSV/Heartbeat and Live Migration. But the SAN will not support teaming. I was teaming them so I could connect them to both switches.
Thanks Danny
I recently setup a new Hyper-V cluster all running on Windows Server 2012 R2. I also configured the converged network fabric, and so far, I am loving it. However, one thing still confuses me. I get that when we create a VM we can then define which port on the virtual switch it uses (in my case VM Traffic), but for the Live Migration, CSV, Cluster data, and even Management traffic, how can we be sure that the cluster is properly designating that specific traffic to those specific ports on the logical switch? I’m trying to figure out how when I perform a live migration it uses the live migration port on the logical switch and my QoS settings are applied.
Hi Michael Smith,
You need to Select a Virtual Switch in the VM Network Adapter (in this case select the Converged Switch), also set the VALN ID that match the vEthernet Network Port when you created the Converged Switch.
I hope I’ve helped.
Hello Thomas and a big thank you for all your knowledge share!
I will be implementing Hyper-V Converged network but I can’t find an answer on the following question:
Let’s say I setup a tNIC with some NICs and then I create the necessary vNICS (management, live migration, cluster, etc.)
How does Hyper-V know which vNIC if for what role? By the name of it? I guess not since I can set any arbitrary name on my vNICs.
Thanks a lot!
Awesome article, I actually set my environment up using this article. However, I do not know see where you can enable/disable SR-IOV in the design. Is this possible?
Not Really, If you use NIC Teaming it is not possible to have SR-IOV on the same NIC. But you could a dedicated NICs just for SR-IOV if you really need.
In response to Alex’s question:
Alex, I believe you assign your vNIC an IP address in the IP segment of the IP address you assigned to your vSwitch created in the PS above.
For Example: If you created a vSwitch using the powershell above named “Public LAN” and assigned 192.168.10.120/24 to this vSwitch then any interface assigned to your VMs in that segment will use this “Public LAN” vSwitch. Also, keep in mind that in your Hyper-V Manager you will have only one vSwitch defined. Secondly, you will need to configure your NIC team “Load Balancing Algoritm” as Hyper-V port for this to work for all these segments. Also you upstream switch will need to allow these vlans through.
Thanks for all the info!
I’m running into a bit of a problem.
I have 5 hyps in a compute cluster with attached DSAN. I have a VM that has a shared VHDX drive. When I do a speed test to the disk using diskspd and the VM and shared VHDX are on the same cluster node I get great transfer speeds. around 1.2 gigabytes a second. I have 10G network on its own switch.
When I move the cluster storage owner where the shared VHDX is stored to a different node than the VM, the speeds drop to 350 megabytes a second. Any ideas where I can start?
Setup:
SCVMM
SMB Multichannel: disabled
VMQ: enabled
A few questions before i answer:
Is your dsan accessible and shared as one pool of storage between your nodes?
I noticed you have multichannel disablwd. Why?
What is the speed for your cluster heartbeat nics?
How do your nodes connect to shared storage? Not shared vhdx.
I ask because it appears that your failover node is using redirect to get to the shared vhdx.
Btw. Are both VMs on the same volume as your shared vhdx?
Part of Cloud Platform build
5 Node Hyper-v Cluster
Each Node has 4x 10G network adapters in a team using switch independent and dynamic.
We used VMM to create all teamed NICs on each hypervisor
VMQ enabled- You can watch a single core rise to 100% when performing the test.
SMB-Multichannel is disabled so it goes over only the one adapter we want traffic on.
Dsan connected over 10G fiber to separate LUNs using powerpath.
We are not using heartbeat nics
-General steps to reproduce the problem-
Perform a disk speed test within a VM to a second drive in the VM (D:) using diskspd utility:
-If the VM resides on CSV-A, and the VM D: Drive is a shared VHDX file that resides on CSV-B, and both CSV-A and CSV-B are owned by the same cluster node. The transfer speeds are 1200 megabytes a second.
-If the VM resides on CSV-A, and the VM D: Drive is a shared VHDX file that resides on CSV-B, and CSV-A is on cluster node 1 and CSV-B is on cluster node 2. The transfer speeds are 350 megabytes a second.
-Network graph shows 3 gigabit a second since disk IO is redirected.
-It does not matter who owns the node to observe the behavior. If it’s between two different hosts we get the same result.
Transfer a file between hosts:
-If you transfer a file between hosts over SMB you get 500-600 megabytes a second.
-Network graph shows 4-5 gigabit a second since disk IO is redirected.
Perform disk speed test using diskspd utility:
-If you perform a speed test to the SAN disk it performs between 1300-1500 megabytes a second
-If you perform the same test over the network to the same SAN disk it performs 350 megabytes a second
-Desired Outcome-
-We would like to see 10 gigabit a second (or close to) with transfers between hosts. If we have full throughput then they can see close to the 1200 megabytes a second to another drive in the VM.
With all that said, I think I might have narrowed down the issue. Using VMQ, I think I’m expericing something that is by design. I found the following in a different blog.
“This limits total throughput on a 10GB interface to ~2.5-4.5GBits/sec (results will depend on speed of core and nature of traffic). VMQ is especially helpful on workloads that process a large amount of traffic, such as backup or deployment servers. For dVMQ to work with RSS, the parent partition must be running Server 2012R2, otherwise RSS can not coexists with VMQ.”
I’m okay with the VMs being restricted in their network by using the one core to process data, but I’m not okay with the hosts being subject to the same one core rule. I have the system using core 0 and the rest being deviced up on the other cores.
I see this is not totally dead thread so I want to ask a question.
I am trying to setup a 2-node hyper-v 2012 R2 cluster on a dell PE R730xd server.
it has only 4x1Gb ports in it.
we are running about 10-15 VMs where only 2 is a high demand VM
1 is MSSQL server
1 is File Server
the rest are 2 AD/DC servers
1 print server (not used much at the moment)
3 various special need machines to run data recorder software for networked data collection units
and a few custom needs machines that are not too active most of the time.
plan is to use StarWind vSAN on both nodes to expose local storage to the cluster.
what is the best way to set this up?
I have been following several guides for configuration, including this one and am getting confused a bit.
I installed 2012 R2 Server with server UI (I know many of you here say “use core” no GUI but I wan to have it this
way).
added Hyper-V role to it.
installed StarWind.
now I am trying to get a network going properly and got stuck.
my network is 192.168.1.0/24
#1 .as per various forums etc. I have created a team using 2 nics (n1 and n2)
#2. create switch PS “New-VMSwitch -Name ConvergedHVSwitch -NetAdapterName HVTeam -AllowManagementOS $False -MinimumBandwidthMode Weight”
#3 create 3 vNic on that switch
Add-VMNetworkAdapter -ManagementOS -Name “Management” -SwitchName “ConvergedHVSwitch”
Add-VMNetworkAdapter -ManagementOS -Name “LiveMigration” -SwitchName “ConvergedHVSwitch”
Add-VMNetworkAdapter -ManagementOS -Name “CSV” -SwitchName “ConvergedHVSwitch”
3.a. set weight to the vnics
Set-VMNetworkAdapter -ManagementOS -Name “LiveMigration” -MinimumBandwidthWeight 40
Set-VMNetworkAdapter -ManagementOS -Name “CSV” -MinimumBandwidthWeight 5
Set-VMNetworkAdapter -ManagementOS -Name “Management” -MinimumBandwidthWeight 5
3.b set an ip for management nic that matches what my server IP should be
New-NetIPAddress -InterfaceAlias “vEthernet (Management)” -IPAddress 192.168.1.8 -PrefixLength “24” -DefaultGateway 192.168.1.1
now my questions are:
1. what my IP schema should be
for the rest of the connections.
Management connection is set to the main server IP 192.168.1.8/24
I assume that 2 other interfaces will use IPs in 192.168.1.x/24 range as well since they connect to the main network nics and thus main network
but how do I configure the NIC 3 and 4 that I left out of the team for iSCSI
what would be the IP and subnet setup on them?
this are 2 nics that will be connected to the second node directly
2. are 4 x 1Gb nics OK for this use ?
am I must plan for adding 4 more to the server ASAP or can I run like this for a bit and see?
3. can I build what I would call a degraded cluster with one node and run on it for a month or so.
I have push though a PO for the second server but it might take some time to get it approved and purchase one. I however is in need of a running server now.
please advice.
thanks
sincerely Vlad.
I’m wondering what is the difference to have on switch for everything or two switches one for Management (Cluster, LM, etc.) and second for VM traffic?
1. For one and the two switches scenario, as I understood I also have traffic for VMs, and I have to assign vSwitch to the virtual machine and assign VLANID?
You should have VM, cluster and LM on the same switch. Mgmt should be different switch. This all depends on what type of switch, protocol (Eth or Infiniband) and interconnect speed. Storage migration and Live Migrations can impact network communications for large VMs.
Personally, I had 4 x 56Gb Infiniband connections for host to storage. 2 x 56Gb Infiniband for LM, Storage Migration and Backups. 4 x 40Gb Eth for Mgmt, LAN and external access.