This blog post covers how you can create a bootable USB media drive to install Windows Server 2019 on a physical server. This blog post will not use any third-party tools; it only uses built-in tools that you can find on Windows 10 or Windows Server. Depending on your system you will need it to install it on a BIOS system or a UEFI based system, which is slightly different since UEFI will use GPT disks and BIOS will use an MBR disk. Here is how you create a USB Drive for a Windows Server 2019 installation.
Getting ready to create a USB Drive for a Windows Server 2019 Installation
First, you will need to have all the prerequisites in place.
- Download the Windows Server 2019 ISO File
- A USB Drive with at least 8GB size
Windows Server 2019 USB Thumb Drive for UEFI (GPT) systems
To create the USB drive to install Windows Server 2019 on a UEFI (GPT system, you do the following steps:
- The at least an 8GB USB drive has to be formatted in FAT32
- The USB needs to be GPT and not MBR
- Copy all files from the ISO to the USB drive
This is it, and here is how you do it. First, plug in your USB drive to your computer.
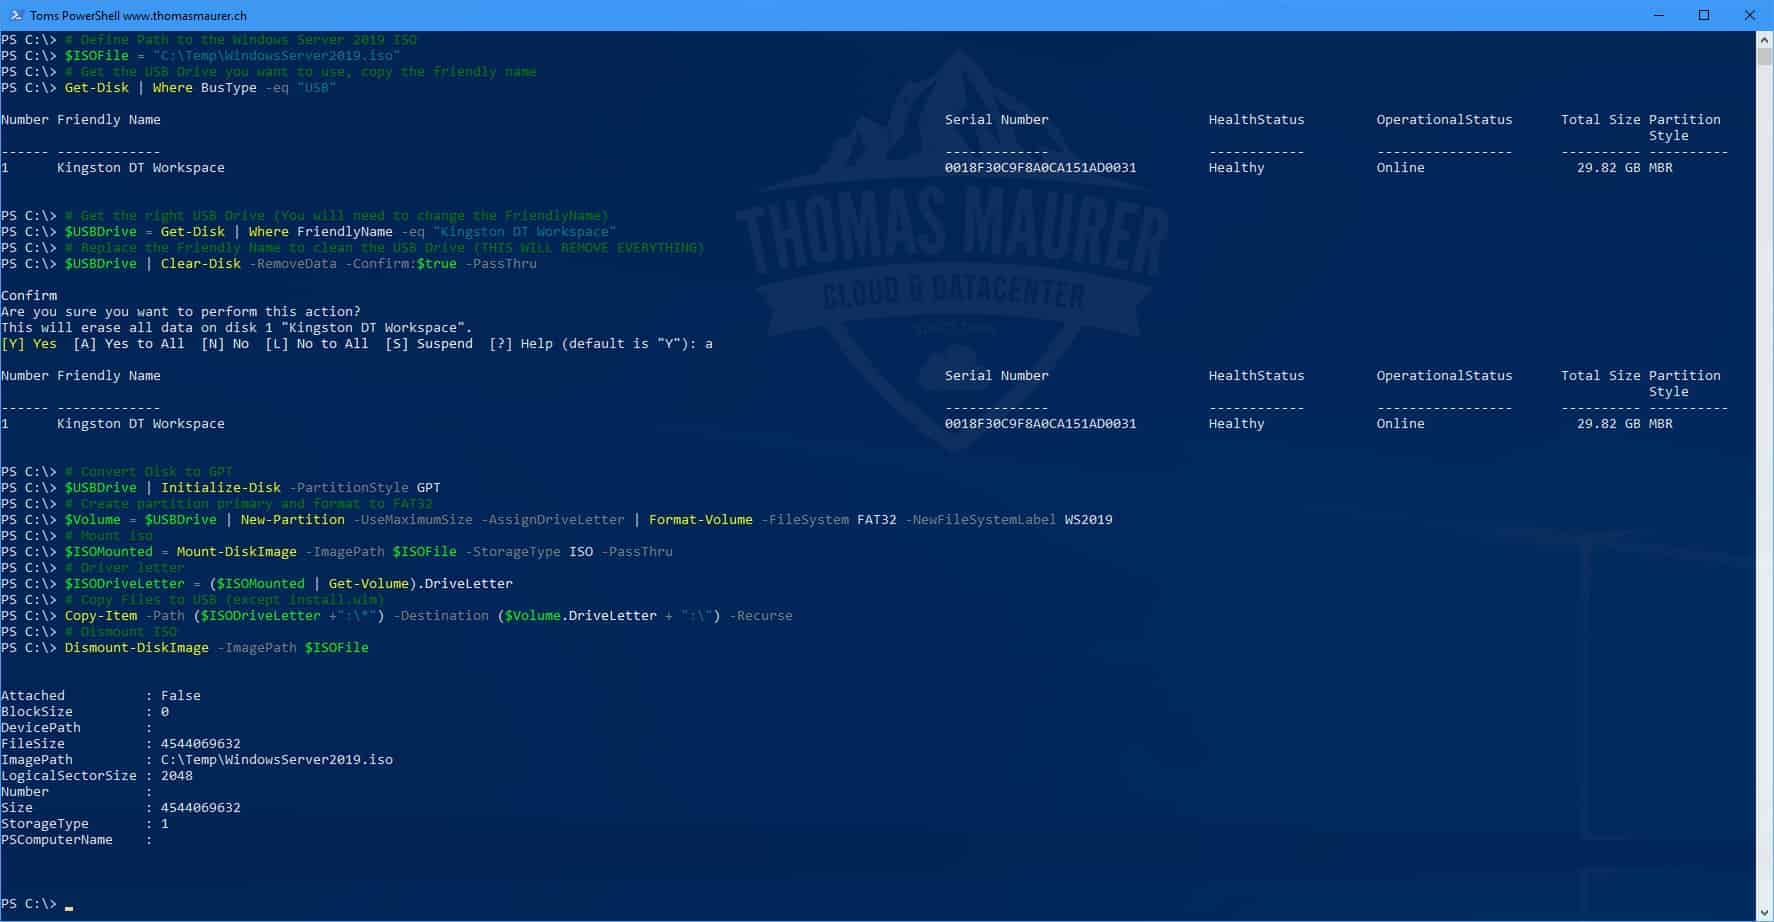
Open a PowerShell using the Run as Administrator option. You will need to change the path of the Windows Server 2019 ISO, and you will need to replace the USB Friendly Name in the script.
REMINDER: The following commands will wipe the USB Drive completely. So backup everything before you run through the PowerShell.
# Define Path to the Windows Server 2019 ISO
$ISOFile = "C:\Temp\WindowsServer2019.iso"

# Get the USB Drive you want to use, copy the friendly name
Get-Disk | Where BusType -eq "USB"

# Get the right USB Drive (You will need to change the FriendlyName)
$USBDrive = Get-Disk | Where FriendlyName -eq "Kingston DT Workspace"

# Replace the Friendly Name to clean the USB Drive (THIS WILL REMOVE EVERYTHING)
$USBDrive | Clear-Disk -RemoveData -Confirm:$true -PassThru

# Convert Disk to GPT
$USBDrive | Set-Disk -PartitionStyle GPT

# Create partition primary and format to FAT32
$Volume = $USBDrive | New-Partition -UseMaximumSize -AssignDriveLetter | Format-Volume -FileSystem FAT32 -NewFileSystemLabel WS2019

# Mount iso
$ISOMounted = Mount-DiskImage -ImagePath $ISOFile -StorageType ISO -PassThru

# Driver letter
$ISODriveLetter = ($ISOMounted | Get-Volume).DriveLetter

# Copy Files to USB
Copy-Item -Path ($ISODriveLetter +":\*") -Destination ($Volume.DriveLetter + ":\") -Recurse

# Dismount ISO
Dismount-DiskImage -ImagePath $ISOFile
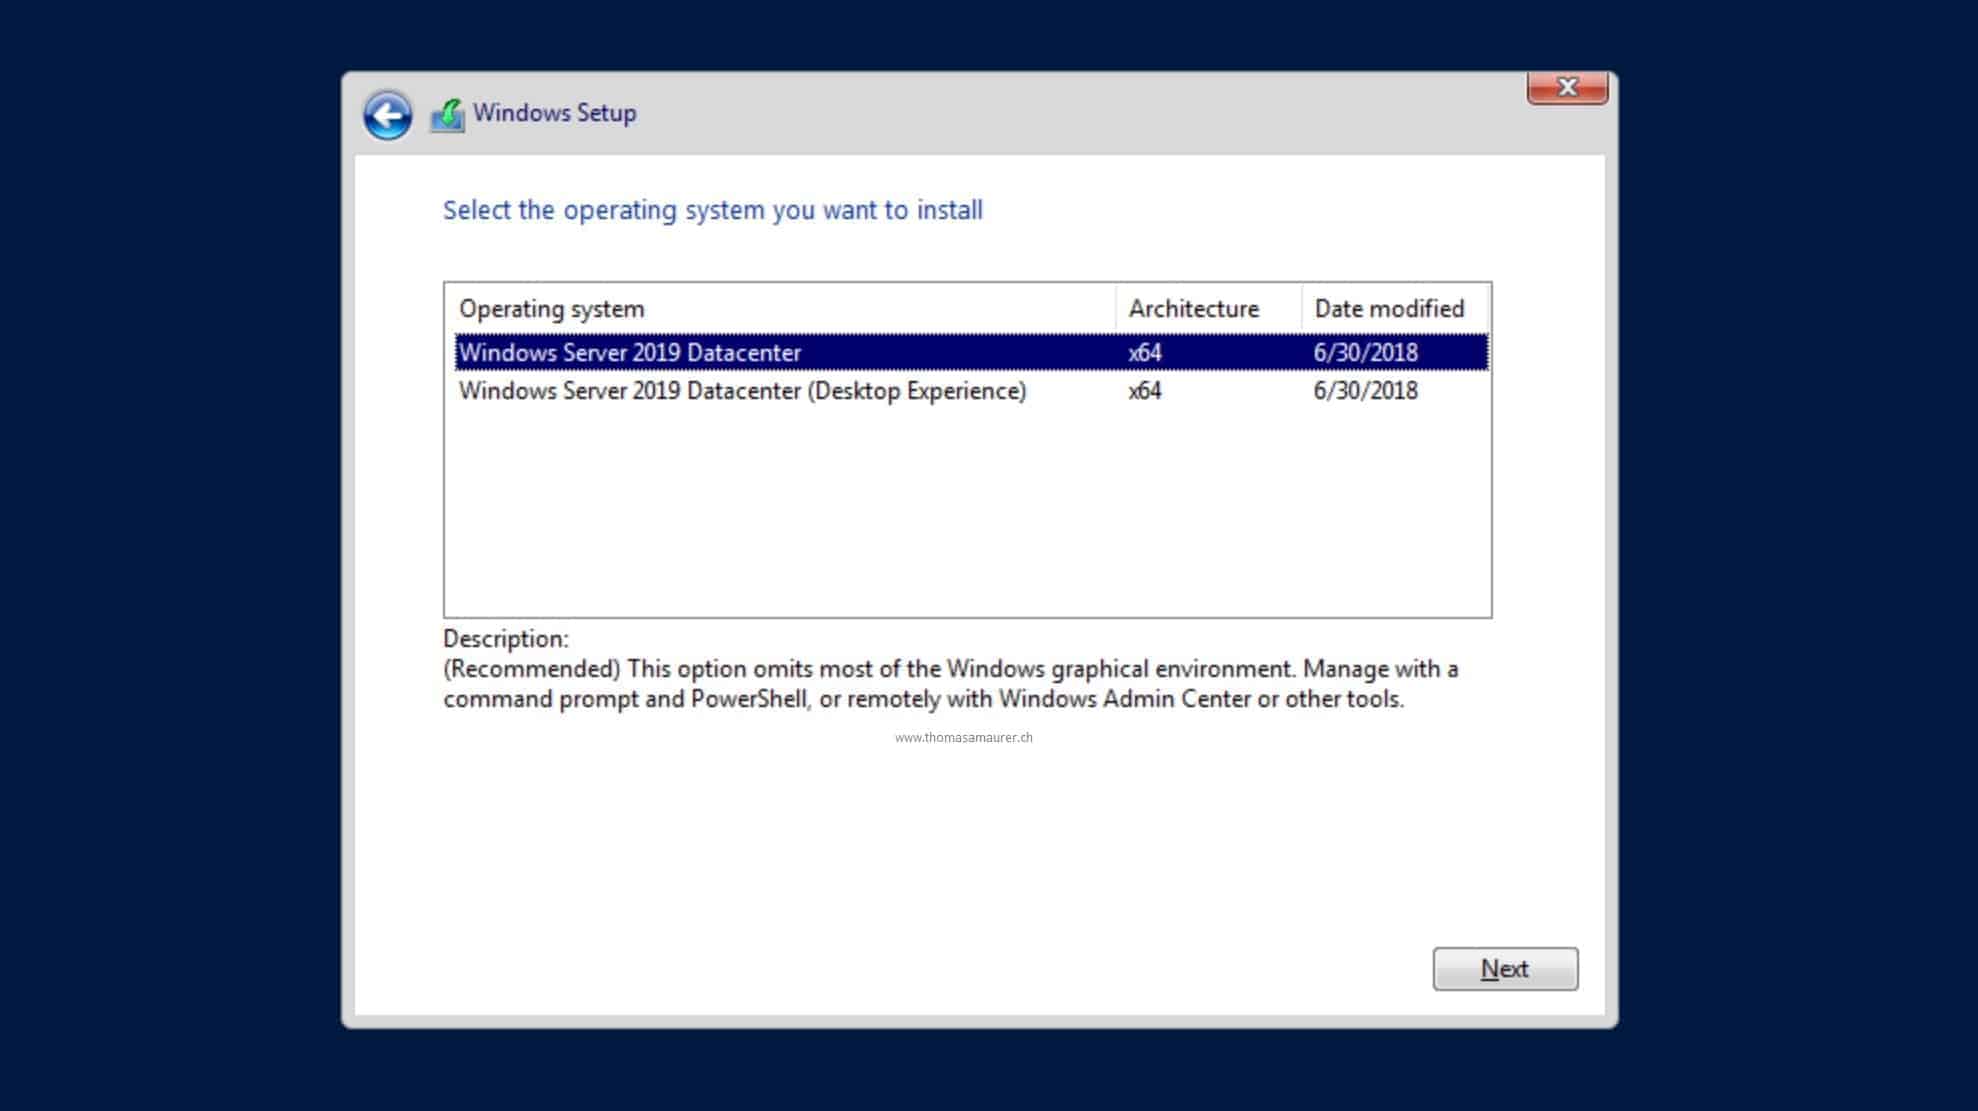
After that, you can safely remove the USB drive and use it to boot your server from.
Important:
If Install.wim is larger than 4GB, you cannot copy the file to the drive, because of the FAT32 based partition limitation. The solution for this is to split the wim file into smaller files.
split wim file using dism (you may have to change the drive letters):
dism /Split-Image /ImageFile:e:\sources\install.wim /SWMFile:k:\sources\install.swm /FileSize:4096
Windows Server 2019 USB Thumb Drive for BIOS (MBR) systems
To create the USB drive to install Windows Server 2019 on BIOS (MBR) systems, you can follow these steps:
- The at least an 8GB USB drive has to be formatted in NTFS
- USB drive needs to us MBR
- The partition needs to be set active
- Copy all files from the ISO to the USB Drive
This is it, and here is how you do it. First, plug in your USB drive to your computer.
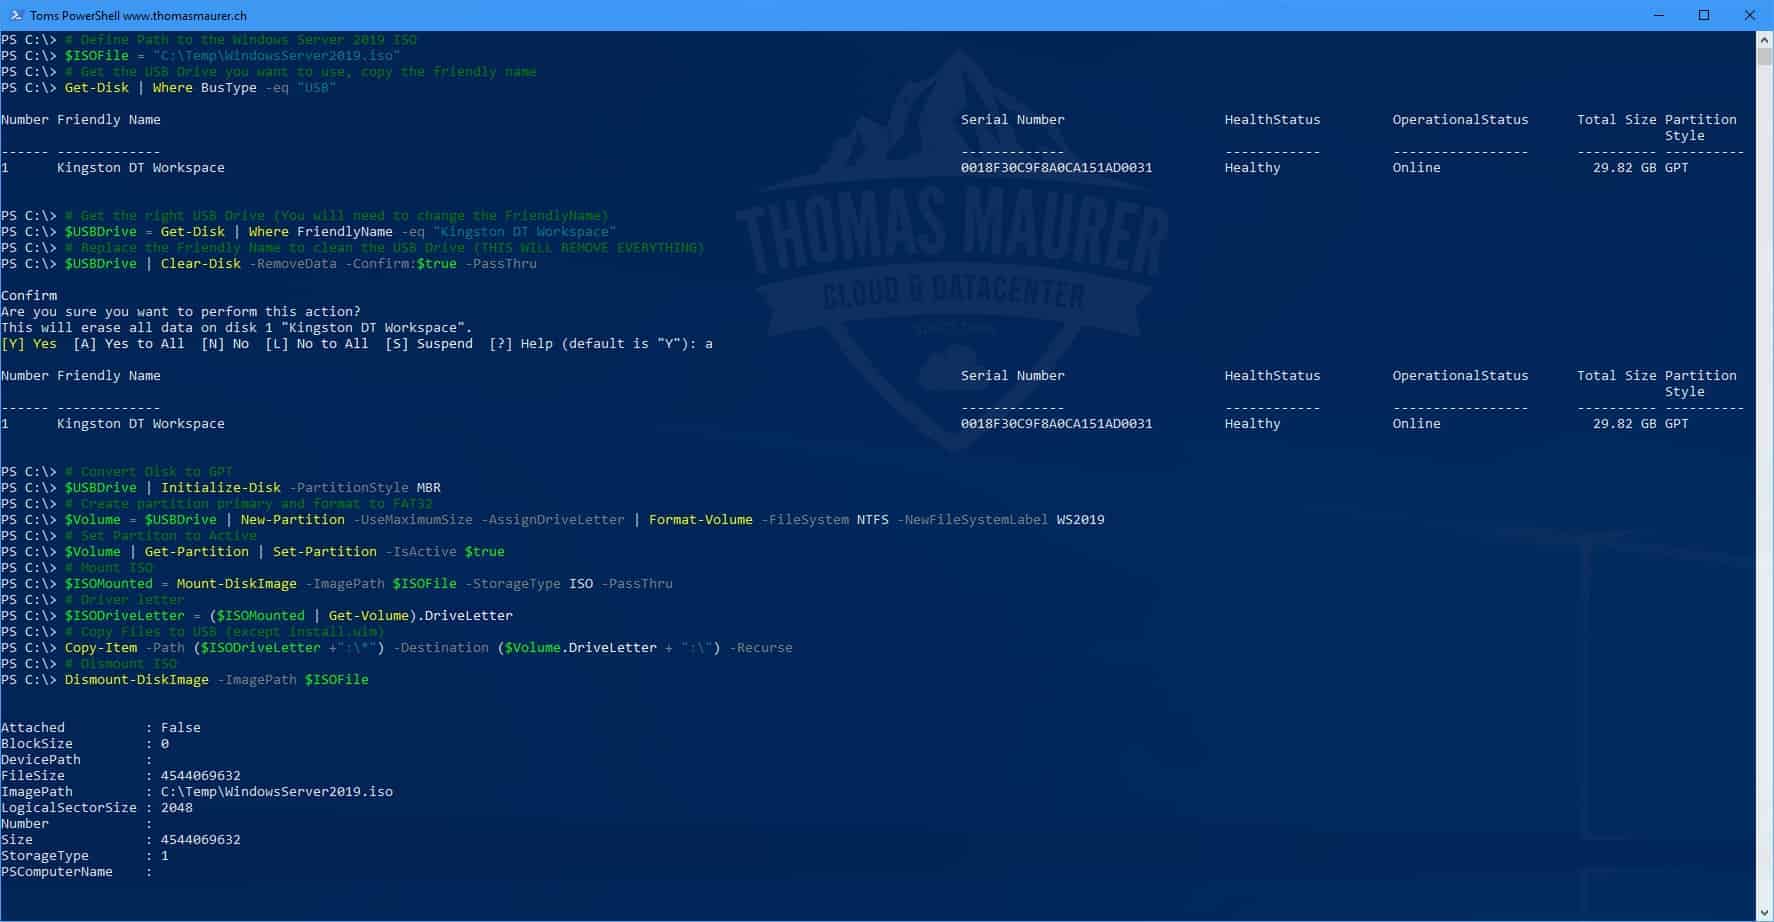
Open a PowerShell using the Run as Administrator option. You will need to change the path of the Windows Server 2019 ISO, and you will need to replace the USB Friendly Name in the script.
REMINDER: The following commands will wipe the USB Drive completely. So backup everything before you run through the PowerShell.
# Define Path to the Windows Server 2019 ISO
$ISOFile = "C:\Temp\WindowsServer2019.iso"

# Get the USB Drive you want to use, copy the friendly name
Get-Disk | Where BusType -eq "USB"

# Get the right USB Drive (You will need to change the FriendlyName)
$USBDrive = Get-Disk | Where FriendlyName -eq "Kingston DT Workspace"

# Replace the Friendly Name to clean the USB Drive (THIS WILL REMOVE EVERYTHING)
$USBDrive | Clear-Disk -RemoveData -Confirm:$true -PassThru

# Convert Disk to MBR
$USBDrive | Set-Disk -PartitionStyle MBR

# Create partition primary and format to NTFS
$Volume = $USBDrive | New-Partition -UseMaximumSize -AssignDriveLetter | Format-Volume -FileSystem NTFS -NewFileSystemLabel WS2019

# Set Partiton to Active
$Volume | Get-Partition | Set-Partition -IsActive $true

# Mount ISO
$ISOMounted = Mount-DiskImage -ImagePath $ISOFile -StorageType ISO -PassThru

# Driver letter
$ISODriveLetter = ($ISOMounted | Get-Volume).DriveLetter

# Copy Files to USB
Copy-Item -Path ($ISODriveLetter +":\*") -Destination ($Volume.DriveLetter + ":\") -Recurse

# Dismount ISO
Dismount-DiskImage -ImagePath $ISOFile
After that, you can safely remove the USB drive and use it to boot your server from to install Windows Server 2019.
If you have any questions, please let me know in the comments.
Tags: BIOS, Boot from USB, Format Disk, gpt, Install USB Drive, Install Windows Server 2019, installation, iso, MBR, Microsoft, Mount ISO, PowerShell, UEFI, USB, USB Drive, USB media drive, USB Windows Server 2019, Windows Server, Windows Server 2019 Last modified: November 22, 2021


Hi Thomas
Wouldn’t this command
# Copy Files to USB (except install.wim)
Copy-Item -Path ($ISODriveLetter +”:\*”) -Destination ($Volume.DriveLetter + “:\”) -Recurse
Copy everything including the install.wim file when the comment says except install.wim ?
Sorry forgot to remove it from the PowerShell Comment. Copy Past error :) I used the script for a ISO where the install.wim was larger than 4GB, in that case you need to split it first before you can copy it.
Thanks fixed it :)
I thought that Windows Server 2019 was supposed to fit on one single-layer DVD. The original release did, because I actually made such a DVD. The fixed one seems to be just a little too big, which strikes me as being sloppy. Burning a DVD is a lot easier than typing Powershell commands!
Sometimes :) But there are a lot of servers out there, which do not have a DVD drive anymore :)
Plus, it an USB drive is way faster :) DVD is so 2003 ;)
We could also just use Rufus to burn the iso to a usb to make it bootable. kinda does all of this for you. right?
Absolutely :) If you don’t want to spend time and you can install software on your device, then yes :)
After the instalation I want turn back my pen drive to a normal Pen Drive (removable), how I can do this? You can help me?
Hi Roberto
You can just format the drive again :)
I am not able to convert my USB drive to GPT. I searched and found this Microsoft article that states, “You cannot use the GPT partition style on removable media.” (https://docs.microsoft.com/en-us/windows-server/storage/disk-management/change-an-mbr-disk-into-a-gpt-disk)
Hi Paul
I checked with the Microsoft Product Group, this was a mistake in the documentation. It is now fixed!
You should be able to use GPT on your USB Drive!
Thomas
Thank you for the post which worked well. However I cannot get 2019 to boot after the I initial installation and I am starting to suspect every thing. I get a flashing cursor and 4hat is it. Can 2019 run in bios mode? Previously I have just played on a hyperv session with 2019.
Thanks for this – very helpful
One note: I found that Clear-Disk did not remove the MBR partition style from a previously used USB flash drive. As a result, the “Initialize-Disk -PartitionStyle GPT” command failed.
I successfully used “$USBDrive | set-disk -PartitionStyle GPT ” after the Clear-Disk command to set the GPT partition style
Thanks. But, common mistake in second script: comments do not match the code.
Thanks, I fixed it!
Unfortunately, this fails for me on WS2016:
Initialize-Disk : The disk has already been initialized.
Activity ID: {9f3c63c2-0674-43b1-800d-dd4c035fe603}
At K:\iso\create_bootable_usbstick_from_iso_image.ps1:16 char:13
+ $USBDrive | Initialize-Disk -PartitionStyle MBR
+ ~~~~~~~~~~~~~~~~~~~~~~~~~~~~~~~~~~~
+ CategoryInfo : NotSpecified: (StorageWMI:ROOT/Microsoft/Windows/Storage/MSFT_Disk) [Initialize-Disk], CimException
+ FullyQualifiedErrorId : StorageWMI 41001,Initialize-Disk
What might be wrong?
Did you run the clear command to clean up the USB stick from all existing partitions etc?
You should look up the SerialNumber:
$USBDrive = Get-Disk | Where SerialNumber -eq “AA00000000000489”
as the FriendlyName often is truncated:
Number Friendly Name Serial Number
—— ————- ————-
2 Generic ST… 000000000540
3 Generic ST… 000000000541
4 Generic ST… 000000000542
5 Generic ST… 000000000543
6 Generic ST… 000000000544
7 Verbatim S… AA00000000000489
No. 7 is really Verbatim STORAGE N GO. Not that easy, if you didn’t know.
Hi, Thomas! Thanks for sharing your scripts. I slightly modified each to make them a bit more universal. Take a look: http://www.hyper-v.io/create-bootable-usb-windows-server-2019-installation/
HI, Will this above method work for windows 7
Thanks in advance
Yes, I haven’t tried it, but it should work the same way :)
As Graham Goddard has stated, I was getting the “Initialize-Disk : The disk has already been initialized.” error after the Clear-Disk command when my drive had an MBR partition style. Graham’s command helped me but it alone did not do it as the $USBDrive variable was still referencing the old MBR drive instance and not the newly-updated GPT instance. These two commands after the Clear-Disk command got me back on track (the second one needs to be updated for each user just like the very first version of this command needs to be updated for us):
$USBDrive | Set-Disk -PartitionStyle GPT
$USBDrive = Get-Disk | Where FriendlyName -eq “Kingston DT Workspace”
At this point, I also could still not run the Initialize-Disk command but it didn’t seem to be necessary, so I continued without it.
Next, the “$Volume | Get-Partition | Set-Partition -IsActive $true” command failed with the error: “The parameters MbrType and IsActive cannot be used on a GPT disk.”. So again, I skipped this command.
After all of these issues and tweaks, it worked for me with the “Windows Server 2019 (updated March 2019)” ISO from MSDN.
I got a little stuck in this guide as PowerShell refused to Initialize-Disk because the disk had already been initialized. Ended up sorting it with diskpart and the rest went smooth
diskpart> select disk N
diskpart> clean
diskpart> convert gpt
Sorry, this fails immediately on my Windows 7 Professional laptop.
I get this error:
PS C:\Users\alamoureux.ATEC> Get-Disk | Where BusType -eq “USB”
The term ‘Get-Disk’ is not recognized as the name of a cmdlet, function, script file, or operable program. Check the sp
elling of the name, or if a path was included, verify that the path is correct and try again.
At line:1 char:9
+ Get-Disk <<<< | Where BusType -eq "USB"
+ CategoryInfo : ObjectNotFound: (Get-Disk:String) [], CommandNotFoundException
+ FullyQualifiedErrorId : CommandNotFoundException
Hi Andrew
Sorry, it looks like I misunderstood your question. You can create a Windows 7 USB drive like this. However, if you want to run these commands you need at least Windows 8 or higher, because the PowerShell Storage Module, is only available in Windows 8 or higher.
what a totally unnecessary bunch of steps.
use a linux computer.
fdisk /dev/sda > delete partitions, make one partition, write
mkfs.vfat /dev/sda1
dd status=progress if=/pathTOiso of=/dev/sda (dont include the partition number, write to whole disk)
make sure partition is under 32GB
Hi Andrew I get this error when I enter the copy-item command, any idears?
PS C:\WINDOWS\system32> Copy-Item -Path ($ISODriveLetter +”:\*”) -Destination ($Volume.DriveLetter + “:\”) -Recurse
Copy-Item : The parameter is incorrect.
At line:1 char:1
+ Copy-Item -Path ($ISODriveLetter +”:\*”) -Destination ($Volume.DriveL …
+ ~~~~~~~~~~~~~~~~~~~~~~~~~~~~~~~~~~~~~~~~~~~~~~~~~~~~~~~~~~~~~~~~~~~~~
+ CategoryInfo : WriteError: (install.wim:FileInfo) [Copy-Item], IOException
+ FullyQualifiedErrorId : CopyDirectoryInfoItemIOError,Microsoft.PowerShell.Commands.CopyItemCommand
Sorry not Andrew, meant Thomas :)
HI
I get a 0xc0000021a stop error when attempting to boot from a Windows Server 2019 USB I created with rufus
I am about to receive my new server and will give it a try. One question, how is this going to work if install.wim is removed? Are there any additional steps to perform for the installation? Seems as if the meat of the OS is missing from the USB drive.
Oh, I see, there is still a comment that says install.wim will not be copied. This is not the case, install.wim will be copied with that script. Just didn’t, just forgot to update the comment in the script. You should definitely have install.wim copied by this script.
I removed the mention in the comment.
As I suspected, I am getting an error that install.wim does not exist. How is this script supposed to work? I followed the steps, created the bootable drive, the install starts, and I am getting an error that this file is missing.
I get the same error that Darren has:
Copy-Item : The given path’s format is not supported.
At C:\temp\create.ps1:26 char:1
+ Copy-Item -Path ($ISODriveLetter +”:\*”) -Destination ($Volume.DriveL …
+ ~~~~~~~~~~~~~~~~~~~~~~~~~~~~~~~~~~~~~~~~~~~~~~~~~~~~~~~~~~~~~~~~~~~~~
+ CategoryInfo : NotSpecified: (:) [Copy-Item], NotSupportedException
+ FullyQualifiedErrorId : System.NotSupportedException,Microsoft.PowerShell.Commands.CopyItemCommand
Also getting:
Copy-Item : The given path’s format is not supported.
At line:1 char:1
+ Copy-Item -Path ($ISODriveLetter +”:\*”) -Destination ($Volume.DriveL …
+ ~~~~~~~~~~~~~~~~~~~~~~~~~~~~~~~~~~~~~~~~~~~~~~~~~~~~~~~~~~~~~~~~~~~~~
+ CategoryInfo : NotSpecified: (:) [Copy-Item], NotSupportedException
+ FullyQualifiedErrorId : System.NotSupportedException,Microsoft.PowerShell.Commands.CopyItemCommand
But I found the USB disk wasn’t given a drive letter, so it didn’t know where to copy it to. Manually gave it one and edited the destination and it worked.
Not ideal as I make many of these, but it worked.
Also edited the top part to give a gridview out of USB disks, I did nick the idea from somewhere else but can’t for the life of me remember.
$USBDrive = Get-Disk | Where-Object BusType -eq USB | Out-GridView -Title ‘Select USB Drive to Format’ -OutputMode Single | Clear-Disk -RemoveData -Confirm:$false -PassThru | Initialize-Disk -PartitionStyle MBR
That might be half my other problem though.
I also get the following error:
PS C:\Windows\system32> Copy-Item -Path ($ISODriveLetter +”:\*”) -Destination ($Volume.DriveLetter + “:\”) -Recurse
Copy-Item : The parameter is incorrect.
At line:1 char:1
+ Copy-Item -Path ($ISODriveLetter +”:\*”) -Destination ($Volume.DriveL …
+ ~~~~~~~~~~~~~~~~~~~~~~~~~~~~~~~~~~~~~~~~~~~~~~~~~~~~~~~~~~~~~~~~~~~~~
+ CategoryInfo : WriteError: (install.wim:FileInfo) [Copy-Item], IOException
+ FullyQualifiedErrorId : CopyDirectoryInfoItemIOError,Microsoft.PowerShell.Commands.CopyItemCommand
It seems script is not working. It starts copying the installation files from the ISO image and stops when it is trying to copy the WIM.
In order to be fair, it might not be the script. I also tried with another method using diskpart and I also get an error when trying to copy WIM
E:\sources\install.wim -> D:\sources\install.wim
File creation error – The parameter is incorrect.
So there must be an error in the ISO file. It is strange because the same mistake happened to other people too. Also I used this ISO to install Windows 2019 server on a Hyper-V host as a virtual machine without any problems
I think the reason for the problem was the following: Install.wim file is 4,2GB. FAT32 is not compatible with files larger than 4GB. When a script or any command tries to copy the file from the ISO to the USB the error shows up.
I tried the second method ntfs and mbr and it created the USB without errors
This is great an all but this assumes everyone knows how to create and run a script in powershell. A short explanation on how to do that would help. I open powershell and don’t know what to do. Am I supposed to copy/past your text into a notepad file and name it a certain way and then run that? Assume we are all novices with powershell.
Hi thank you for the article, I want to make it UEFI compatible but my iso Install.wim file is over 4 gb how can I accomplish it?
I have seen you talk about splitting the the file to copy it. What do I have to add to the script?
Hi Eduardo
You can use the following dism command to split the WIM file. Make sure you change the driveletters:
dism /Split-Image /ImageFile:e:\sources\install.wim /SWMFile:k:\sources\install.swm /FileSize:4096I have spent the entire day reading different google searches and still have not succeeded in making a bootable usb WS2019 device.
Is there any persons that could assist me by email?
Same problems here: Your assumptions are sloppy and incomplete! First, you mention to make this FAT32, which does NOT work; so, please, give EXACT details; because later, you mention SPLITTING WIM FILE. What method? How do we do that? Also, you assume everyone is Win 8 or higher – many of us are still using Windows 7 workstations to do this; which will not have the Powershell version needed to run this – so, please mention the requirements at the very beginning of your article! The HUGE issue is: If you tell us to use FAT32, then how do we properly copy the WIM file to the target USB? Also, I am thinking we could use something besides FAT32 that allows larger than 4 GB files to be be copied – ??? (wouldn’t ExtFat work?)
Hi
To split the WIM file you can use the following command (I added it to the blog post):
dism /Split-Image /ImageFile:e:\sources\install.wim /SWMFile:k:\sources\install.swm /FileSize:4096If you run Windows 7, you can use my guide for Windows Server 2016, since that one is based on the dism.exe file. https://www.thomasmaurer.ch/2016/10/create-a-usb-stick-for-windows-server-2016-installation/
I hope that helps you :)
Bad instructions! You need “$USBDrive | set-disk -PartitionStyle GPT ” before Initialise-Disk
That is not correct, during initialize-disk you set the PartitionStyle, you don’t need to run it before. When you follow the instructions and clean the disk fully before.
Your instructions saved me. I had spent all weekend trying to install Server 2019 on a brand new server that supports it but it just wouldn’t boot. I had formatted my USB as MBR/NTFS because the .wim wouldn’t fit on a GPT/FAT32 key. The MBR/NTFS key booted just fine and performed the install but I couldn’t boot from the hard drive afterwards. I didn’t think that the source key format could affect the result so significantly but using the .wim split and GPT/FAT32 worked perfectly.
Hi Dermot
Did you see the notice in the blog where it says important? There you find instructions to split the WIM file, so it will fit on the USB drive with FAT32.
dism /Split-Image /ImageFile:e:\sources\install.wim /SWMFile:k:\sources\install.swm /FileSize:4096
Update: Oh I see you did, sorry :) Happy it worked for you!
Might be useful to just add the dism to the script where if the copy fails due to install.wim file size, run dism from newly mounted iso to the drive letter of the usb being formatted. THEN unmount the iso.
Just think you might get less push back from the confused peanut gallery.
Great script though!
Good idea! will see if I can find some time to add it :)
I did get this to work, thank you – other posts including using Rufus don’t work, since it has to be FAT32. A couple suggestions: I used the SerialNumber suggestion in a comment above because FriendlyName was truncated. (I had also tried a -Like instead of -eq, but didn’t notice my friendly name had a leading space.)
Splitting the wim was required and did work, but then the copy script can’t be used as-is, so I just copied manually. So I agree with the comment just above to work it into the script instructions.
The main thing I bumped into was I had a 64 GB USB, and -UseMaximumSize failed. What is the command to specify a 32 GB partition? (I dug up a 32 GB USB drive to get it to go.)
Thank you!
Hi Thomas,
Awesome Post! Glad you shared this post on creating a USB drive for windows server. But I am confused, Is this the only solution or we can also create windows 7 usb? Please tell what’s the difference.
Thanks
Hi Vikas
No this is not the only solution. But it is the easiest way if you use build-in software. :)
Thank you Thomas! Just used this to create a Hyper-V 2019 install drive which worked great. Very nice to know that built-in commands can do this in PowerShell.
Thanks, Charlie, you’re welcome
Thomas, maybe you have article how switch 2019 console to GUI mode?
Hi Serg
Windows Server 2019 doesn’t support switching between Core and Desktop Experience anymore. If you have installed Windows Server Core you be using core and if you choose to install Desktop Experience (GUI) you can’t convert to Core. This was possible in earlier versions of Windows Server, but it is not supported with Windows Server 2019 anymore.
If you want to manage your server without a GUI you might want to have a look at Windows Admin Center: https://www.thomasmaurer.ch/2018/04/windows-admin-center/
You can find a blog here, about how to use it on Windows Server Core. https://www.thomasmaurer.ch/2019/09/run-windows-admin-center-on-windows-server-core/ (You don’t have to install it on every server, you can use remote management to connect to different servers.)
Just to avoid any confusion, if the install.wim is too big, just copy everything else (which should be done by the above script) and then run the dism command at the bottom of that article to create the 2 SWM files. Copy the SWM files into the location the install.wim would have been – there’s nothing more to do than this. No need to update anything else to reference those swm files, it just detects them for you.
There shouldn’t be anything else you need to do.
Regarding RUFUS created USBs, I tried but they failed. Manually created USBs work. Selecting formatting such as FAT32 and partitioning style e.g. GPT and MBR is very important.
Your script worked incredibly well, though to get around the greater than 4GB file size issue, I formatted as exFAT instead of FAT32, that gets around that limitation.
$Volume = $USBDrive | New-Partition -UseMaximumSize -AssignDriveLetter | Format-Volume -FileSystem NTFS Sollte man im Skript Für die BIOS-Version ergänzen, damit es läuft, sonst wirds Standard FAT32 und da Schlägt wieder dieser über 4GB große .wim Datei zu ;)
Aber sonst Super Arbeit! Vielen Dank dafür! Hat mir die Powershell gleich etwas näher gebracht ;)
thanks :)
Ach herje, ich hätte ja mal nach rechts scrollen sollen, da stand ja “-FileSystem NTFS” ;P
Do you have a final script that works ? Can you re post it?
PS C:\Windows\system32> Copy-Item -Path ($ISODriveLetter +”:\*”) -Destination ($Volume.DriveLetter + “:\”) -Recurse
Copy-Item : Данный формат пути не поддерживается.
строка:1 знак:1
+ Copy-Item -Path ($ISODriveLetter +”:\*”) -Destination ($Volume.DriveL …
+ ~~~~~~~~~~~~~~~~~~~~~~~~~~~~~~~~~~~~~~~~~~~~~~~~~~~~~~~~~~~~~~~~~~~~~
+ CategoryInfo : NotSpecified: (:) [Copy-Item], NotSupportedException
+ FullyQualifiedErrorId : System.NotSupportedException,Microsoft.PowerShell.Commands.CopyItemCommand
Thanks!
The UEFI method also works for Windows Server 2022.
However, the install.wim _is_ larger than 4GB, thus the DISM split method (and copying of the resulting files install.swm and install2.swm) should be included as an expected and mandatory step in the guide.
Great Idea, thanks Gustav, I will maybe do a post on it!
Note that nowadays the issues with Rufus appear to have been fixed but it’s always a good thing to know what’s going on under the hood.