
If you have download the latest version of Windows Server 2016 you can create a USB stick to install it on a physical server. This blog goes through how you create a USB Stick for Windows Server 2016.
For UEFI Systems:
- The at least a 8GB USB drive has to be formatted in FAT32
- The USB needs to be GPT and not MBR
- Copy all files from the ISO to the USB drive
This is it, and here is how you do it:
First plugin your USB drive to your computer. The USB drive should be bigger than 6GB.
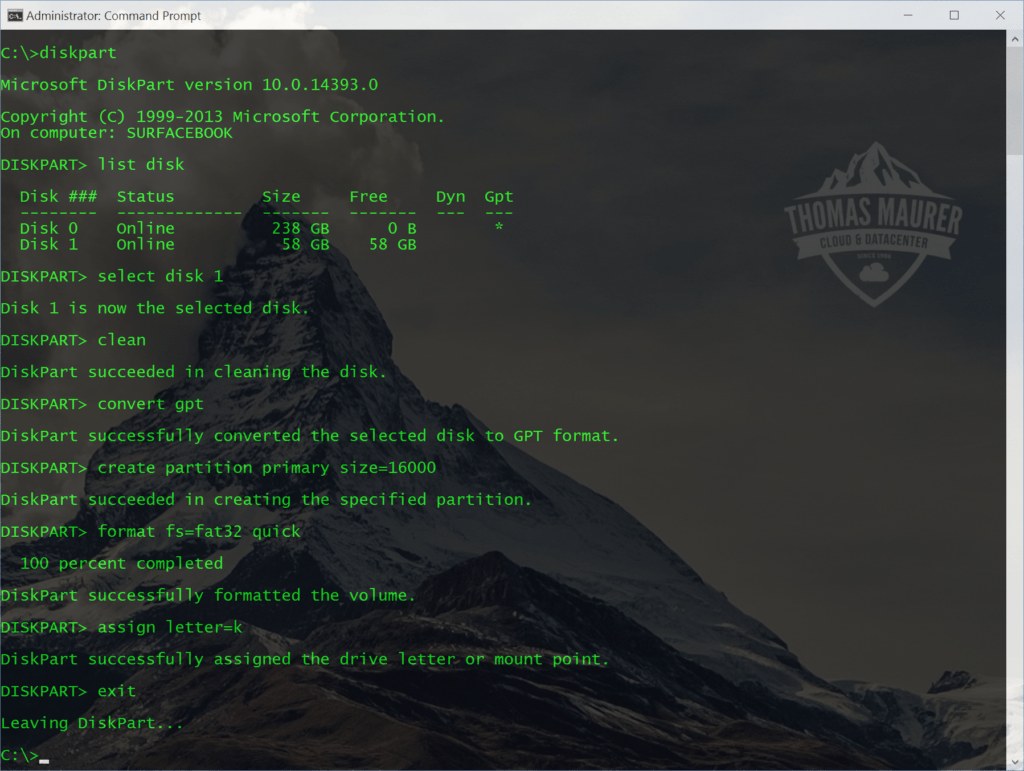
Open a CMD prompt or PowerShell using the Run as Administrator option and open diskpart. Now you can do list all this by using
list disk
Select the USB disk, in my case this was disk 1
select disk 1
Clean the disk. Be careful this will remove all files and partitions on the USB media.
clean
Now convert it to GPT
convert gpt
Create a new primary partition. But make sure the partition is not greater than 16GB otherwise it can be formatted with FAT32.
create partition primary

# If your USB drive is bigger than 16GB use the following command

create partition primary size=16000
Format the partition with FAT32
format fs=FAT32 quickAssign a drive letter to the volume
assign letter=know you can exit the diskpart and copy all files from the Windows or Windows Server to the USB drive and boot it. This works with Windows 8, Windows 8.1, Windows 10, Windows Server 2012, Windows Server 2012 R2 and Windows Server 2016 or even Hyper-V Server in the same editions.
For MBR systems:
- The at least a 8GB USB drive has to be formatted in FAT32
- The USB needs to be MBR
- Partition need so be set active
- Copy all files from the ISO to the USB drive
This is it, and here is how you do it:
First plugin your USB drive to your computer. The USB drive should be bigger than 6GB.
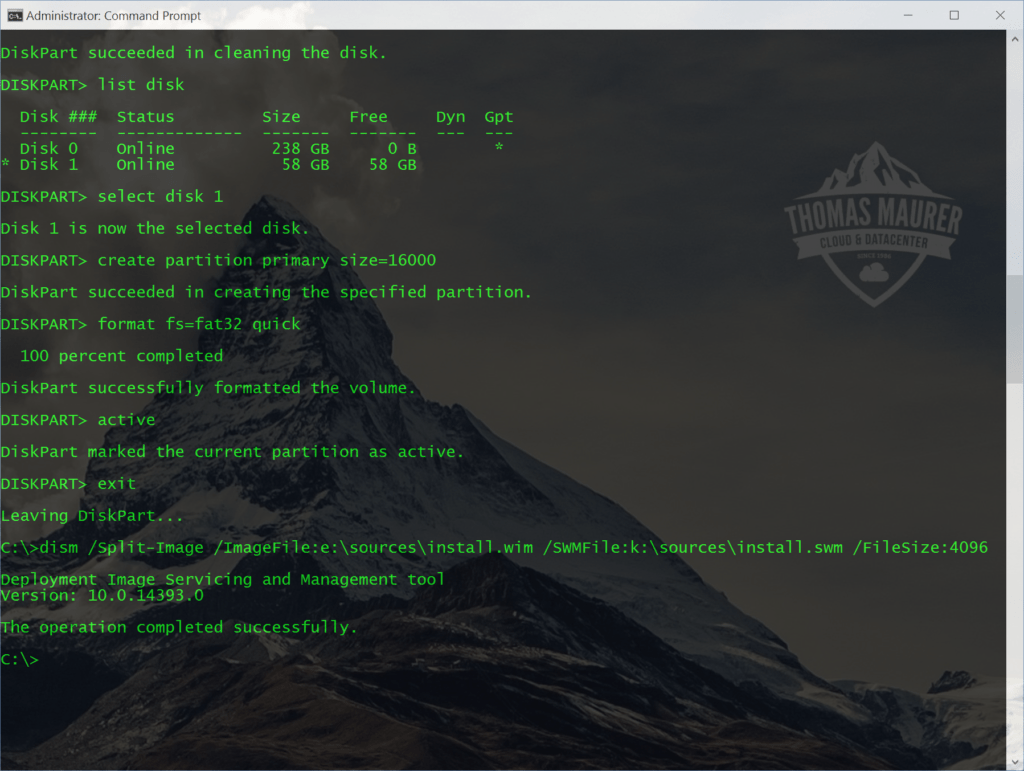
Open a CMD prompt or PowerShell using the Run as Administrator option and open diskpart. Now you can do list all this by using
list disk
Select the USB disk, in my case this was disk 1
select disk 1
Clean the disk. Be careful this will remove all files and partitions on the USB media.
clean
Create a new primary partition. But make sure the partition is not greater than 16GB otherwise it can be formatted with FAT32.
create partition primary

# If your USB drive is bigger than 16GB use the following command

create partition primary size=16000
Format the partition with FAT32
format fs=FAT32 quickSet Active
active
Assign a drive letter to the volume
assign letter=know you can exit the diskpart and copy all files from the Windows or Windows Server to the USB drive and boot it. This works with Windows 8, Windows 8.1, Windows 10, Windows Server 2012, Windows Server 2012 R2 and Windows Server 2016 or even Hyper-V Server in the same editions.
Important:
If Install.wim is larger than 4GB, you cannot copy the file to the drive, because of theFAT32 based partition limitation. The solutions for this is to split the wim file into smaller files.
split wim file using dism (you may have to change the drive letters):
dism /Split-Image /ImageFile:e:\sources\install.wim /SWMFile:k:\sources\install.swm /FileSize:4096
Tags: Boot, diskpart, DISM, MBR, Microsoft, UEFI, USB, USB Drive, Windows, Windows 10, Windows Server 2016 Last modified: April 25, 2019


Great writeup. I found your website when I searched for solutions for the Windows Server 2016 USB installation media. The WIM-file is just over 4 GB, so I tried your command for splitting the image with DISM. The splitting went well, and created 4GB + 40 MB WIM-files, but during installation of Server 2016 Datacenter, the setup asked for disk 2.
Since the ISO-file is more than 4,7 GB, I also cannot burn it to a DVD+R.
Any suggestions are greatly appreciated.
I would recommend you to use boot from USB :)
Found the issue! When using DISM to split a file, the extension of the output files must be .swm, not .wim.
Succesfully installed Server 2016 on the NUCi3MYHE. Now off to find drivers for NIC etc.
install.wim on the RTM ISO is >4GB, so FAT32 can’t be used
This is why you need to split the wim file :) see the command in the blog post
But why not just use ntfs? It works.
NTFS works if you do a legacy BIOS boot if you want to install it on a UEFI machine, you need fat32.
I just installed in on UEFI using NTFS.
https://blogs.technet.microsoft.com/askcore/2013/03/20/creating-bootable-usb-drive-for-uefi-computers/
there are two options now:
you installed it on a UEFI system using a fail back to legacy boot, so it is not really installed as UEFI boot
or
you maybe have a really new UEFI board where NTFS boot from USB works.
but for most systems out there if you want to install it on UEFI you habe to create a fat32 partition.
formatting with exFAT worked very nice for me with >4gb .wim file
However, FAT32 always works with UEFI. Same as for the NTFS option exFAT is not working on every UEFI machine. UEFI needs a FAT or FAT32 formatted partition. How ever there are tools to work around this limitations like:
– https://github.com/pbatard/uefi-ntfs
Also check this blog which describes this https://blogs.technet.microsoft.com/askcore/2013/03/20/creating-bootable-usb-drive-for-uefi-computers/
If it is working for you:
– There are maybe newer version of UEFI which can support that
– If you use some tools to create media files, they will create a very small FAT partition for the EFI files and put the rest on a NTFS partition
– It is still doing a legacy boot as fall back
I read all these blogs and tips with horrible effort to get this silly 4 GB .wim on a stick. But no one mentioned plan “d” with exFAT. may be exFAT is not supported the official way, but it much more than worth a try. to my surprise Apple Mac EFI handled the filesystem and I could install server 2016
great that this worked for you :)
Second option works perfectly (MBR with split mode), thank you !
great it worked :)
Awesome~!!! Thank you so much.
I just spent a lot of time before reading your article…..
your article is great solution to me!!
Thanks for the article. Install.wim on my Server 2016 ISO is 3.71GB in size. It just scrapes in.
Thanks for these steps, the UEFI Systems steps worked like a charm.
Thanks I worked for over 3 hours on this before finding your article
Hi, apparently latest versions of diskpart would let us create USB install disks with 2 partitions. One fat32 (for UEFA booting) and 1 NTFS (for install media > 4GB). Did you test this, and if it works would you consider updating this post?
Thanks!
Can the update rollup in that case be slipstreamed into the install.wim?
I purchased a file server for a non-profit that I volunteer for. I thought I ordered it with Windows Server 2016 on it but when I got the server I found out it didn’t have an OS installed. When I looked at my invoice, it said no OS installed. The good news is I was able to use reward points to purchase the OS. I have downloaded the .iso file from MS onto my desktop. I’m trying to copy it to a DVR or USB but I can’t as I found out in your blog. I clearly need to split the file. I’m struggling with following the dism command. I’m not an IT professional but typically can figure things out. Can you help?
In your example you use dism /Split-Image /ImageFile:e:\sources\install.wim / SWMFile:k:\sources\install.swm /FileSize:4096
I have an .iso file and not a .wim file. Is the .wim file imbedded in the .iso file? If I have the .iso file in c:\downloads, do I change the “e:\sources\” from your example to “c:\downloads\sources”?
Sorry to be so naïve. Just trying to figure this out.
Ok, I transferred the .iso file to its own folder on my server and mapped a network drive. I ran the dism command and am getting error 87, the split-image option is unknown. Any advice?
Dear Ron,
verify the command, error code 87 is command typo mistake
I tried both ways, System is not booting from USB, i have spent around 10 hours. any body have the idea how to use dvd split using DISM commands.
Great Job. Work like a charm. As a reminder DISM has to be the latest and the split must be done from a windows 10 or Server 2012 R2 PC. If attempted from an older PC windows 7 and below the “/Split-Image” command does not exist
Hi Thomas,
Thank you for this write-up. It is well described and documented. However, My problem of Installing W2012R2 or 2016 on my New HP 380G9 still persist. The Installation gets stuck at Install.wim. The whole Server Freeze up. only Hard Reset works. Have tried every possible thing under the Sun. Even changed the Server to a New one ;)
Any Ideas?
*PLEASE* stop using FAT32 (from 1999) with UEFI.
Ugh.
It fully supports NTFS. All of our computers use it here.
This is only the USB stick which is format with FAT32 to make it possible to boot from. The Operating System is installed in NTFS (Windows 10 and Windows Server do not even support to be installed on a FAT32 anymore).
Why would anyone go through all that when you can just download RUFUS and hit “click”????
It quickly creates a perfect UEFI bootable USB thumb drive…. every time.
Hi Vickii
Of course you can also do this, but there are several reasons you might don’t want or cannot download third party software for this. I also like the cleanness of this solution. You can exactly see what is going to happen and you know that there is nothing else done to that image.
But you are right you can also use third party tools to create the stick if this is more convenient for you.
That worked perfectly for me using DISM in elevated PS. Interesting that Microsoft has not modified their Media Tool to do this for us, or to have the file limited to 4gb in the first place…so when we are copying files over to USB it would not have issues as the files are proportional to FAT32. Or is this a “work-around” to a solution that Microsoft has never provided? Meaning…I just ordered Server 2016 from my authorized rep. He sends me just the license file and no media. In Microsoft’s VLC site I can download the ISO. What is Microsoft’s “intended” installation method for this? Clearly it is not able to be copied to USB/DVD just like that. So would seem to me that Microsoft has failed in providing the ability to create installation media for their OS’s without the need of obtaining a 3rd party software to create your installation media. SMH!
All the same, I was stuck and found your article and it worked flawlessly. Thank you very much for spending the time to share with us!
Cheers!
Correction – I realize I said “…without the need of obtaining a 3rd party software to create your installation media.” and realizing that DISM is part of Windows and not a 3rd party software.
So rewording that phrase to be “…without the need of doing something manually in order to get the media to a state where it can be copied to an installation media.”
Cheers!
Has anyone tried this with Win10 1709 setup? It doesn’t appear that Windows Setup doesn’t like splitting up the .wim file.
Thanks for the tip Vickii. Go Rufus. Worked like a charm. MBR for non UEFI systems or GPT for UEFI. So easy the hardest part was to google and download it.
I wish you would provide a little more info on how to copy files, I just have 1 big ISO. Copyign that file will not work?
If you are running Windows 8 or higher, you can just double click the ISO file, it will mount the ISO file and you will see a new drive with all the files you need to copy. :) I hope this helps you
Very awesome and easy how-to. everything what is needed is mentioned. Thank you very much.
Hi all.
I suggest before starting the process of creating USB Bootable, update the BIOS of the PC / Server to its newest version, because doing so can now support NTFS, and save the headache of the 4GB limitation
Tested on an old x3550 IBM with SAS RAID 0
– Option 2 with format NTFS
– mounted iso Win Server 2016 on windows explorer
– copied all files to usb, safe eject
– then used on x3550, booted on the server
No install.wmi error any more!
Thank you