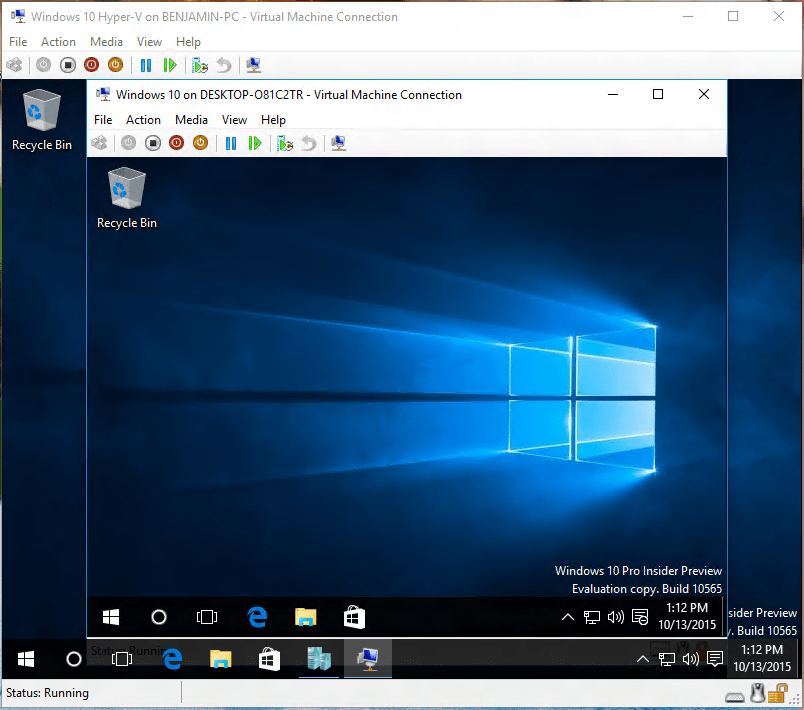
This week Microsoft released a new Windows 10 Insider Preview build to the Windows Insiders. It brings a couple of new features to the OS, but Ben Armstrong (Hyper-V Program Manager at Microsoft) mentions in a blog post that it also brings a preview of Nested Virtualization to Hyper-V in Windows 10. Nested Virtualization allows you to run Hyper-V inside a VM. This is prefect for Lab and Training scenarios, so you can run multiple Hyper-V server without the need of a lot of physical hardware.
So how can you enable Nested Virtualization in this early preview build? Theo Thompson describes this in a blog post:
Step 1: Create a VM
Step 2: Run the enablement script
Given the configuration requirements (e.g. dynamic memory must be off), we’ve tried to make things easier by providing a PowerShell script.
This script will check your configuration, change anything which is incorrect (with permission), and enable nested virtualization for a VM. Note that the VM must be off.
Invoke-WebRequest https://raw.githubusercontent.com/Microsoft/Virtualization-Documentation/master/hyperv-tools/Nested/Enable-NestedVm.ps1 -OutFile ~/Enable-NestedVm.ps1
~/Enable-NestedVm.ps1 -VmName "VmName"
Step 3: Install Hyper-V in the guest
From here, you can install Hyper-V in the guest VM.
Step 4: Enable networking (optional)
Once nested virtualization is enabled in a VM, MAC spoofing must be enabled for networking to work in its guests. Run the following PowerShell (as administrator) on the host machine:
Set-VMNetworkAdapter -VMName"VName"-MacAddressSpoofing on
Step 5: Create nested VMs
This is still a very early preview and this means this feature still has a lot of know issues:
- Both hypervisors need to be the latest versions of Hyper-V. Other hypervisors will not work. Windows Server 2012R2, or even builds prior to 10565 will not work.
- Once nested virtualization is enabled in a VM, the following features are no longer compatible with that VM. These actions will either fail, or cause the VM not to start:
- Dynamic memory must be OFF. This will prevent the VM from booting.
- Runtime memory resize will fail.
- Applying checkpoints to a running VM will fail.
- Live migration will fail.
- Save/restore will fail.
- Once nested virtualization is enabled in a VM, MAC spoofing must be enabled for networking to work in its guests.
- Hosts with Virtualization Based Security (VBS) enabled cannot expose virtualization extensions to guests. You must first disable VBS in order to preview nested virtualization.
- This feature is currently Intel-only. Intel VT-x is required.
- Beware: nested virtualization requires a good amount of memory. I managed to run a VM in a VM with 4 GB of host RAM, but things were tight.
Tags: Hyper-V, Hyper-V Nested Virtualization, Hyper-V Nested Virtualization in Windows 10, Microsoft, Nested Virtualization, PowerShell, Virtual Machine, Virtualization, VM, Windows, Windows 10, Windows Insider, Windows Server, Windows Server 2016 Last modified: September 2, 2018






Hi Thomas,
Congratulations for this post, I have my blog with technical tutorials Microsoft.
Best regards.
Osanam Giordane
How can I disable this? or make it back as it was?
Hi Timo
This is a per VM setting. So if you delete the VM it is gone. If you just want to disable it again for the VM you can use the command: Set-VMProcessor -VMName “VMName” -ExposeVirtualizationExtensions $false
Also check out my “newer version” of this blog here: https://www.thomasmaurer.ch/2015/11/nested-virtualization-in-windows-server-2016-and-windows-10/