![]()
This blog post is a part of a series of blog posts about System Center 2012 Virtual Machine Manager, I am writing together with Michel Luescher (Consultant from Microsoft Switzerland).
- Basic Hyper-V Networking in System Center 2012 SP1 – Virtual Machine Manager
- Using System Center 2012 SP1 – Virtual Machine Manager Logical Switch with Hyper-V
- Hyper-V Converged Fabric with System Center 2012 SP1 – Virtual Machine Manager
Hyper-V Converged Fabric
Last year I already wrote a blog post about Windows Server 2012 Hyper-V Converged Fabric or Converged Networking. Hyper-V Converged Fabric in a simple way allows you to use network adapters for different type of traffic. In Windows Server 2008 R2 Hyper-V we didn’t really had this capabilities because the network teaming relied on 3rd party software and Hyper-V itself didn’t offered a mature QoS solution. In other words, we had to go with what I now would call a traditional Hyper-V host design.
Traditional Design
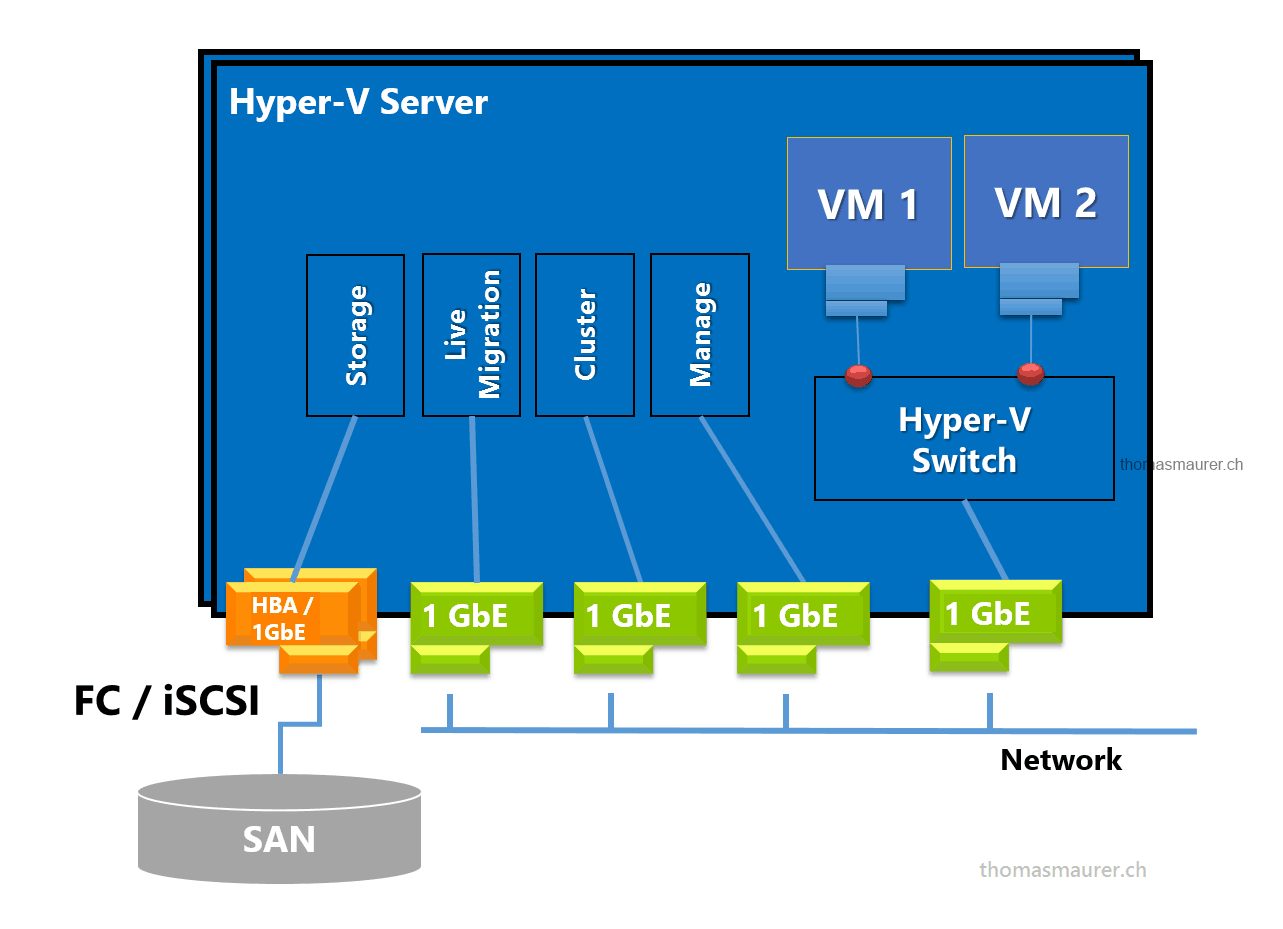
Each dedicated Hyper-V network such as CSV communication or the Live Migration network used an own dedicated physical network interface. These different network interfaces could also be teamed with third party software, example with the software from HP, Broadcom or Intel. This design is still a good design in Windows Server 2012 but there are other configurations which are a lot more flexible.
In Windows Server 2012 you can get much more out of your network configuration. First of all NIC Teaming is now integrated and therefor out-of-the-box supported in Windows Server 2012. Another cool feature is the use of virtual network adapters in the Management OS (a.k.a. Parent Partition). This allows you to create a Hyper-V Hosts with all the necessary networks (Management, Live Migration, Cluster,…) by teaming just two or more physical adapters for a virtual switch and then create the additional virtual network adapters (vNICs) for the Hyper-V Management OS.
Full Converged Setup
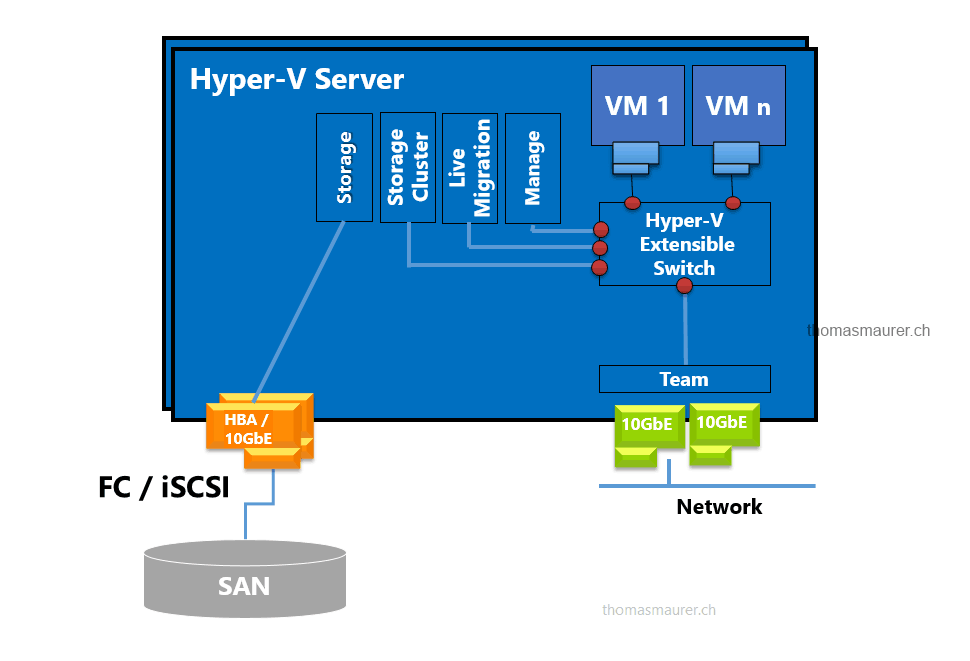
In this example two physical 10GbE network adapters are teamed and are used by the Hyper-V Virtual Switch. But in this case this Virtual Switch is not only used by the Virtual Machines, but also the Management OS is using for different functions. This is done by three virtual network adapters, one for Management, one for Live Migration and one for CSV traffic. Even the storage traffic, like iSCSI or SMB 3.0, could run over this virtual switch and would not need any dedicated physical adapters.
How to setup a Hyper-V host with a Full Converged Setup via Windows PowerShell
First of all this post should show you how you can created a manual Hyper-V Converged Fabric setup via Windows PowerShell. It’s always good to understand how the setup is done in the background.
Let’s start with a Windows Server 2012 server with the Hyper-V role installed. Of course it could also be a Hyper-V Server 2012 server.
Create NIC Teams
First you have to create a LBFO team, which can be created over the Server Manager or PowerShell. The Teaming Mode of course depends on your configuration. In this example we will use a Switch independent teaming.
New-NetLbfoTeam -Name Team01 -TeamMembers NIC1,NIC2 -LoadBalancingAlgorithm HyperVPort -TeamingMode SwitchIndependent
Create the Virtual Switch
After the team has been created you have to create a new Virtual Switch. We also define the DefaultFlowMinimumBandwidthWeight to be set to 20 or whatever you default Bandwidth Weight should be.
New-VMSwitch -Name VMNET -NetAdapterName Team01 -AllowManagementOS $False -MinimumBandwidthMode Weight
Set-VMSwitch "VMNET" -DefaultFlowMinimumBandwidthWeight 3
Create Virtual Network Adapters for the Management OS
After you have created your Hyper-V Virtual Switch you can now start adding VM Network Adapters to this Virtual Switch. We also configure the VLAN ID and the QoS policy settings.
Add-VMNetworkAdapter -ManagementOS -Name "Management" -SwitchName "VMNET"
Add-VMNetworkAdapter -ManagementOS -Name "LiveMigration" -SwitchName "VMNET"
Add-VMNetworkAdapter -ManagementOS -Name "CSV" -SwitchName "VMNET"

Set-VMNetworkAdapterVlan -ManagementOS -VMNetworkAdapterName "Management" -Access -VlanId 185
Set-VMNetworkAdapterVlan -ManagementOS -VMNetworkAdapterName "CSV" -Access -VlanId 195
Set-VMNetworkAdapterVlan -ManagementOS -VMNetworkAdapterName "LiveMigration" -Access -VlanId 196

Set-VMNetworkAdapter -ManagementOS -Name "LiveMigration" -MinimumBandwidthWeight 40
Set-VMNetworkAdapter -ManagementOS -Name "CSV" -MinimumBandwidthWeight 10
Set-VMNetworkAdapter -ManagementOS -Name "Management" -MinimumBandwidthWeight 10
Your new configuration will now look like this:

As you can see the name of the new Hyper-V Virtual Ethernet Adapter is vEthernet (YourNetworkAdapaterName). This will be important for automation tasks or configuring IP addresses via Windows PowerShell.
Set IP Addresses
After your new vNICs are really you can configure the IP addresses of these vNICs how you would do it with physical servers. And of course you can use Windows PowerShell to do that.
# Set IP Address Management

New-NetIPAddress -InterfaceAlias "vEthernet (Management)" -IPAddress 192.168.25.11 -PrefixLength "24" -DefaultGateway 192.168.25.1

Set-DnsClientServerAddress -InterfaceAlias "vEthernet (Management)" -ServerAddresses 192.168.25.51, 192.168.25.52

# Set LM and CSV
New-NetIPAddress -InterfaceAlias "vEthernet (LiveMigration)" -IPAddress 192.168.31.11 -PrefixLength "24"
New-NetIPAddress -InterfaceAlias "vEthernet (CSV)" -IPAddress 192.168.32.11 -PrefixLength "24"
Well this after this you are done with the Converged Fabric solution on the Hyper-V host. If you add the host to System Center Virtual Machine Manager 2012 SP1 the Virtual Switch will look like a Standard Virtual Switch. If you want to use the Logical Switch from System Center Virtual Machine Manager you have to create this configuration via VMM.
How to setup a Hyper-V host with a Full Converged Setup via System Center 2012 SP1 Virtual Machine Manager
If you are going to deploy a Converged Fabric Hyper-V setup with System Center 2012 Virtual Machine Manager you have to prepare some things first. If you not already know the new networking definitions of System Center 2012 SP1 – Virtual Machine Manager have a look at this post: Basic Hyper-V Networking in System Center 2012 SP1 – Virtual Machine Manager
Add Logical Networks and IP Pools
As a first step make sure that all logical networks are added to Virtual Machine Manager and you have created IP Pools on the Logical Networks with IP addresses which need to be added to the Hyper-V host as described in the previous article. In this case we created a Logical Network for the Hyper-V management network, Live Migration Network and the CSV network. Make sure you create different network sites if you deploy your host in a multi site environment. The Hyper-V host management network could also be your server network, if your Hyper-V servers are in the same subnet as the other servers.

After the Logical Networks have been created, add the IP Pools with IP addresses which will be used for the vNICs of the Management OS (Hyper-V host).
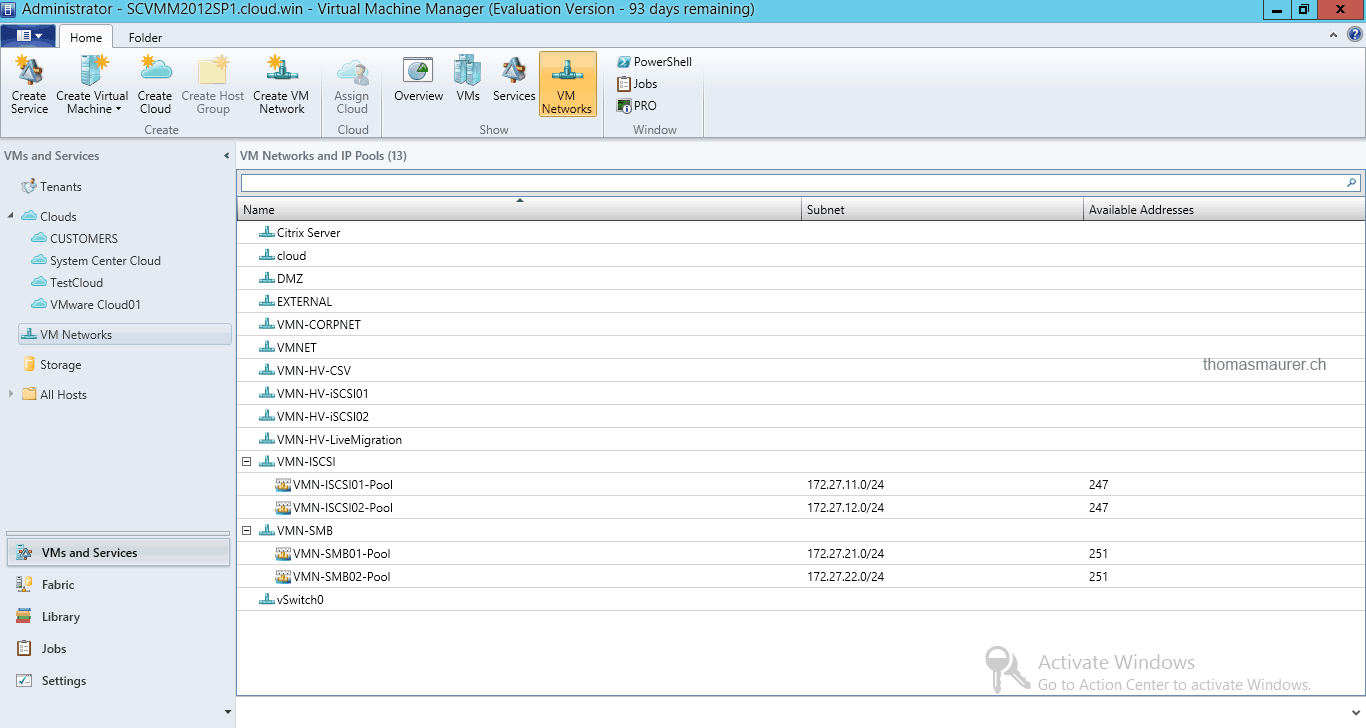
VM Networks
Because in Service Pack 1 the Logical Networks are not connected directly to a Virtual Network Adapter, VM Networks have to get created for every Logical Network used by the Hyper-V Hosts or virtual machines.
This is done in the VMs and Services section. There create a new VM Network and select the Logical Network. Repeat this for each logical network, for example:
- Hyper-V Host Management
- Hyper-V CSV
- Hyper-V Live Migration
Native Port Profiles
After the networks have been created and configured the Virtual and Uplink Port Profiles will be next.
Microsoft already offers a very complete list of Virtual Port Profiles which are preconfigured with settings for these network types, but of course there is still the option change the existing or to create own profiles .
On the other hand the Uplink Port Profile is something which has to get created because this profile depends on the current used environment. First choose the teaming mode and the load balancing algorithm..

Second choose which “Logical Networks” are available on which site. This is important for the placing of virtual machines and virtual network adapters later on.

In this example the Hyper-V host networks “Management” and “Live Migration” have been chosen as well as the Logical Networks for the VM which will run on the Hyper-V host.
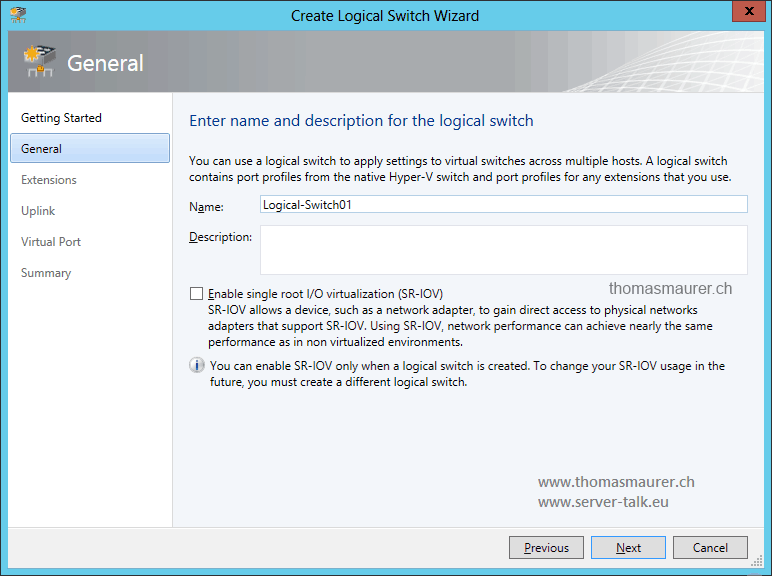
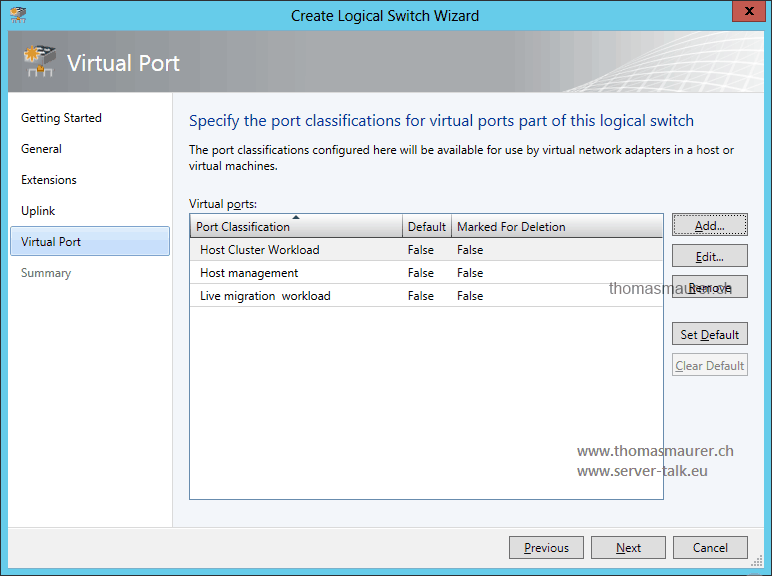
Logical Switch
After the profiles are ready the Logical Switch can finally get created. Enter the name of the Logical Switch, which will be used as the name for the virtual switch too. Then choose the extensions which will be used for this Virtual Switch.
Change the Uplink mode to Team and add the Uplink Port Profile which has been created just before. When using different locations or different type of hardware maybe different / multiple Uplink Port Profiles will be used for the same Logical Switch. This would allow you to use the same Logical Switch on different clusters or network sites.

Add the Virtual Port Profiles together with the Port Classification. In this case also the Port Profiles for Host Management, Cluster and Live Migration will be added.
Configure Hyper-V host
After all the needed network definitions like Logical Networks, Port Profiles and the Logical Switch have been created, the Hyper-V host configuration will follow next. Make sure you to already have the management IP address assigned to one of the 10 GbE network interfaces and the host is also domain joined. Virtual Machine Manager will use the same network settings from this physical NIC to configure the Virtual Network Adapter.
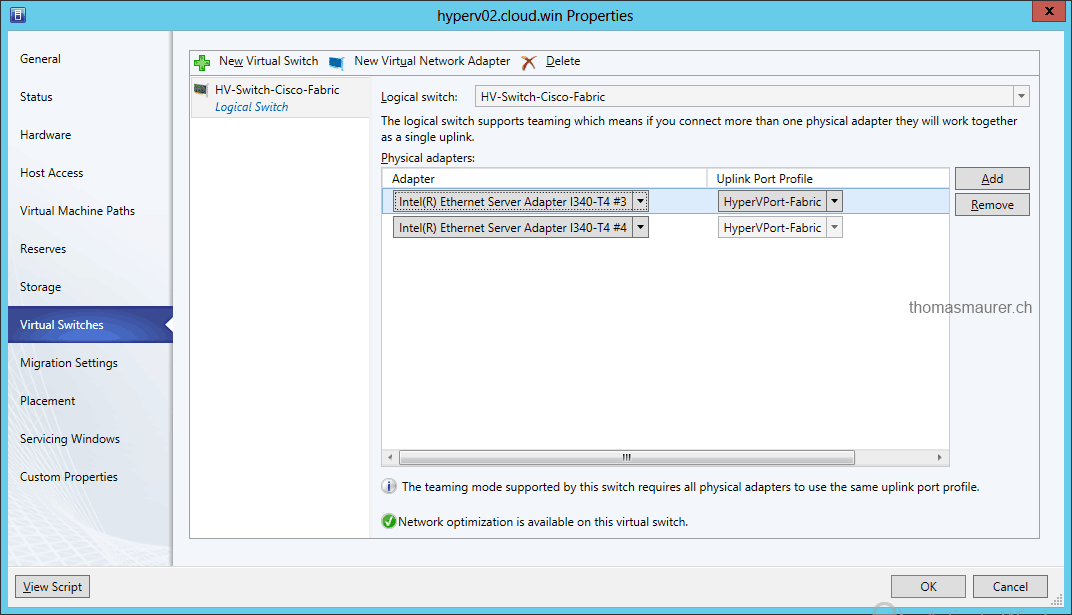
To configure the Logical Switch right click on the Hyper-V host and open properties. Select the Virtual Switches tap and click on “New Logical Switch”

Select the Logical Switch which has been created before and at the network adapters which should be in the team. Select the Uplink Port Profile which includes the settings for this host. You can only choose one Uplink Port Profile which defines the network team.
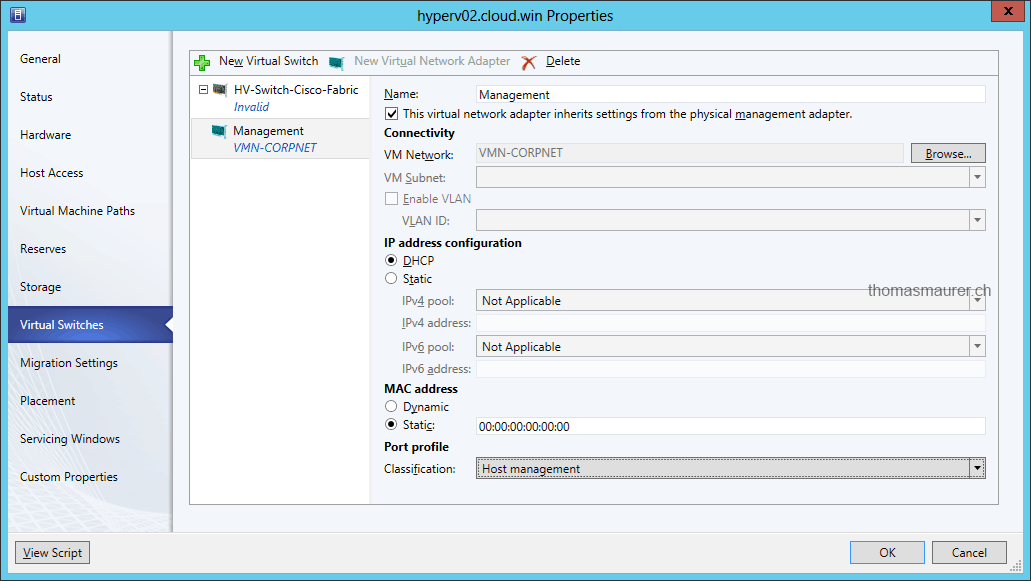
Click on New Virtual Network Adapter to add a new vNIC. First add the Management network adapter. Enter the name for it and make sure the checkbox for “This virtual network adapter inherits settings from the physical management adapter” is checked and select the write VM Network. On Port Profile select the Port Classification “Host Management” this will added the specified QoS settings for this Virtual Network Adapter.
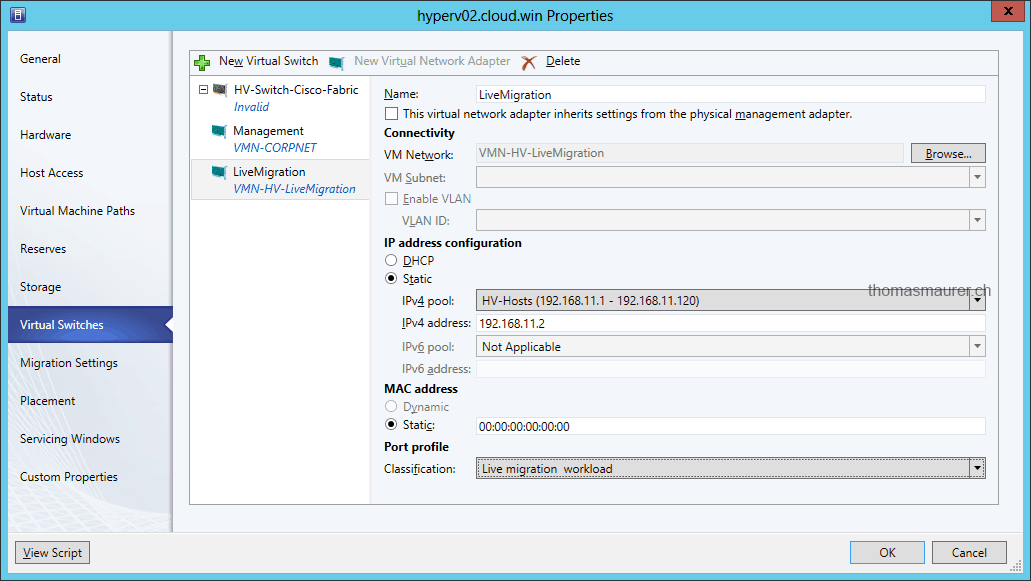
Now create the vNICs for the CSV and the Live Migration network. Again click on New Virtual Network Adapter. Enter the name and connect it to the specific VM Network. In the IP address configurations section select static, choose the write IP Pool and enter the IP address which should be used for this host. At the send select also the write Port Classification. Do this for both, Live Migration and CSV network.
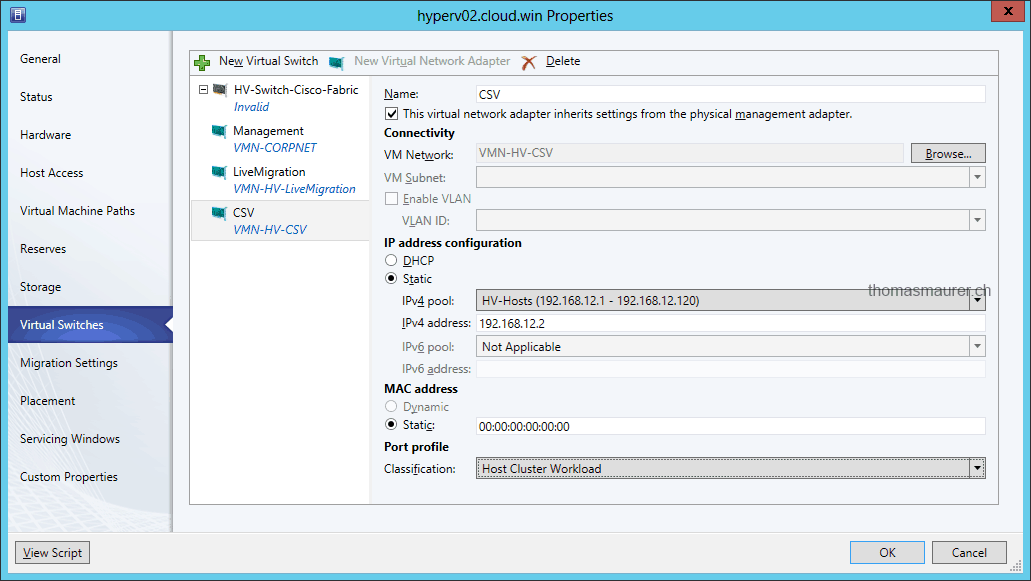
After you click on okay VMM will:
- Creates the network team
- Creates the Virtual Switch
- Creates 3 Virtual Network Adapters
- Adds the management IP address from the physical network adapter to the management vNIC
- Adds IP addresses from the IP Pools to the CSV and the Live Migration vNIC.
- Applies QoS configuration to does vNICs
Tags: Converged Fabric, Hyper-V, IP, Logical Networks, Microsoft, NIC, PowerShell, SCVMM, System Center, System Center 2012, System Center 2012 SP1, Teaming, Virtual Machine Manager, Virtualization, VM Networks, VMM, vNICs, Windows Powershell, Windows Server, Windows Server 2012 Last modified: April 8, 2013


Hi Thomas
I’ve tested 3 different configuration scenarios, including the one above. I keep on having trouble to Live Migrate on a dedicated network card, it works immediately when allow the server to use any available network.
I’ve been struggling for about 8 days with this and haven’t got anywhere. Would you be able to provide some information?
Thanks!
I would need more information on that.
Hi
Check if you have duplicate MAC Adresses, this might causes some problems. The vNIC’s are getting a MAC from the configured range in Hyper-V.
Thanks
Michel
Using SCVMM to set up this configuration what does the teaming on the OS? In the powershell example you created the team.
On the host would I use the GUI in windows and create the team, then apply an IP to it so VMM can talk to it and do the rest?
Thanks!
I would like to know if there are any recommended best practices on how to setup physical switches in order to support converged networking. In other words, will this work with traditional VLANs or VLAN tags? If so, where do I define the VLAN information in VMM? Thanks in advance.
Hi yes they do work with SCVMM and Hyper-V you define them in the Logical networks
Hello Thomas,
first of all, thanks for this Post. Was very useful to me ín Setting up my Network in VMM.
I ran into some Problems though that I would like to share. It may be that this issue is already known, but maybe not ;-)
When you get to the point of configuring the Hyper-V Host (with a Team), you have to have at least 3 NIC’s in the Host. One NIC needs to be configured for TCP in a separate LAN (to Keep the communication open during the Teaming process) and the other two NIC’s just need to be active for the Teaming setup. I’ve done this serveral times, with Powershell and with the GUI, with one, two and three NIC’s and the only time it worked correctly was with three NIC’S, with the one “extra” NIC configured in a separate LAN from my Team. The Problem is that the script will configure the Team properly as a Switch and then it will add a Virtual NIC. As soon as it does this it loses communication with the Host, because the Team becomes a Switch (without protocols) and the vNIC receives the protocols but not the IP configuration, although I checked the box to use the Network configuration from the active NIC, it just does not work. The script then waits and finally times out. Like I said, I’ve tried it many times with different methods, always with the same result. My “Workaround” worked fine on all 4 Nodes/Hosts in my Cluster. Afterwards I setup all my vNIC’s with the LAN configurations and then I deactivated the third NIC and everything was good to go.
Hope this helps anyone who has had the same Problem.
Cheers!
Hi,
What is the effect of setting the same native port profile with the same weighting on all VMs?
In the above configuration how does the host decide which VMs’ traffic has priority and which needs more bandwidth?
Regards
Lionel
I would set the bandwidth weight on more important machines higher than on the not important machines. For example bronze serves would be weight 3, silver would be weight 5 and gold would be weight 10 or something like that :)
Hello Thomas, one more time your blog safe my life :) actually working on a 26 nodes hyper-v cluster for SAP with IBM blades and converged network. This post is very nice and in addition with Aidan Finn ones: http://www.aidanfinn.com/?p=14049
Thanks again Thomas !
I tried creating the Converged networking fabric using powershell, as described above, but I noticed one thing…
When you create the Virtual Switch using PS, it shows up as a “Standard Switch” in SC VMM. However, if you create the Virtual Switch using VMM, it shows up as a “Logical Switch”.
Am I missing something?