AzCopy is a command-line tool to manage and copy blobs or files to or from a storage account. It also allows you to sync storage accounts and move files from Amazon S3 to Azure storage. In this blog post, I will cover how to install AzCopy on Windows, Linux, macOS, or in update the version in the Azure Cloud Shell.
AzCopy v10 is now generally available to all of our customers and provides higher throughput and more efficient data movement compared to the earlier version of AzCopy (v8). Version 10 also adds additional functionality like sync of blob storage accounts and much more.
Install AzCopy
You can get the latest version of AzCopy from here: Get started with AzCopy
Install AzCopy on Windows
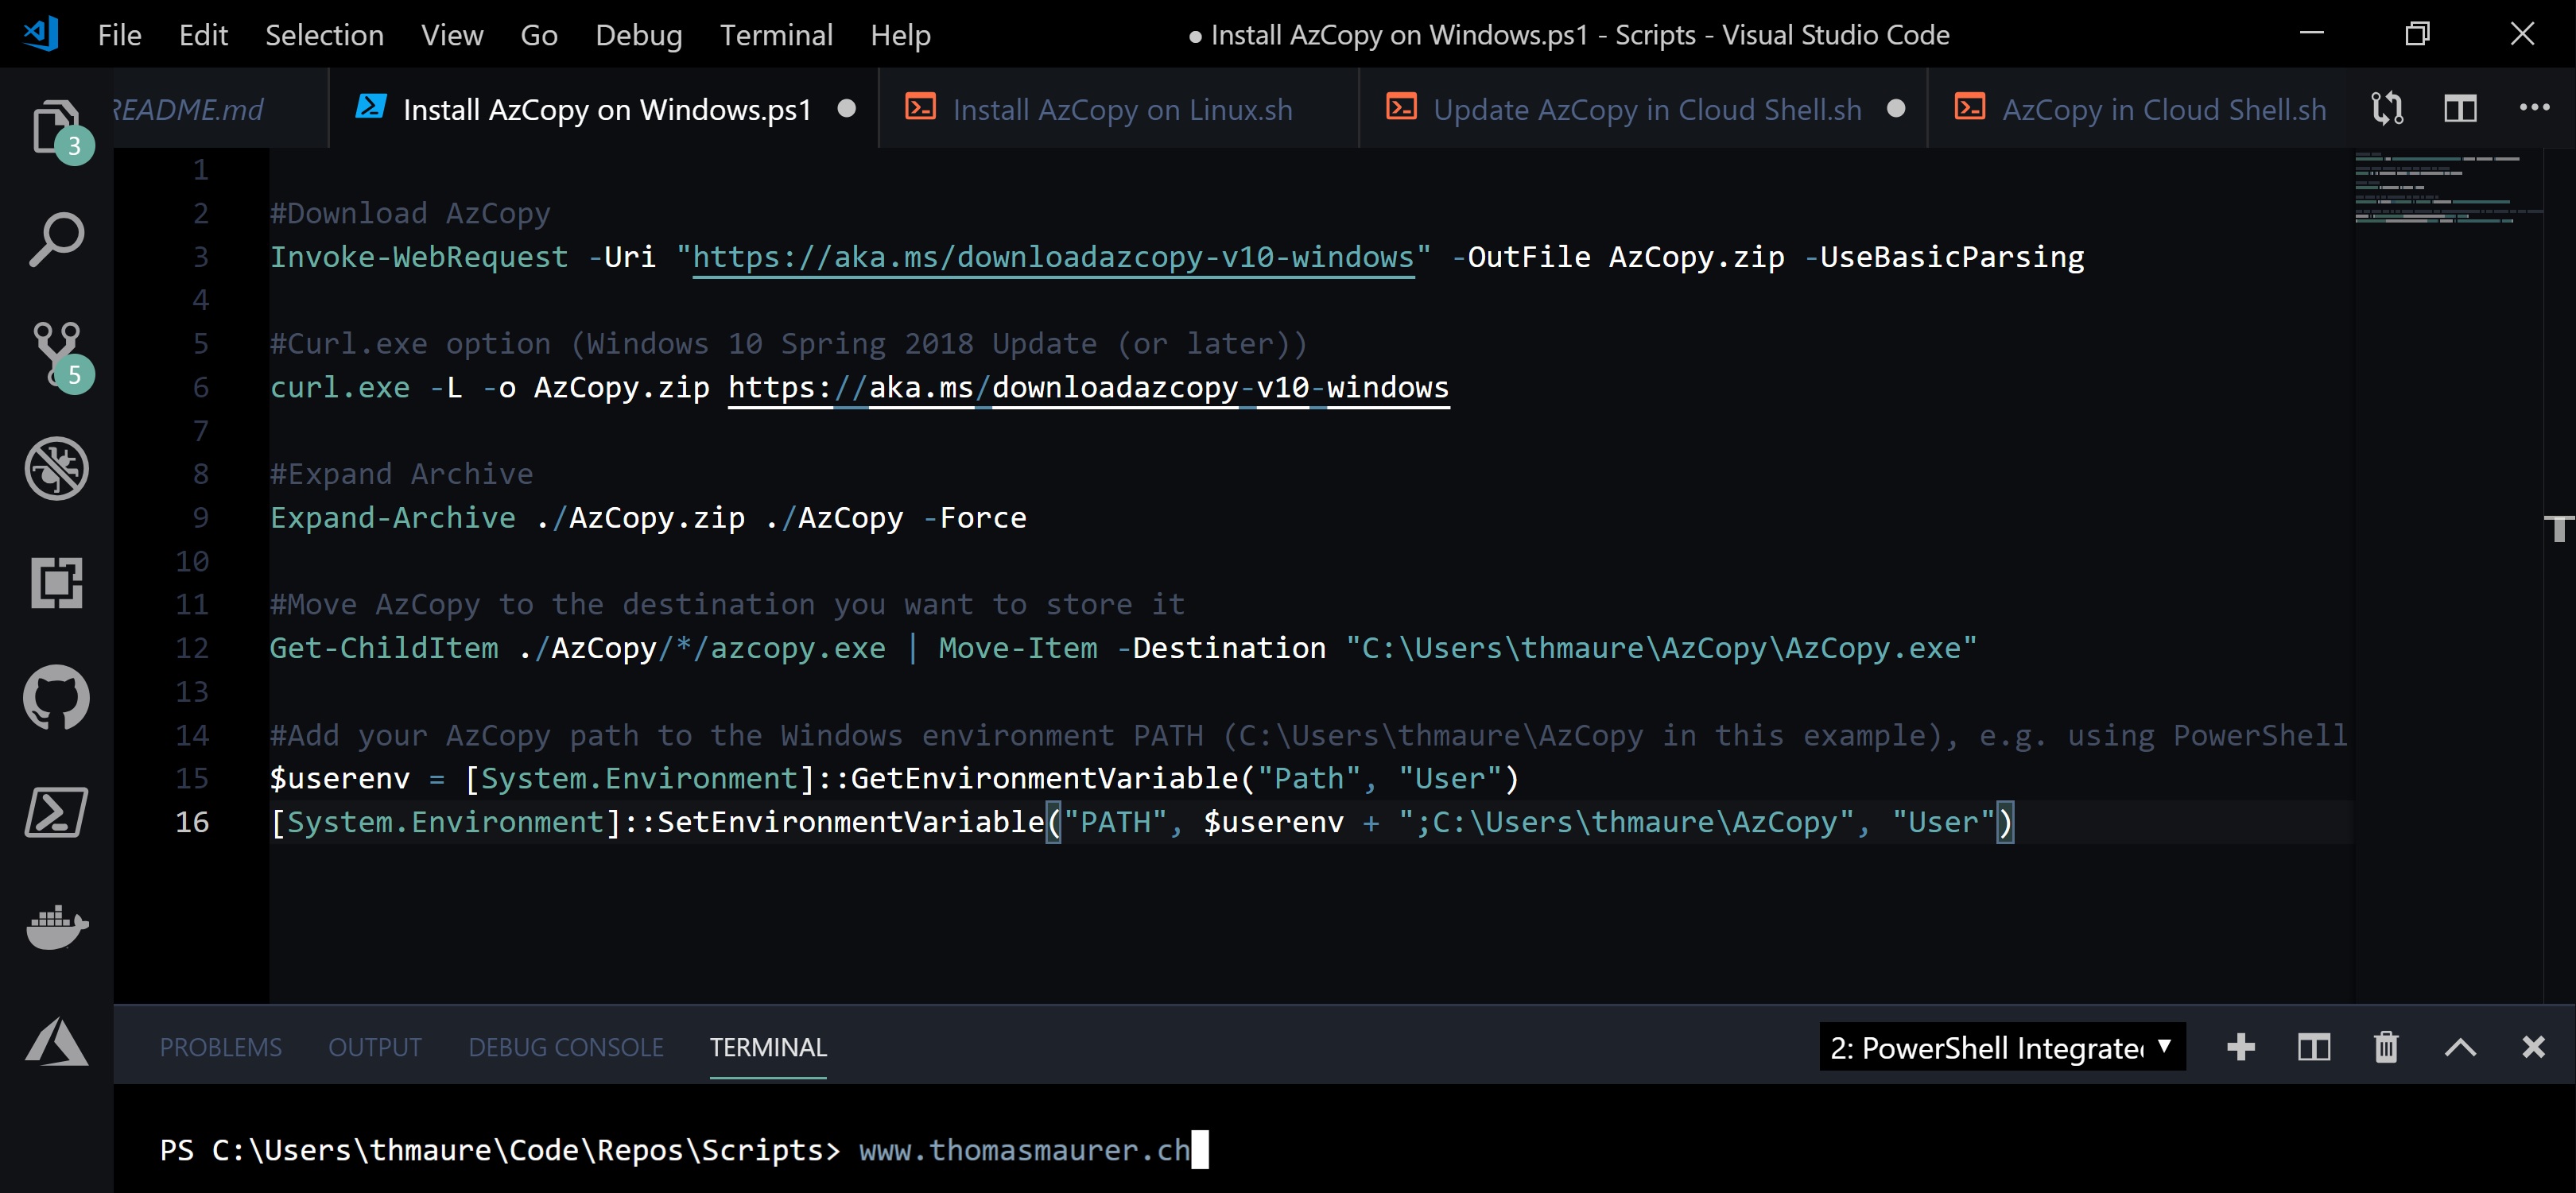
To install AzCopy on Windows, you can run the following PowerShell script, or you can download the zip file and run it from where ever you want. This script will add the AzCopy folder location to your system path so that you can run the AzCopy command from anywhere.
#Download AzCopy
Invoke-WebRequest -Uri "https://aka.ms/downloadazcopy-v10-windows" -OutFile AzCopy.zip -UseBasicParsing

#Curl.exe option (Windows 10 Spring 2018 Update (or later))
curl.exe -L -o AzCopy.zip https://aka.ms/downloadazcopy-v10-windows

#Expand Archive
Expand-Archive ./AzCopy.zip ./AzCopy -Force

#Move AzCopy to the destination you want to store it
Get-ChildItem ./AzCopy/*/azcopy.exe | Move-Item -Destination "C:\Users\thmaure\AzCopy\AzCopy.exe"

#Add your AzCopy path to the Windows environment PATH (C:\Users\thmaure\AzCopy in this example), e.g., using PowerShell:
$userenv = [System.Environment]::GetEnvironmentVariable("Path", "User")
[System.Environment]::SetEnvironmentVariable("PATH", $userenv + ";C:\Users\thmaure\AzCopy", "User")
Install AzCopy on Linux
To install AzCopy on Linux, you can run the following shell script, or you can download the tar file and run it from where ever you want. This script will put the AzCopy executable into the /usr/bin folder so that you can run it from anywhere.
#Download AzCopy
wget https://aka.ms/downloadazcopy-v10-linux

#Expand Archive
tar -xvf downloadazcopy-v10-linux

#(Optional) Remove existing AzCopy version
sudo rm /usr/bin/azcopy

#Move AzCopy to the destination you want to store it
sudo cp ./azcopy_linux_amd64_*/azcopy /usr/bin/
Authorize with Azure Storage
When you start working with Azure Storage, you have two options to authorize against the Azure Storage. You can provide authorization credentials by using Azure Active Directory (AD), or by using a Shared Access Signature (SAS) token.
It also depends on which services you want to use.
| Storage type | Supported method |
|---|---|
| Blob storage | Azure AD and SAS |
| Blob storage (hierarchical namespace) | Azure AD |
| File storage | SAS only |
Authenticate using Azure AD
To authenticate with AzCopy using Azure AD, you can use the following command
azcopy login
Authenticate using SAS token
To authenticate with AzCopy using a SAS token you can use this command as an example
azcopy cp "C:\local\path" "https://account.blob.core.windows.net/mycontainer1/?sv=2018-03-28&ss=bjqt&srt=sco&sp=rwddgcup&se=2019-05-01T05:01:17Z&st=2019-04-30T21:01:17Z&spr=https&sig=MGCXiyEzbtttkr3ewJIh2AR8KrghSy1DGM9ovN734bQF4%3D" --recursive=true
To make things easier you can use Azure PowerShell to generate the SAS token for you. I wrote a blog post on ITOPSTALK.com about how you can do that. You can get the SAS token using the following Azure PowerShell command. If you are running Linux or macOS, you can find on this blog post, how to install PowerShell 6.
Connect-AzAccount
Get-AzSubscription

$subscriptionId = "yourSubscriptionId"
$storageAccountRG = "demo-azcopy-rg"
$storageAccountName = "tomsaccount"
$storageContainerName = "images"
$localPath = "C:\temp\images"

Select-AzSubscription -SubscriptionId $SubscriptionId

$storageAccountKey = (Get-AzStorageAccountKey -ResourceGroupName $storageAccountRG -AccountName $storageAccountName).Value[0]

$destinationContext = New-AzStorageContext -StorageAccountName $storageAccountName -StorageAccountKey $storageAccountKey

$containerSASURI = New-AzStorageContainerSASToken -Context $destinationContext -ExpiryTime(get-date).AddSeconds(3600) -FullUri -Name $storageContainerName -Permission rw

azcopy copy $localPath $containerSASURI --recursive
To learn more about SAS tokens, check out Using shared access signatures (SAS).
I hope this helps you to install AzCopy and configure it. If you have any questions, feel free to leave a comment.
Tags: AzCopy, Azure, Azure Storage, Cloud Shell, Cloud Storage, How to install, How to install AzCopy, Install AzCopy, Linux, macOS, Microsoft, Microsoft Azure, Storage, Windows Last modified: May 30, 2019


Hi. Thanks for the guide. Can you tell me if AzCopy v10 supports the /XO /XA commands? Im trying to copy files to an azure file share regularly but i want to make sure im only copying new files and not all the previous ones again. The sync command doesnt work with fileshares and i need this to be a share for application reasons. Thank you.
Download file from Azure Blob Storage to Linux local machine
Connect-AzAccount
Get-AzSubscription
$subscriptionId = “yourSubscriptionId”
$storageAccountRG = “demo-azcopy-rg”
$storageAccountName = “tomsaccount”
$storageContainerName = “images”
$localPath = “C:\temp\images”
Select-AzSubscription -SubscriptionId $SubscriptionId
$storageAccountKey = (Get-AzStorageAccountKey -ResourceGroupName $storageAccountRG -AccountName $storageAccountName).Value[0]
$destinationContext = New-AzStorageContext -StorageAccountName $storageAccountName -StorageAccountKey $storageAccountKey
$containerSASURI = New-AzStorageContainerSASToken -Context $destinationContext -ExpiryTime(get-date).AddSeconds(3600) -FullUri -Name $storageContainerName -Permission rw
azcopy copy $localPath $containerSASURI –recursive
above script how to mentione or change source path and destination path for download azure storage container files to local linu machine