 This is a modified document which I wrote for a Microsoft Workshop at KTSI. It’s a Desgin, Step by Step and a Troubleshooting Guide for Microsoft DirectAccess. This is made for SMB or LAB environments not for Enterprise Deployments.
I hope this guide can help you deploy DirectAccess in your environment and you can enjoy DirectAccess like I do ;-)
Design
Requirements
Basically this is a project which is optimized for SMB environments. That means this design uses a minimum of servers to deploy Microsoft DirectAccess.
So what do you need for a DirectAccess environment.
- One or more DirectAccess servers running Windows Server 2008 R2 (with or without UAG) with two network adapters: one that is connected directly to the Internet and one that is connected to the intranet. DirectAccess servers must be a member of an AD DS domain.
- On the DirectAccess server, at least two consecutive, public IPv4 addresses assigned to the network adapter that is connected to the Internet.
- DirectAccess client computers that are running Windows 7 Enterprise or Windows 7 Ultimate. DirectAccess clients must be members of an AD DS domain.
- At least one domain controller and DNS server that is running Windows Server 2008 SP2 or Windows Server 2008 R2. When UAG is used, DirectAccess can be deployed with DNS servers and domain controllers that are running Windows Server 2003 when NAT64 functionality is enabled.
- A public key infrastructure (PKI) to issue computer certificates, and optionally, smart card certificates for smart card authentication and health certificates for NAP. For more information, see Public Key Infrastructure on the Microsoft Web site.
- Without UAG, an optional NAT64 device to provide access to IPv4-only resources for DirectAccess clients. DirectAccess with UAG provides a built-in NAT64.
- Activated IPv6 on the Servers you want to use with DirectAccess
Key elements
- DirectAccess client. A domain-joined computer running Windows 7 Enterprise, Windows 7 Ultimate, or Windows Server 2008 R2 that can automatically and transparently connect to an intranet through a DirectAccess server.
- DirectAccess server. A domain-joined computer running Windows Server 2008 R2 that accepts connections from DirectAccess clients and facilitates communication with intranet resources.
- Network location server. A server that a DirectAccess client uses to determine whether it is located on the intranet or the Internet.
- Certificate revocation list (CRL) distribution points. Servers that provide access to the CRL that is published by the certification authority (CA) issuing certificates for DirectAccess.
DirectAccess Connection Process
- The DirectAccess client computer running Windows 7 Enterprise or Windows 7 Ultimate detects that it is connected to a network.
- The DirectAccess client computer determines whether it is connected to the intranet. If it is, DirectAccess is not used. Otherwise, DirectAccess is used.
- The DirectAccess client computer on the Internet connects to the DirectAccess server with IPv6 and IPsec. If a native IPv6 network is not available (and it probably will not be when the computer is connected to the Internet), the client uses the 6to4 or Teredo IPv6 transition technologies to send IPv4-encapsulated IPv6 traffic.
- If a firewall or proxy server prevents the client computer using 6to4 or Teredo from reaching the DirectAccess server, the client automatically attempts to connect with the Internet Protocol over Secure Hypertext Transfer Protocol (IP-HTTPS) protocol. IP-HTTPS uses an IPv4-based Secure Sockets Layer (SSL) connection to encapsulate IPv6 traffic.
- As part of establishing the IPsec session for the infrastructure tunnel to reach the intranet DNS server and domain controller, the DirectAccess client and server authenticate each other using computer certificates and computer account credentials.
- If Network Access Protection (NAP) is enabled and configured for health validation, the DirectAccess client attempts to obtain a health certificate from a Health Registration Authority (HRA) on the intranet. The HRA forwards the DirectAccess client’s health status information to a NAP health policy server. The NAP health policy server processes the policies defined within the Network Policy Server (NPS) and determines whether the client is compliant with system health requirements. If so, the HRA obtains a health certificate for the DirectAccess client.
- When the user logs on, the DirectAccess client establishes the intranet tunnel to access the resources of the intranet. The DirectAccess client and server authenticate each other using a computer certificate and user account credentials. IF NAP is being used, the DirectAccess client submits its health certificate for authentication.
- The DirectAccess server forwards traffic between the DirectAccess client and the intranet resources to which the user has been granted access.
From TechNet: http://technet.microsoft.com/en-us/library/dd637792(WS.10).aspx
IMPORTANT: DirectAccess authenticates the computer before the user logs on. Typically, computer authentication grants access only to domain controllers and DNS servers. After the user logs on, DirectAccess authenticates the user, and the user can connect to any resources he or she is authorized to access.
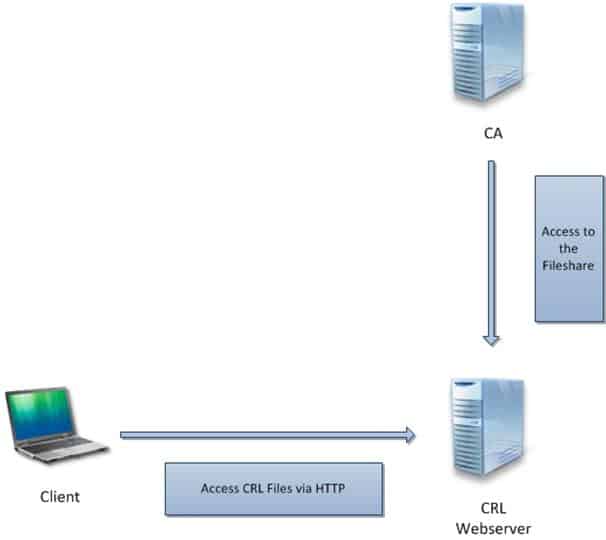
Separating Internet and Intranet Traffic
DirectAccess is splitting Internet and Intranet Traffic. So if a client is out-side the company network it will not connected to the company network to get Internet Access.
Picture from TechNet: http://technet.microsoft.com/en-us/library/dd637769(WS.10).aspx
DirectAccess versus legacy VPN
Problems with VPN
Traditionally, users connect to intranet resources with a VPN. However, using a VPN can be cumbersome because:
Connecting to a VPN takes several steps, and the user needs to wait for authentication. For organizations that check the health of a computer before allowing the connection, establishing a VPN connection can take several minutes.
- Any time users lose their Internet connection, they need to re-establish the VPN connection.
- VPN connections can be problematic in some environments that filter out VPN traffic.
- Internet performance is slowed if both intranet and Internet traffic goes through the VPN connection.
Because of these inconveniences, many users avoid connecting to a VPN. Instead, they use application gateways, such as Microsoft Outlook® Web Access (OWA), to connect to intranet resources. With OWA, users can retrieve internal e-mail without establishing a VPN connection. However, users still need to connect to a VPN to open documents that are located on intranet file shares, such as those that are linked within an e-mail message.
TechNet: http://technet.microsoft.com/en-us/library/dd637766(WS.10).aspx
DirectAccess Benefits
- Seamless connectivity. DirectAccess is on whenever the user has an Internet connection, giving users access to intranet resources whether they are traveling, at the local coffee shop, or at home.
- Remote management. IT administrators can connect directly to DirectAccess client computers to monitor them, manage them, and deploy updates, even when the user is not logged on. This can reduce the cost of managing remote computers by keeping them up-to-date with critical updates and configuration changes.
- Improved security. DirectAccess uses IPsec for authentication and encryption. Optionally, you can require smart cards for user authorization. DirectAccess integrates with NAP to require that DirectAccess clients must be compliant with system health requirements before allowing a connection to the DirectAccess server. IT administrators can configure the DirectAccess server to restrict the servers that users and individual applications can access.
TechNet: http://technet.microsoft.com/en-us/library/dd637814(WS.10).aspx
DirectAccess and VPNs Working Together
DirectAcces does not solve every problem or is a solution for everything. That’s why a lot of company could deploy a mixed system with DirectAccess and “legacy” VPN.
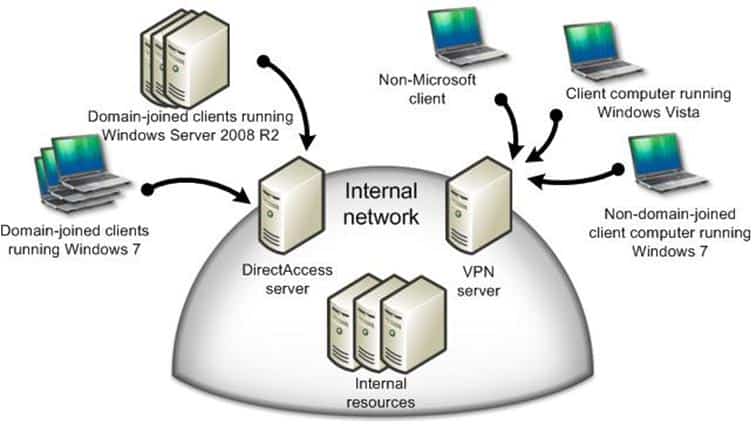
Picture from TechNet: http://technet.microsoft.com/en-us/library/dd875517(WS.10).aspx
Server and Clients for this Guide
| Server01 | ADS, DNS, DHCP, ADCS |
| Server02 | Fileserver, Network Location Server |
| Server03 | DirectAccess Server, CRL |
| Server04 | External DNS Server |
| Client01 | Windows 7 Client |
As mentioned in an earlier chapter, this is designed to use a minimum of servers. This is not Microsoft best practice, but it should be okay for lab environments and it shows what you need as a minimum.
Overview
DirectAccess Overview
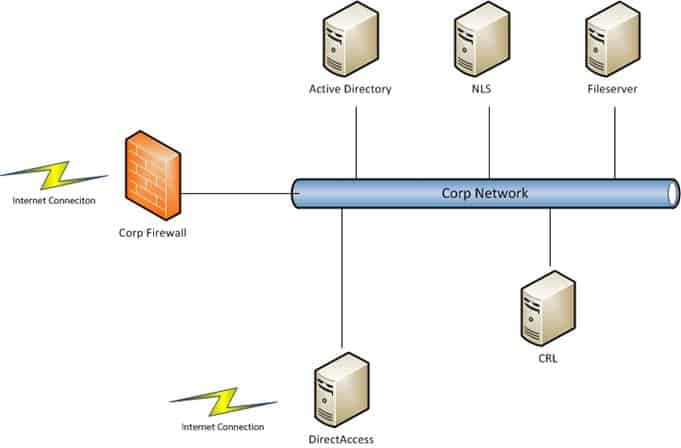
LAB Overview
Domains
| Internal | corp.pepsi.local |
| External | microsoft-engineering.ch |
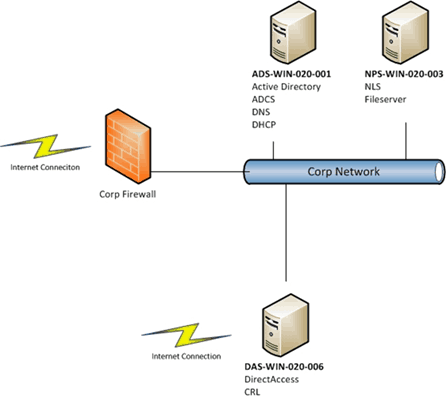
Servers
| ADS-WIN-020-001 | ADS, ADCS, DNS, DHCP | 10.10.XXX.XXX |
| NPS-WIN-020-003 | Network Location Server, Fileserver | 10.10.XXX.XXX |
| DAS-WIN-020-006 | DirectAccess Server, CRL | 10.10.XXX.XXX |
All this Servers are Virtual Machines based on Microsoft Hyper-V 2008 R2, on the following Hyper-V Hosts.
Hyper-V Hosts
| Hyperv01 | 10.10.XXX.XXX |
| Hyperv02 | 10.10.XXX.XXX |
| Hyperv03 | 10.10.XXX.XXX |
Groups
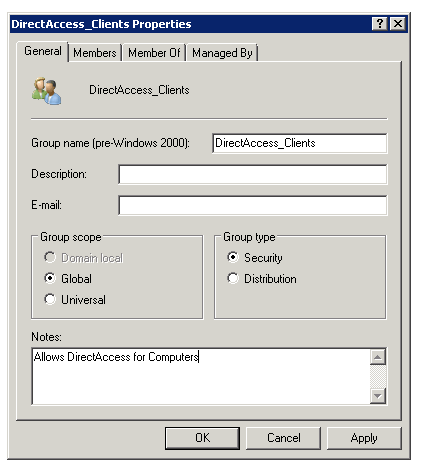
| DirectAccess_Clients | Computer Accounts for DirectAccess |
Network Overview
Group Policies
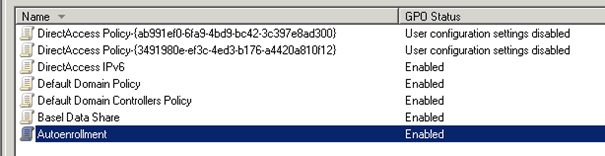
| DirectAccess IPV6 | Firewall Rule for ICMPv6 echo |
| Autoenrollment | Certificate Autoenrollment |
| DirectAccess Policy | Created by DirectAccess |
| DirectAccess Policy | Created by DirectAccess |
Step by Step Deployment
Make your Environment Ready
Active Directory Domain Services
Installing the Active Directory Domain Service is nothing special, in our lab environment we used an already existing Active Directory Domain.
The only other thing you need is a Security Group for Active Directory Computer Accounts which are allowed to use DirectAccess.
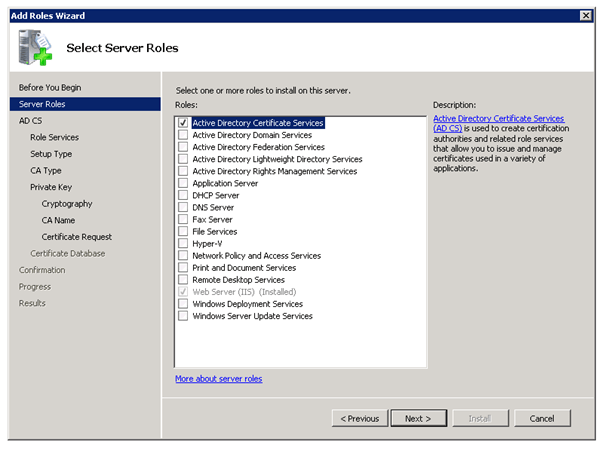
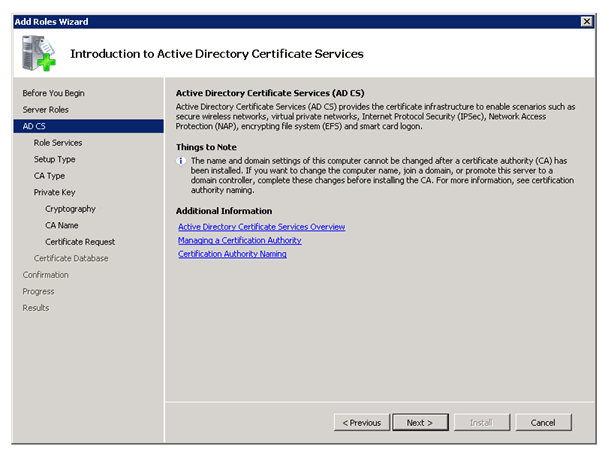
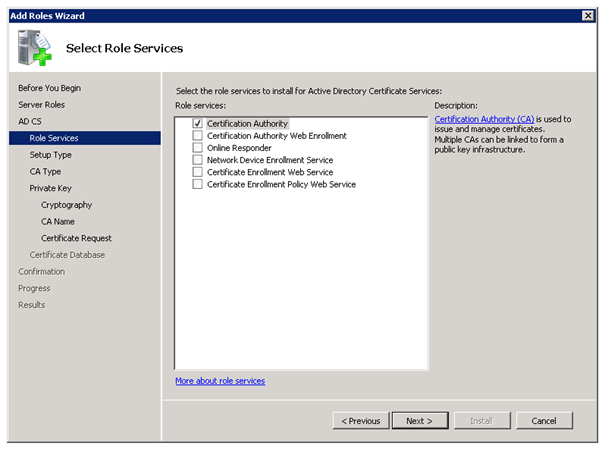
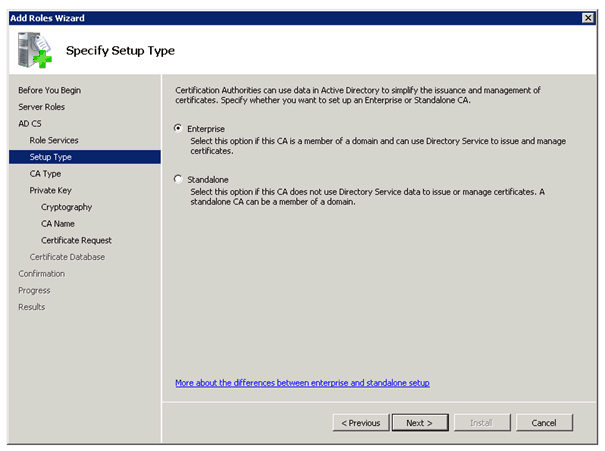
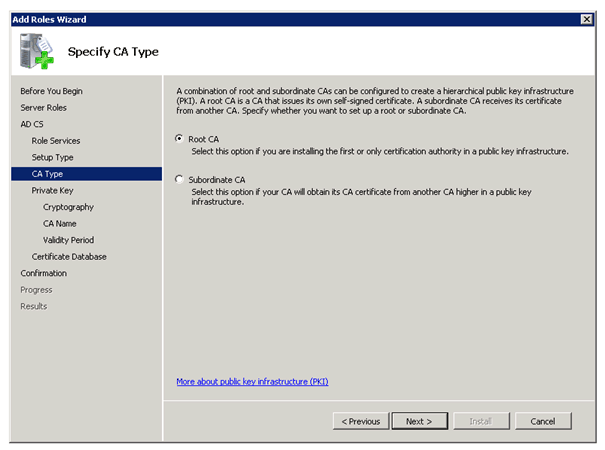
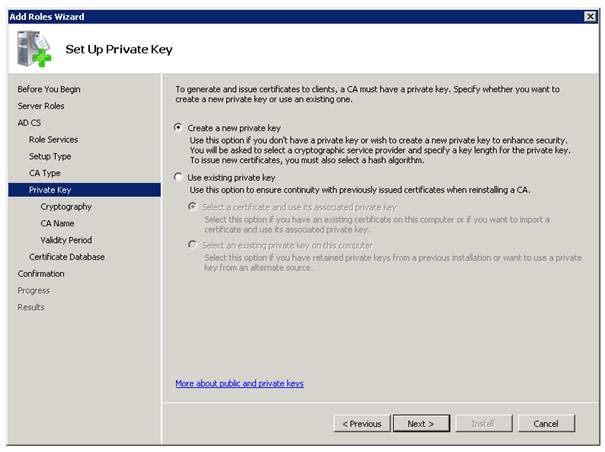
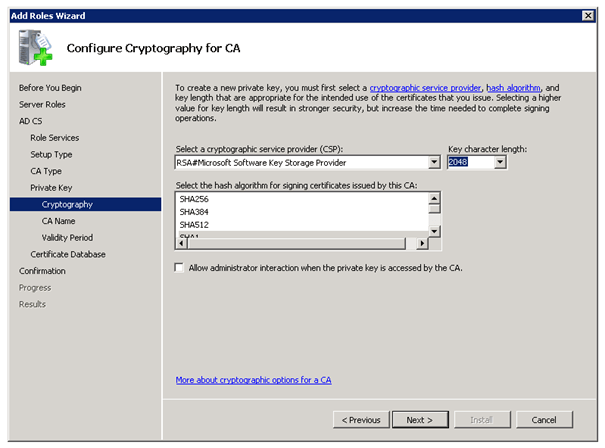
Active Directory Certificate Services
To use DirectAccess you need the Active Directory Certificate Services. If you don’t have a working PKI yet, you can use this step by step guide to deploy one.
DHCP Server
There is just one thing you have to make sure, if you don’t have implemented IPv6 in your environment you need to disable DHCPv6 stateless mode. You can do this by choosing Disable DHCPv6 stateless mode for this server in the DHCP Configuration Wizard.

DNS Server
Basically you just need the DNS Server and if you have installed your first Active Directory Server you already have the DNS role installed. There is no special configuration need at this moment; we just have to add some entries later.
Creating a new Certificate Template
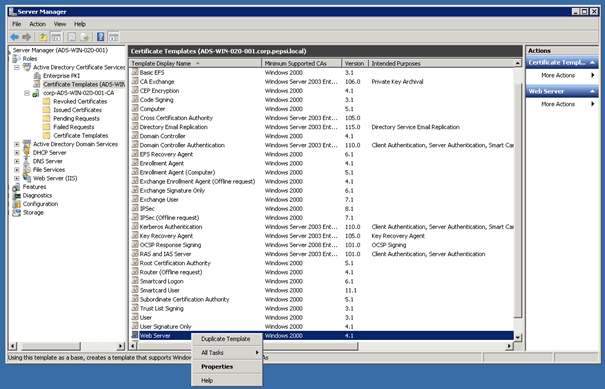
Right click on Webserver and Duplicate Template


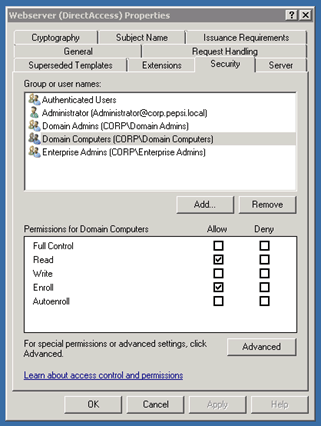

On the Security tab you have to Allow Enroll Permissions for Domain Computers and Authenticated Users.
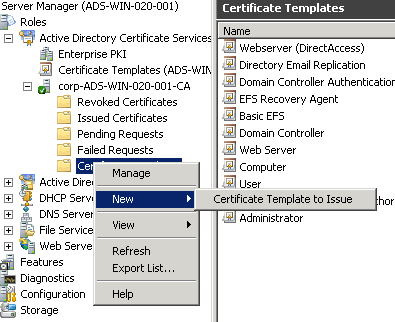
After creating this Certificate Template you have to add this to your CA Template Folder by right click New
à
Certificate Template to Issue and now choose your Certificate in this case Webserver (DirectAccess).
Create IPv6 ICMP Firewall Group Policy
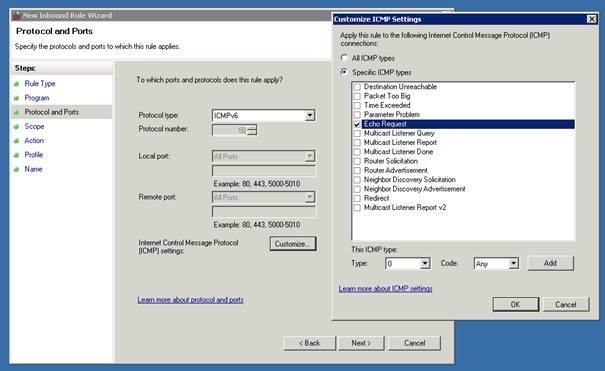
DirectAccess can only work if the systems can ping each other over IPv6 so we have to create an ICMPv6 Inbound and Outbound rule on each system or we do this over Group Policy which is much simpler and quicker.
First open the Group Policy Management MMC and create a new Group Policy Object and edit this. In this case we all the Group Policy Object DirectAccess IPv6.
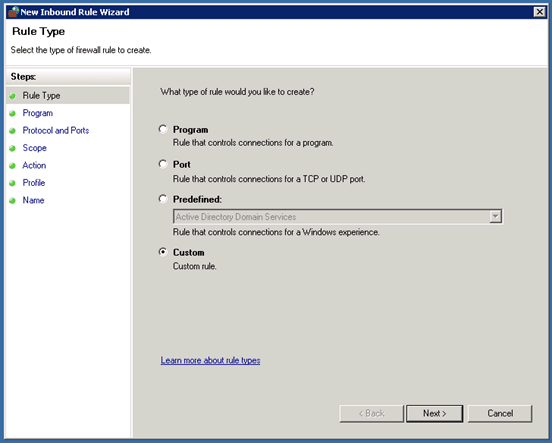
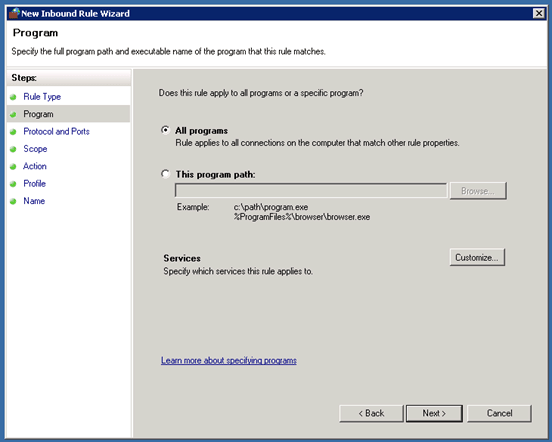
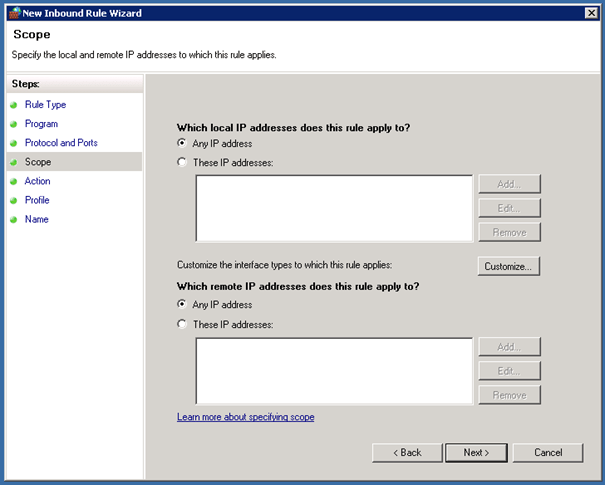
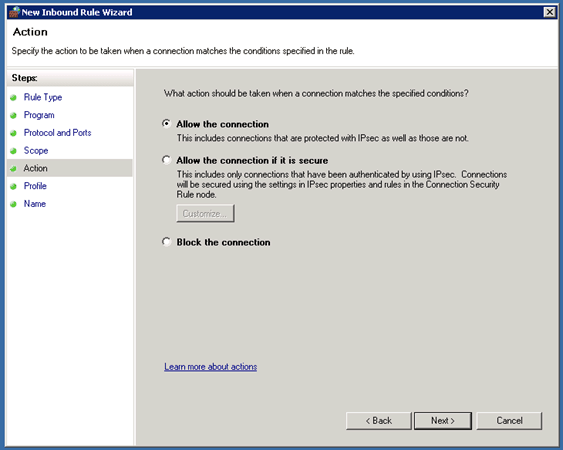
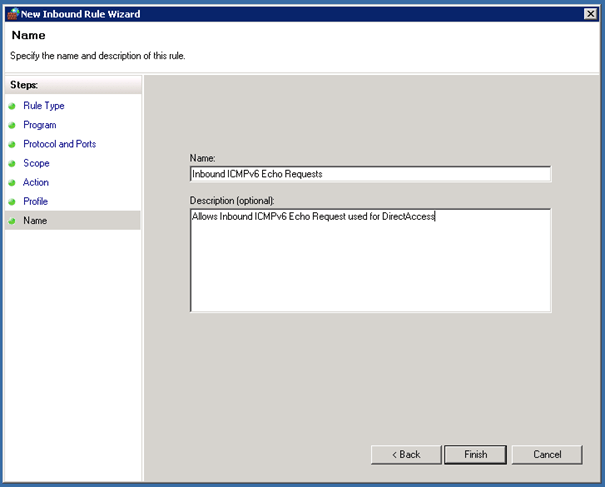
In the Group Policy Management Editor now navigate to Computer Configuration / Policies / Windows Settings / Security Settings / Windows Firewall with Advanced Security / Windows Firewall with Advanced Security. Now under Inbound Rules we create a new rule in our case named Inbound ICMPv6 Echo Requests.
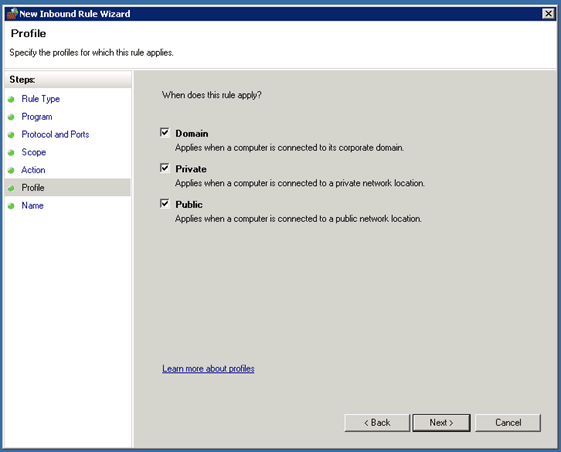
After you have created the Inbound rule, you also have to create an Outbound rule with the same settings as the Inbound rule.
After you have created this Group Policy Object remember to add this to your domain.
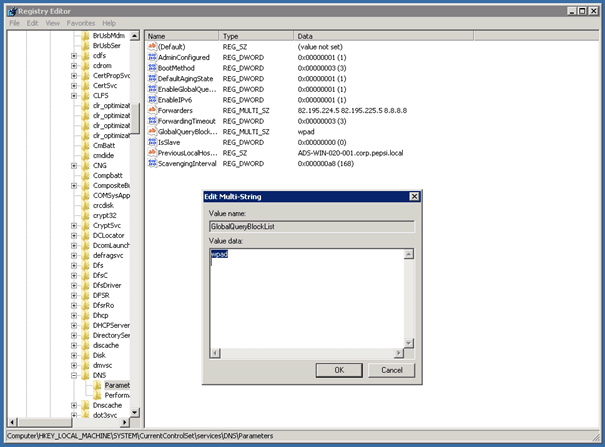
Remove ISATAP from DNS global block list
To remove the ISATAP entry from the DNS global block list you can use the following command:
Dnscmd /config /globalqueryblocklist wpad
This removes the value isatap from the registry key REG_MULTI_SZ “GlobalQueryBlockList” under:
HKEY_LOCAL_MACHINE\SYSTEM\CurrentConrtolSet\Services\DNS\Parameters
On the second DNS Server I did the same. I used Powershell Remoting to do that, you can also connect via Remote Desktop and run the command.
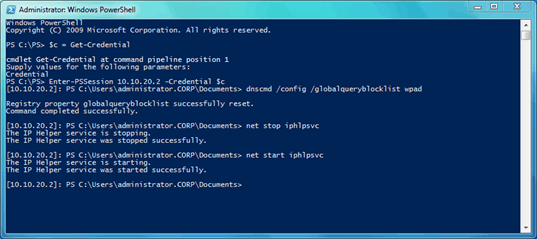
With net stop iphlpsvc and net start iphpsvc you can restart the IP helper service on the DNS server.
More about ISATAP: http://en.wikipedia.org/wiki/ISATAP
Certificate Revocation List
Now if you work with certificates you need a CRL (Certificate Revocation List). We simply deploy this on our DirectAccess Server, you could use every other Server in your environment, but the server needs to be accessible from the Internet.
Setup IIS-Website
First we install the standard IIS role.
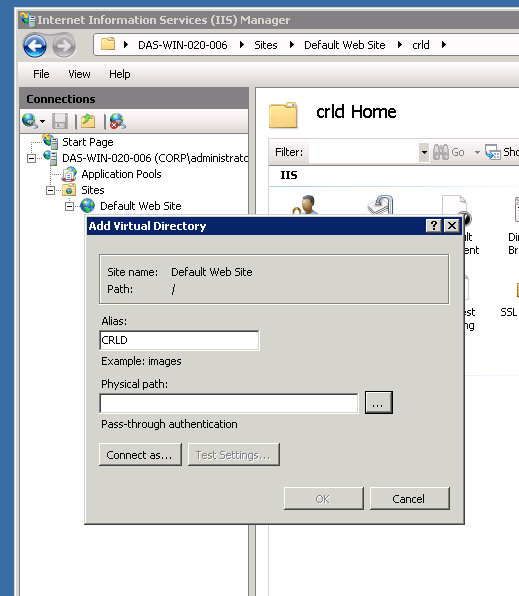
Now we add a Virtual Directory to the Default Website (right click on Default Web Site and Add Virtual Directory).
Under Physical path you need to add a path which the CA saves the Revocation List. So we will create a network share for this directory later.
In our case we used C:\inetpub\wwwroot\crld

Now on the properties of this Virtual Directory you can now click on Directory Browsing.
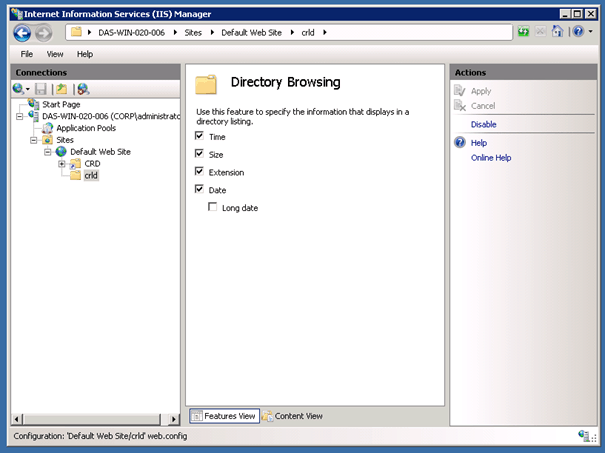
Now you can enable Directory Browsing by pressing Enable on the Actions menu.
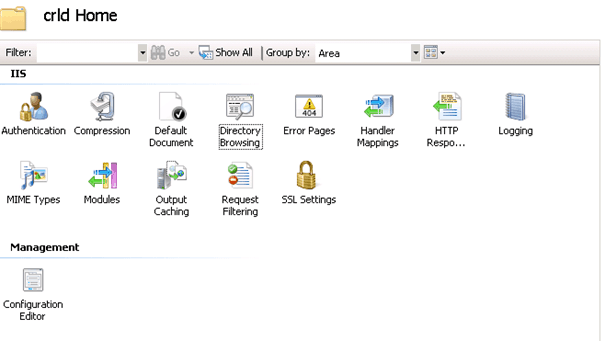
Now in the Configuration Editor we have also to add a setting for requestFiltering.
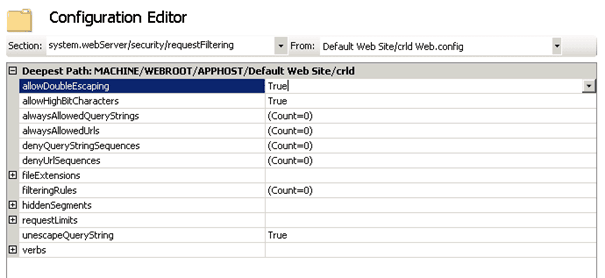
Under system.webServer/security/requestFiltering set allowDoubleEscaping to true.
Create Share for CRL
Create a share on the directory we used for our Virtual Directory (In our case we used C:\inetpub\wwwroot\crld).

And grant Full Control for the CA Computer account.
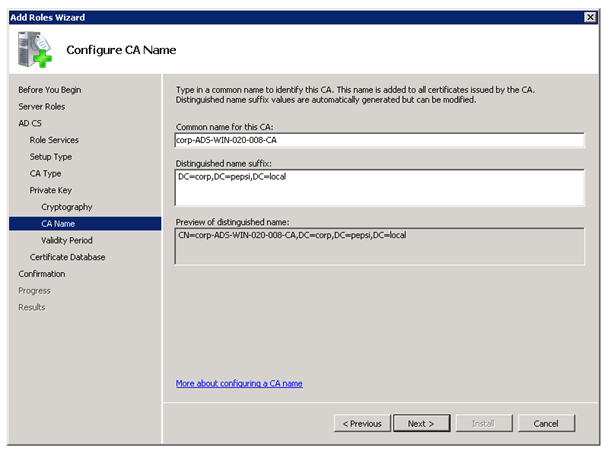
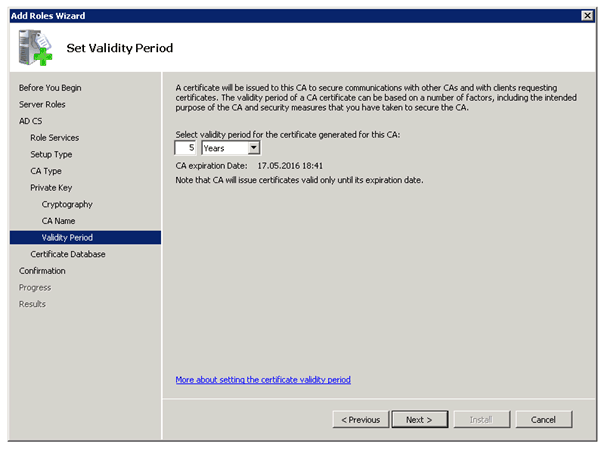
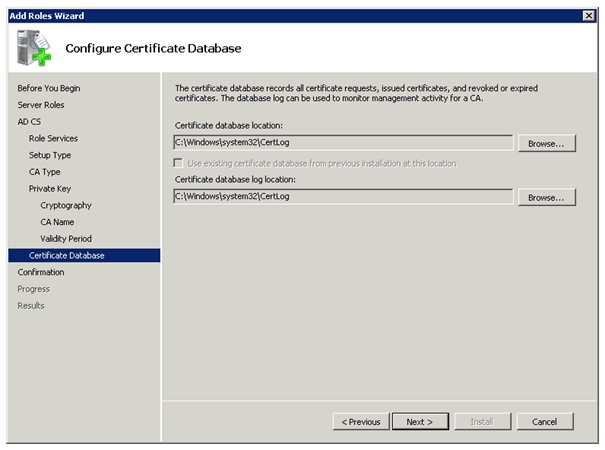
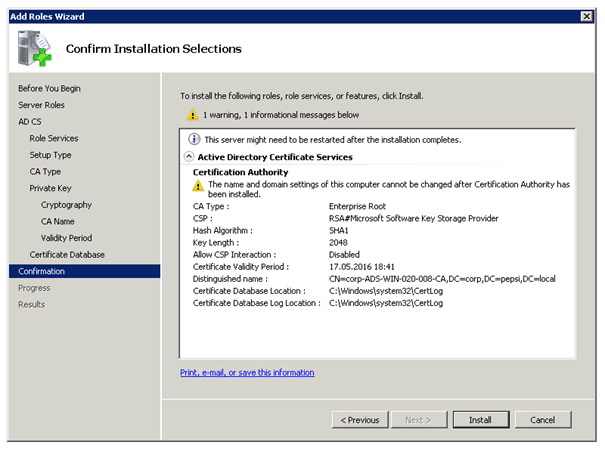
CA Configuration
Basically we now have to publish the CRL from the CA to the CRL webserver we just created. And Clients can check now the CRL from the Webserver over http.
Create External DNS Entries
Create the following A Records for your external domain. In this case our external domain is microsoft-engineering.ch and we create a sub domain called clr.microsoft-engineering.ch and point to the external IP address which the CRL is available.
This is mostly done by our external Hosting Provider.
| crl.microsoft-engineering.ch | A Record | 234.234.233.121 |
You also have to create another A Record for DirectAccess.
| directaccess.microsoft-engineering.ch | A Record | 234.234.233.121 |
IMPORTANT: for the DirectAccess A Record you have to use the first external IP Address. If your external DirectAccess IP Addresses are 234.234.233.121 and 234.234.233.122 you create the A Record only for 234.234.233.121. Not for the second one and not for both.
Configure CRL Distribution Point
On the Server which has the CA role installed you start the Certification Authority Management Console.
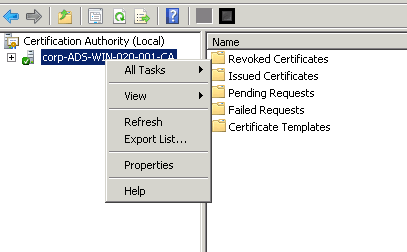
Right click Properties
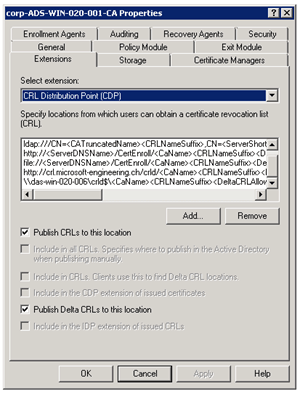
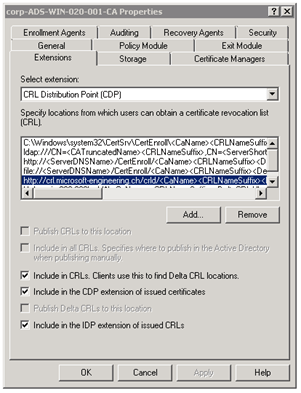
Under the Extensions Tab, select the extension CRL Distribution Point (CDP).
Now click on Add.. and add the external Connection first, by adding the external address:
http://crl.microsoft-engineering.ch/crld/<CaName><CRLNameSuffix><DeltaCRLAllowed>.crl
IMPORTANT: Do not forget the .crl at the end
Click OK and add the select the following checkboxes
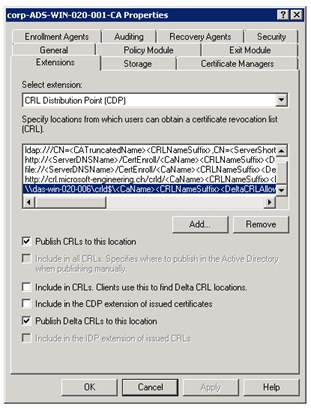
Now add the second entry and this time for the internal connection to the network share.
\\das-win-020-001\crld$\<CaName><CRLNameSuffix><DeltaCRLAllowed>.crl
Click OK and select the following checkboxes
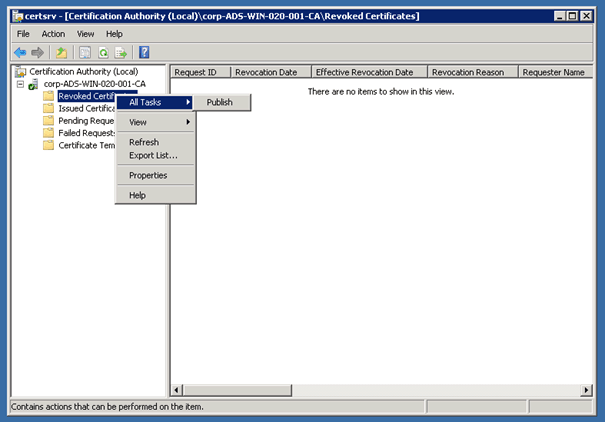
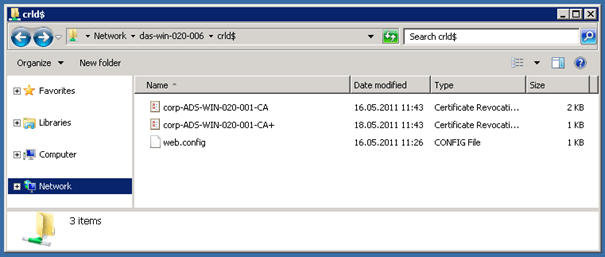
Verify the CRL Distribution
If you now check the network share it should not see any file except the web.config file. If you now right click on Revoked Certificates / All Tasks / Publish it should publish two new files to the network share.
Configure Auto Enrollment for Computer Certificates
To configure Auto Enrollment for Computer Certificate we create another Group Policy. In this case we called this Autoenrollment.
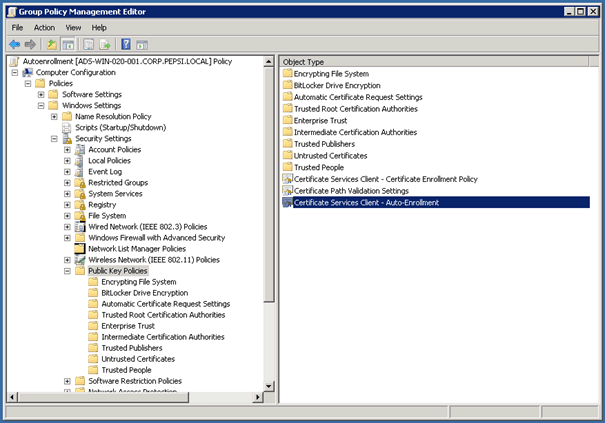
Navigate to Computer Configuration / Policies / Windows Settings / Security Settings /Public Key Policies
Edit the Certificate Services Client – Auto-Enrollment
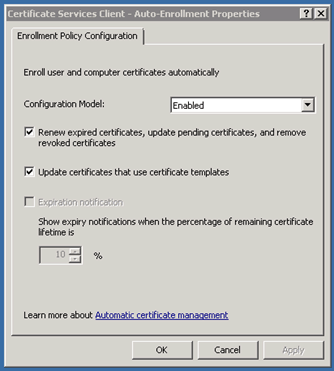
Use the settings from the screenshot
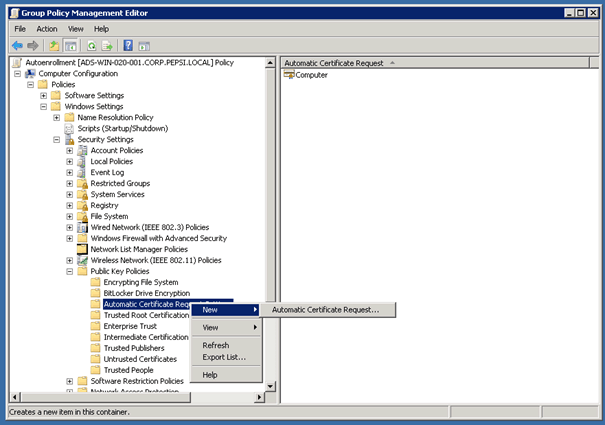
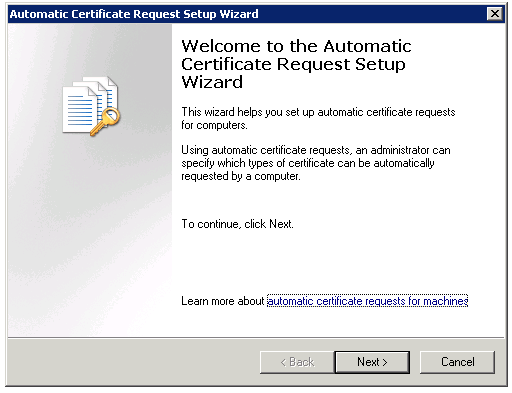
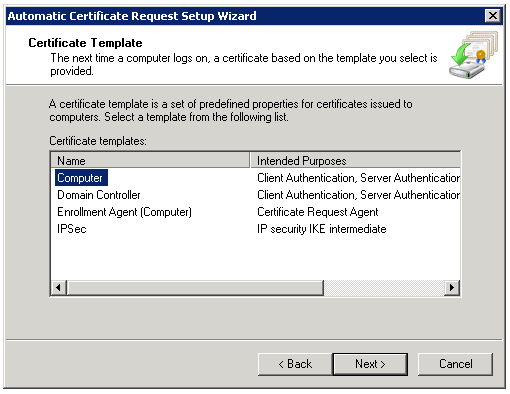
Now run the Automatic Certificate Request Wizard
And don’t forget to add this new Group Policy to your Domain.
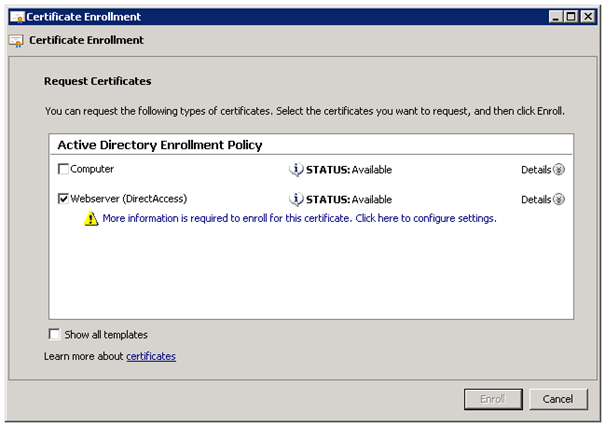
Request Certificate for DirectAccess Server
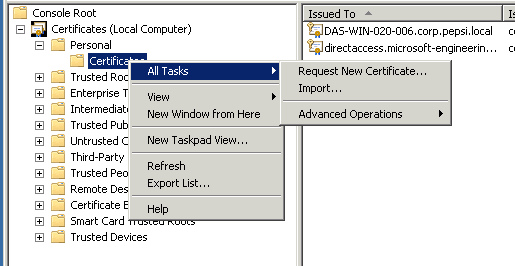
On the DirectAccess Server open a MMC and add the Snap-in Certificates for local Computer account.

Now navigate to Certificates / Personal and click right on Certificates. Now click on All Tasks and Request Certificate.
Now select your template in our case we called this Webserver (DirectAccess). You also need to add some information to this certificate.

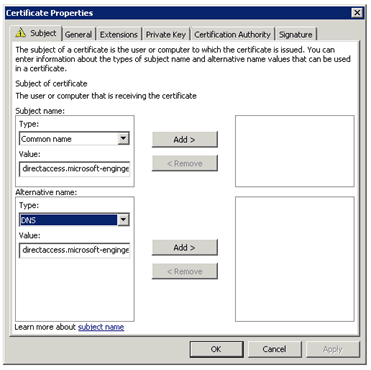
Add a Common Name and as alternative name DNS and use your public DirectAccess domain, for which you have created the A Record. In our example environment we used directaccess.microsoft-engineering.com.
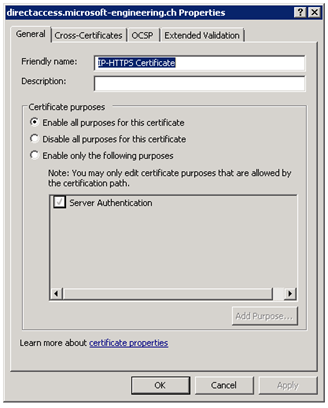
After you have added this certificate it is recommended that you add a friendly name to this Certificate, so you can better find this certificate later.
Network Location Server
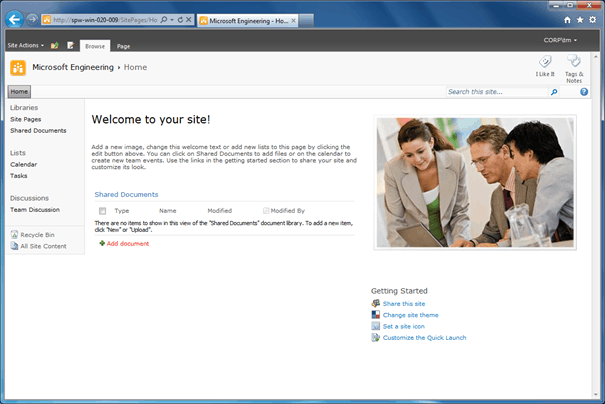
The Network Location Server is basically just a webserver. In this environment we used a simple IIS installation on our fileserver, it could also be a SharePoint site or a existing website or installation of IIS.
With the Network Location Server DirectAccess clients check their location (Internal or external).
So basically this is has to be a server which is a member of the Domain and you IIS is installed or you can install the IIS server role. The server does not need to be reachable from external.
Now first add the DirectAccess webserver certificate to the Server. You can do the same as with the DirectAccess Server.
IMPORTANT: in a productive environment, the Network Location Server should be high available. If the NLS is not available all DirectAccess clients will try to connect over the DirectAccess to the network, even if they are at the local company network.
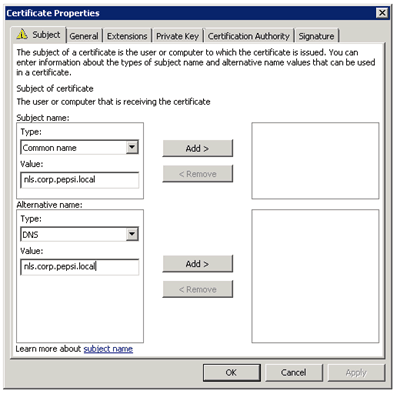
Open the MMC and add the Certificate Snap-In. Request a new Certificate:
As on the DirectAccess server you have to add some information for the certificate.
Add a Common Name and as alternative name DNS and use your internal domain, for which you have created the A record. In our example environment we used corp.pepsi.local.
Next step is to create an HTTPS binding for the site nls.corp.pepsi.local and create a DNS CNAME on your local DNS Server for nls.corp.pepsi.local which points to the Server where the NLS Website runs.
On this Server we now add a binging for HTTPS. Open the IIS Manager right click on the Default Website, or the Website you want to use for NLS, and Edit Bindings.
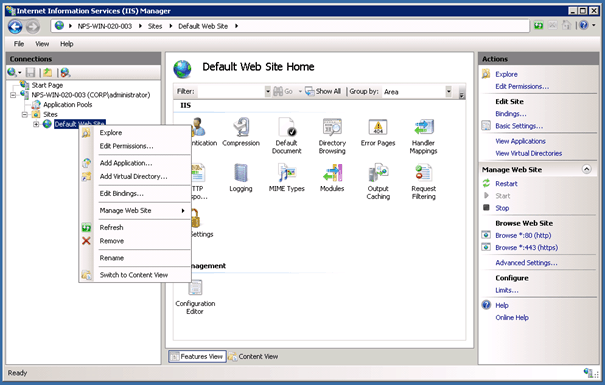
Now Add Binding.
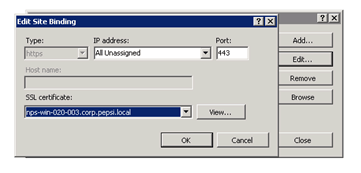
Now later in the DirectAccess installation you need to add the URL for this website location (http://nls.corp.pepsi.local). The webserver needs to send back status code 200. Which means send back a simple OK.
DirectAccess Server
The Direct Access Server is a Windows Server 2008 R2 Server which has an internal and an external network interface. The external network interface must have two external IP addresses.
So you should have two network adapters, and it’s recommended two name them correctly, for example internal and external. We used DA1 for DirectAccess (external) and Local Area Network for the internal adapter.
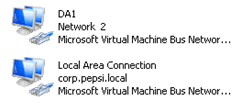
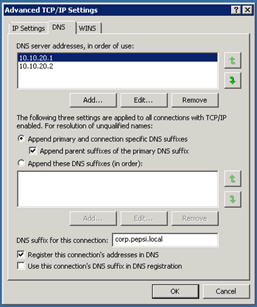
You also should set the DNS-Suffix for the internal connection.
Install DirectAccess
After we finished all these requirements we are now ready to install the DirectAccess feature on our DirectAccess Server.
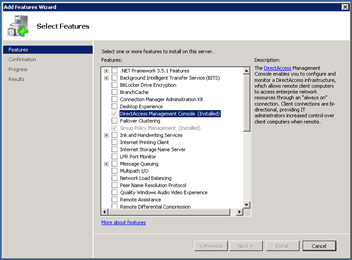
Installing the feature DirectAccess Management Console will automatically add the feature Group Policy Management Console.
After you have installed the DirectAccess feature you should get the following console. By the way no reboot is needed.

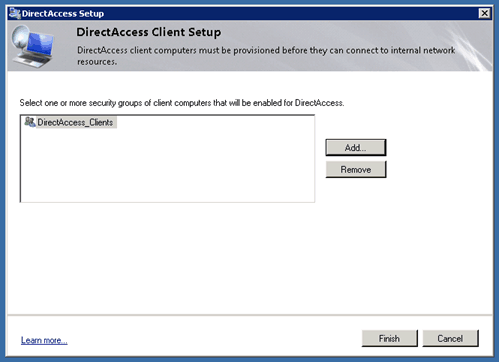
Step 1
In Step 1 add the group with Computer Clients you have created in the Active Directory.
Step 2
In Step 2 you define the network interfaces and certificates.
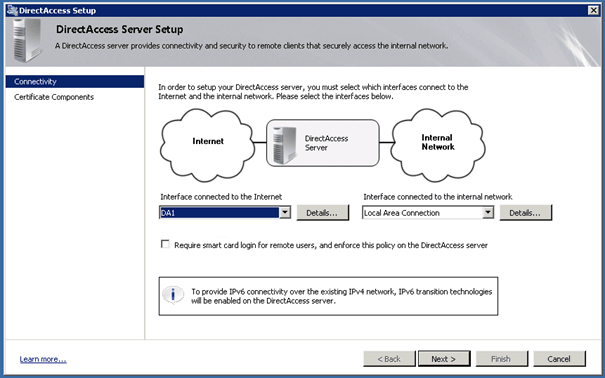
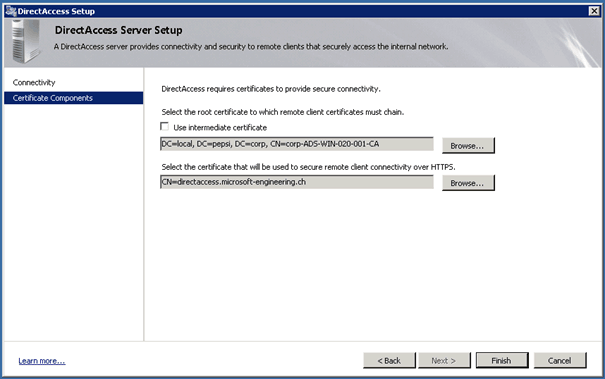
The first certificate is the CA certificate and the second one is the external certificate, in this case for directaccess.microsoft-engineering.ch.
Step 3
In Step 3 you define the Network Location Server
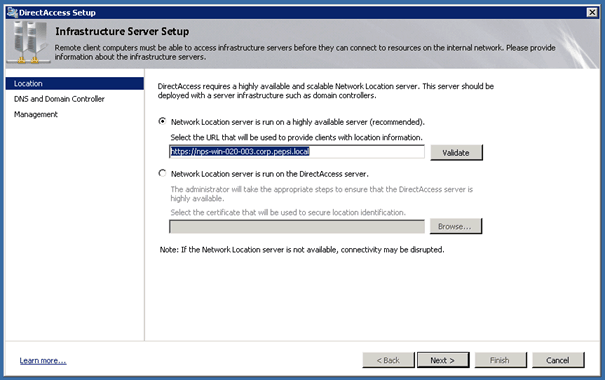

After the click of next it will automatically add the DNS Suffix of the Domain and the name of the Network Location Server.
You can now add the Infrastructure Servers which can access the DirectAccess clients. This could make sense for Management Server or WSUS Servers.
Step 4
In Step for you could add an additional end-to-end authentication.
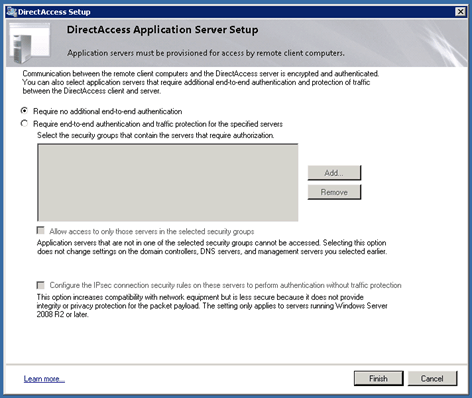
After you click on the finish button you will get an overview of all the settings.
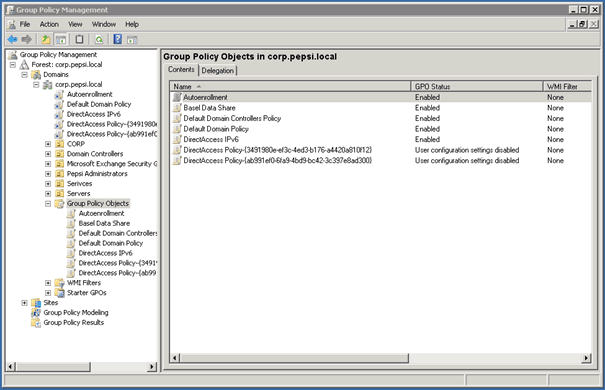
If you now open the Group Policy Management Console you will see that DirectAccess has automatically created two new Group Policies.
Everything Working
After you are done and you don’t have any visible error, DirectAccess should work properly.
On your DirectAccess client you should have access to your company network all the time.
Even Internal DNS Request should work.

Basic Troubleshooting
Checks
Check for DirectAccess Group Policy
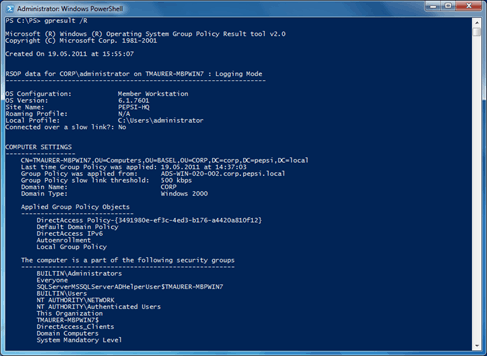
With gpresult you can check on the client if the DirectAccess Group Policy is working on the client.
gpresult /R
This shows all GPO’s deployed to the client.
If the GPO is not all ready deploy to the host you can run a gpupdate /force
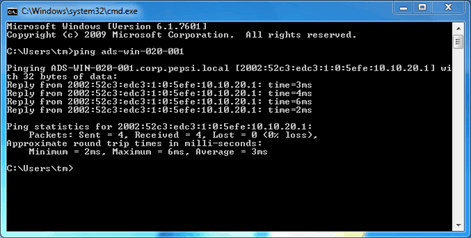
Check Connection
With IPCONFIG you can check if there is a connection
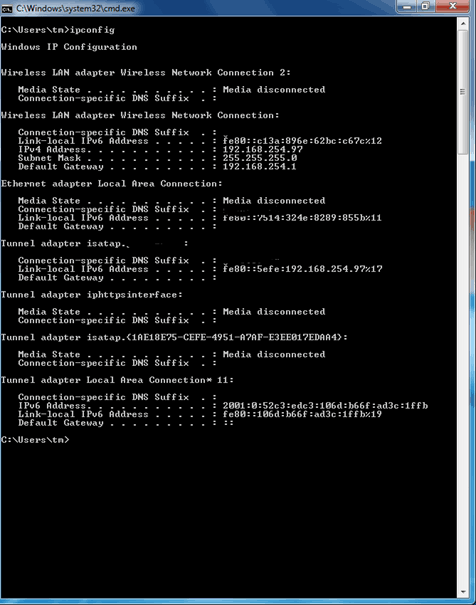
You can see a Tunnel adapter with an IPv6 address beginning with 2001:
Also a ping to a domain client should work
Links and Documents
DirectAccess Deployment and Troubleshooting Guides
http://www.microsoft.com/downloads/en/details.aspx?displaylang=en&FamilyID=647222d1-a41e-4cdb-ba34-f057fbc7198f
Technical Overview of DirectAccess in Windows 7 and Windows Server 2008 R2
http://www.microsoft.com/downloads/en/details.aspx?FamilyID=64966E88-1377-4D1A-BE86-AB77014495F4
Test Lab Guide: Demonstrate DirectAccess
http://www.microsoft.com/downloads/en/details.aspx?FamilyID=8D47ED5F-D217-4D84-B698-F39360D82FAC
Windows 7 and Windows Server 2008 R2 DirectAccess Executive Overview
http://www.microsoft.com/downloads/en/details.aspx?FamilyID=D8EB248B-8BF7-4798-A1D1-04D37F2E013C
Windows 7 and Windows Server 2008 R2 DirectAccess IT Infrastructure Compatibility
http://www.microsoft.com/downloads/en/details.aspx?FamilyID=25B453B4-2DB7-435D-88B5-5C3B81DE249C
Wikipedia ISATAP
http://en.wikipedia.org/wiki/ISATAP
German DirectAccess Guide
http://technikblog.rachfahl.de/technik/howto-einrichtung-von-directaccess/


Hi,
I am following your article to deploy direct access in our environment we have 200 users but our datacenter is some where else. We have a DHCP server installed where clients are located and we are not allowed to create a DHCP server in our datacenter. In this case what should we do. Please help.
Thanks