
In this blog post we are going to have a look at how you can deploy a single-node Azure Kubernetes Service (AKS) cluster on Windows Server running on-premises in your hybrid cloud environment and connect it with Azure Arc.
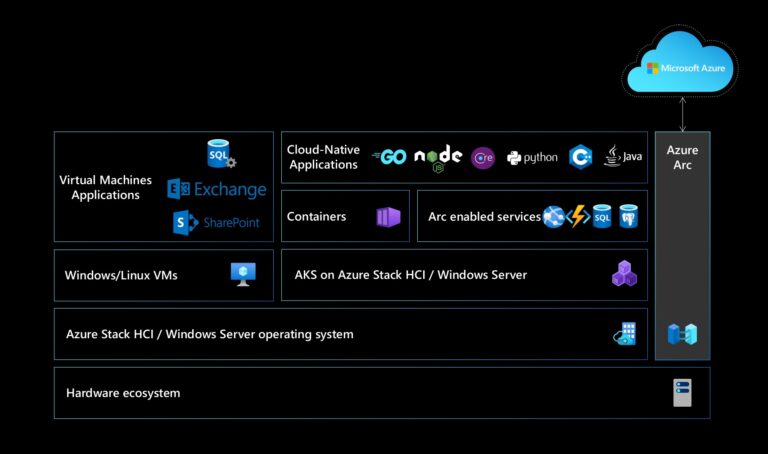
Many customers want to modernize their application landscape and are using managed Kubernetes services from cloud providers such as the Azure Kubernetes Service (AKS) on Microsoft Azure. Many of these organizations also require running Kubernetes on-premises in their hybrid cloud and edge environment. With Microsofts offering you can deploy the Azure Kubernetes Service (AKS) on-premises on Windows Server, Azure Stack HCI or Azure Stack Hub.
If you want to run AKS on-premises in product obviously you will need to deploy a Windows Server Hyper-V, Azure Stack HCI, or Azure Stack Hub cluster, however, if you just want to evaluate AKS or run it in a development environment, you can also run it on a single-node Windows Server with Hyper-V.
Prerequisites
If you want to run a single-node AKS on a Windows Server, there are a couple of prerequisites.
- An Azure subscription to register the AKS cluster
- 32 GB of memory or more depending on the workloads
- Minimum of 500GB direct attached storage (Data drive)
- Networking
- One Network Adapter
- Verify that you have disabled IPv6 on all network adapters.
- Must have external internet connectivity.
- Make sure all subnets you define for the cluster are routable amongst each other and to the internet.
- Make sure that there’s network connectivity between the Windows Server host and the tenant VMs.
- DNS name resolution is required for all nodes to be able to communicate with each other.
- (Recommended) Enable dynamic DNS updates in your DNS environment to allow AKS on Azure Stack HCI and Windows Server to register the cloud agent generic cluster name in the DNS system for discovery. If dynamic DNS isn’t an option, use the steps prescribed in ‘Set-AksHciConfig’.
To learn more about the AKS on Azure Stack HCI or Windows Server prerequisites, check out Microsoft Docs.
Set up an Azure Kubernetes Service host Windows Server and deploy a workload cluster using PowerShell
Now before we get started, I want to mention that you can also set up the AKS on Windows Server cluster using Windows Admin Center, you can find more here on Microsoft Docs. However, I prefer the PowerShell way.
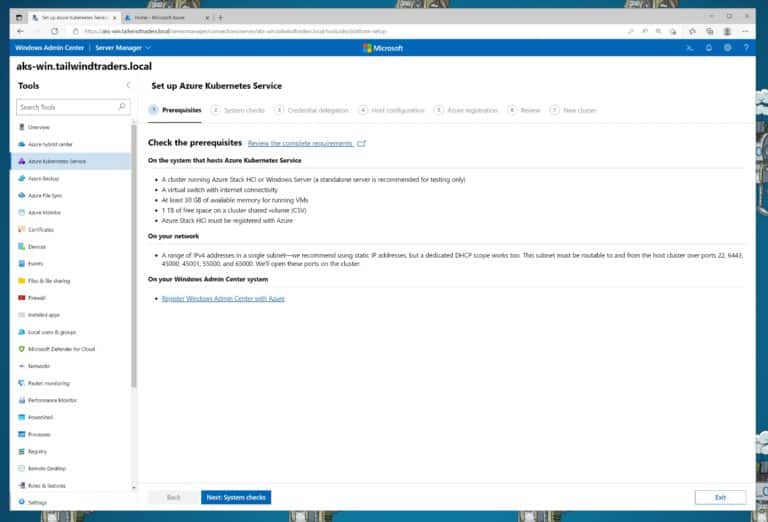
Windows Admin Center provides a super straight forward wizard to install AKS on Windows Server or Azure Stack HCI.
Set up Hyper-V
First set up Hyper-V on your Windows Server and create a virtual switch.
# Install the Hyper-V Role
Install-WindowsFeature  "Hyper-V" -IncludeAllSubFeature -IncludeManagementTools -Restart
# After the reboot create the virtual Switch
New-VMSwitch -Name VirtualSwitch -NetAdapterName Ethernet -AllowManagementOS $true
# Set Default Storage Path
Set-VMHost -VirtualHardDiskPath "E:\VMs" -VirtualMachinePath "E:\VMs"
# Disable IPv6 on all network adapters
Disable-NetAdapterBinding -Name "*" -ComponentID ms_tcpip6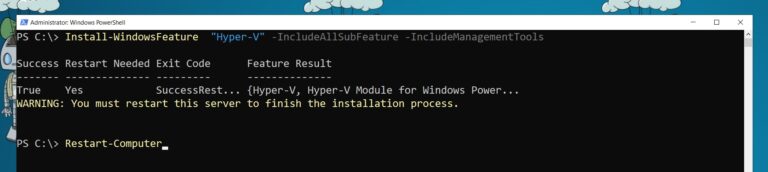
Install the AksHci PowerShell module
If you have not installed the AksHci PowerShell module, run the following commands to install the modules. You must close all existing PowerShell windows and open a fresh administrative session to install the pre-requisite PowerShell packages and modules.
# Prepare PowerShell
Install-PackageProvider -Name NuGet -Force
Install-Module -Name PowershellGet -Force -Confirm:$false -SkipPublisherCheck
# Install PowerShell modules
Install-Module -Name Az.Accounts -Repository PSGallery -RequiredVersion 2.2.4
Install-Module -Name Az.Resources -Repository PSGallery -RequiredVersion 3.2.0
Install-Module -Name AzureAD -Repository PSGallery -RequiredVersion 2.0.2.128
Install-Module -Name AksHci -Repository PSGallery
# Import PowerShell modules
Import-Module Az.Accounts
Import-Module Az.Resources
Import-Module AzureAD
Import-Module AksHci
# Validate your installation
Get-Command -Module AksHci
Register the resource provider to your Azure subscription and login to Azure
Before the registration process, you need to enable the appropriate resource provider in Azure for AKS on Azure Stack HCI and Windows Server registration. To do that, run the following PowerShell commands.
# Login
Connect-AzAccount -Tenant <tenantId> -DeviceCode
Set-AzContext -Subscription "xxxx-xxxx-xxxx-xxxx"
# Register Resource Providers
Register-AzResourceProvider -ProviderNamespace Microsoft.Kubernetes
Register-AzResourceProvider -ProviderNamespace Microsoft.KubernetesConfiguration
To validate the registration process, run the following PowerShell command:
# Verify
Get-AzResourceProvider -ProviderNamespace Microsoft.Kubernetes
Get-AzResourceProvider -ProviderNamespace Microsoft.KubernetesConfiguration
Prepare your machine for deployment
Run checks on every physical node to see if all the requirements are satisfied to install AKS on Azure Stack HCI and Windows Server. Open PowerShell as an administrator and run the following Initialize-AksHciNode command.
Initialize-AksHciNode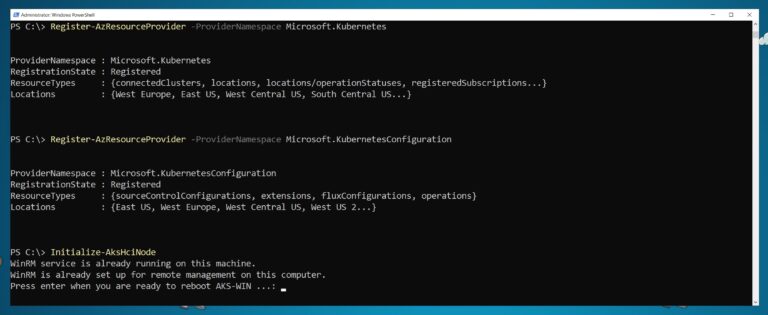
Create a virtual network using the virtual switch earlier. If you don’t remember the name, use the Get-VMSwitch command to find the virtual switch.
To create a virtual network for the nodes in your deployment to use, create an environment variable with the New-AksHciNetworkSetting PowerShell command. This will be used later to configure a deployment that uses static IP.
#Set up vNet with static IP
$vnet = New-AksHciNetworkSetting -name myvnet -vSwitchName "VirtualSwitch" -k8sNodeIpPoolStart "172.21.21.21" -k8sNodeIpPoolEnd "172.21.21.49" -vipPoolStart "172.21.21.51" -vipPoolEnd "172.21.21.120" -ipAddressPrefix "172.21.21.0/24" -gateway "172.21.21.1" -dnsServers "172.21.21.11"
To create the configuration settings for the AKS host, use the Set-AksHciConfig command. You must specify the imageDir, workingDir, and cloudConfigLocation parameters. If you want to reset your configuration details, run the command again with new parameters.
Set-AksHciConfig -imageDir E:\Images -workingDir E:\ImageStore -cloudConfigLocation E:\Config -vnet $vnet -cloudservicecidr "172.21.21.121/24"Run the following Set-AksHciRegistration PowerShell command with your subscription and resource group name to log into Azure. You must have an Azure subscription, and an existing Azure resource group in the Australia East, East US, Southeast Asia, or West Europe Azure regions to proceed.
Set-AksHciRegistration -subscriptionId "<subscriptionId>" -resourceGroupName "<resourceGroupName>" -TenantId "<tenantId>" -UseDeviceAuthentication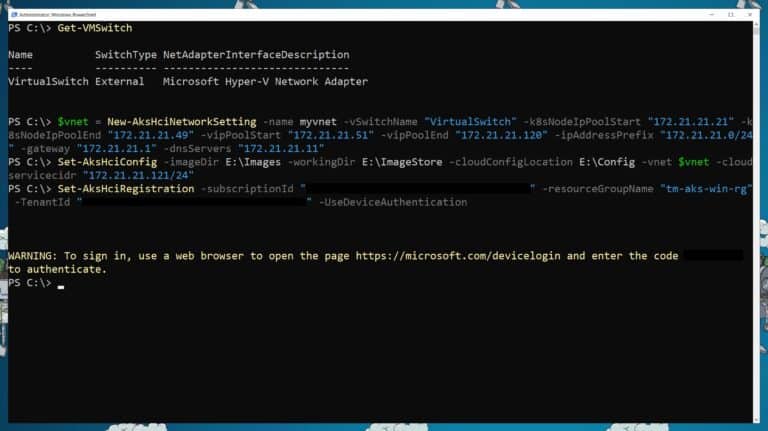
After you’ve configured your deployment, you must start it to install the AKS on Azure Stack HCI and Windows Server agents/services and the AKS host. To begin deployment, run the following commands:
# More detail
$VerbosePreference = "Continue"
# Install AKS on Windows Server
Install-AksHci
This will also download the necessary images for the Azure Kubernetes Service (AKS) cluster.

Manage your AKS on Windows Server deployment
You can now manage your AKS on Windows Server deployment using PowerShell or Windows Admin Center.

You can also see the deploy virtual machines for the AKS services and the future Kubernetes clusters you create in Hyper-V Manager

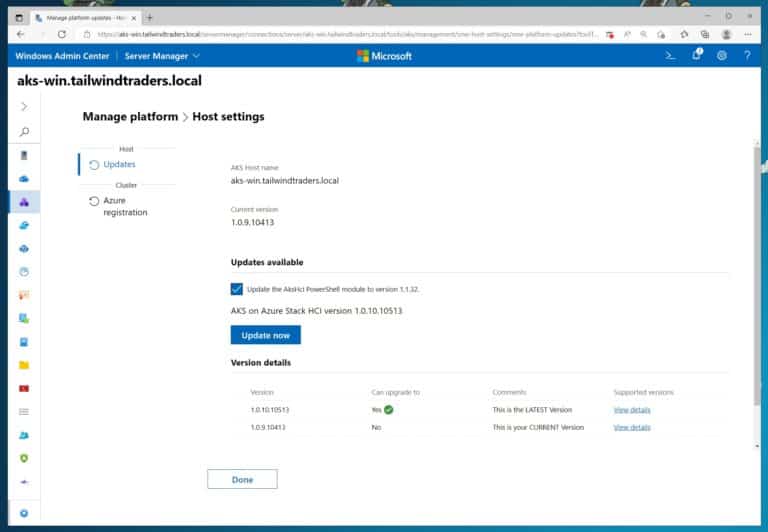
If you need to update your Azure Kubernetes Cluster (AKS) on Azure Stack HCI or Windows Server, you can simply open the host settings.
Create a Kubernetes Cluster
After installing your AKS host, you are ready to deploy a Kubernetes cluster. To create a new Kubernetes cluster on AKS on Windows Server, you can use PowerShell or Windows Admin Center.
PowerShell
Open PowerShell as an administrator and run the following New-AksHciCluster command. This command will create a new Kubernetes cluster with one Linux node pool named linuxnodepool with a node count of 2. To read more information about node pools, visit Use node pools in AKS on Azure Stack HCI and Windows Server.
New-AksHciCluster -name mycluster -nodePoolName linuxnodepool -nodeCount 2 -osType Linux
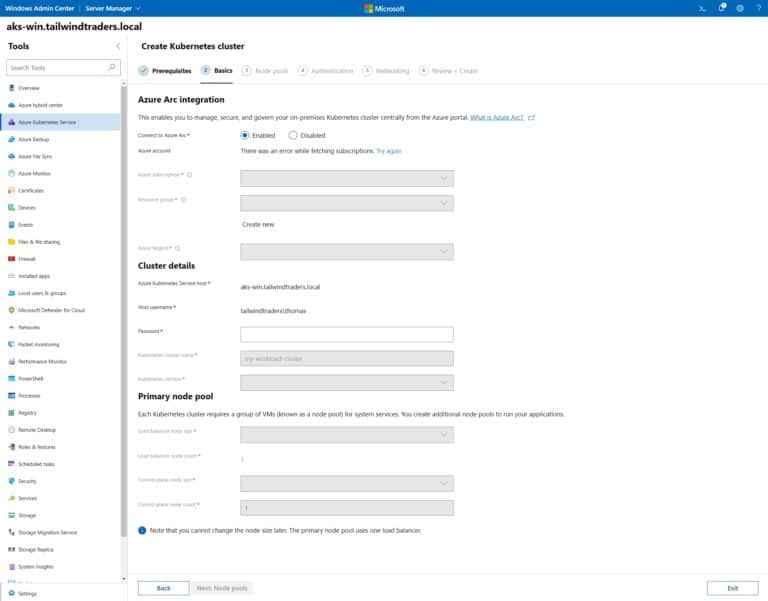
Windows Admin Center
Or use the web-based UI from Windows Admin Center following the wizard.
Connect your cluster to Azure Arc enabled Kubernetes
Connect your cluster to Arc enabled Kubernetes by running the Enable-AksHciArcConnection command. The command below connects your AKS on Windows Server cluster to Azure Arc.
Connect-AzAccount -Tenant <tenantId> -DeviceCode
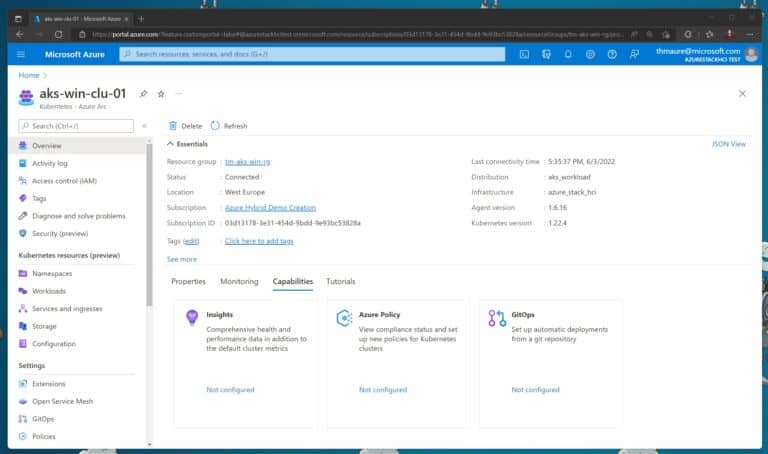
Enable-AksHciArcConnection -name myclusterNow you can view and manage your AKS on Windows Server running on-premises directly from the Azure portal using Azure Arc. This allows you to enable monitoring, use Microsoft Defender for Kubernetes, Azure Policy, configure GitOps, leverage role-based access control (RBAC), and much more.
Manage your Hybrid AKS Kubernetes Cluster on Windows Server
Access your cluster using kubectl
To access your Kubernetes clusters using kubectl, run the Get-AksHciCredential PowerShell command. This will use the specified cluster’s kubeconfig file as the default kubeconfig file for kubectl. You can also use kubectl to deploy applications using Helm.
If you haven’t installed kubectl on your Windows machine, you can simply do that using the following commands:
mkdir C:\kube
Start-BitsTransfer -Source "https://dl.k8s.io/release/v1.24.0/bin/windows/amd64/kubectl.exe" -Destination "C:\kube"
$Env:PATH += ";C:\kube"
Get-AksHciCredential -name mycluster
Monitoring with Azure Monitor using Azure Arc
Once your AKS cluster running on-premises is connected to Azure Arc you can enable Azure Monitor for containers. This is straight forwarded, just click on Insights, and enable Azure Monitor.
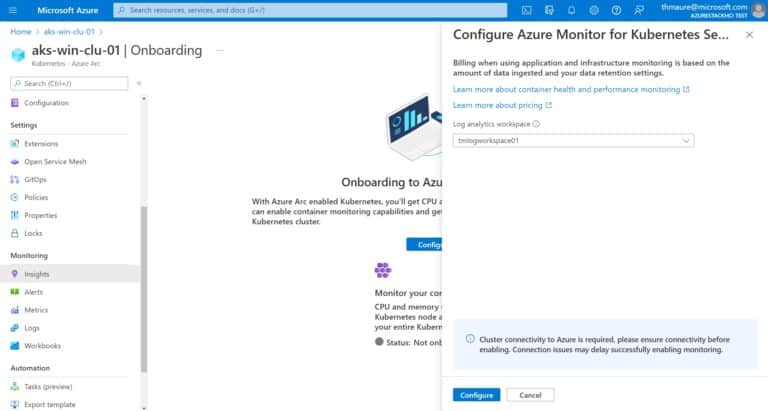
After enabling monitoring, you can review information about the AKS cluster on Windows Server directly in Azure Monitor, and you can also set up alerting.
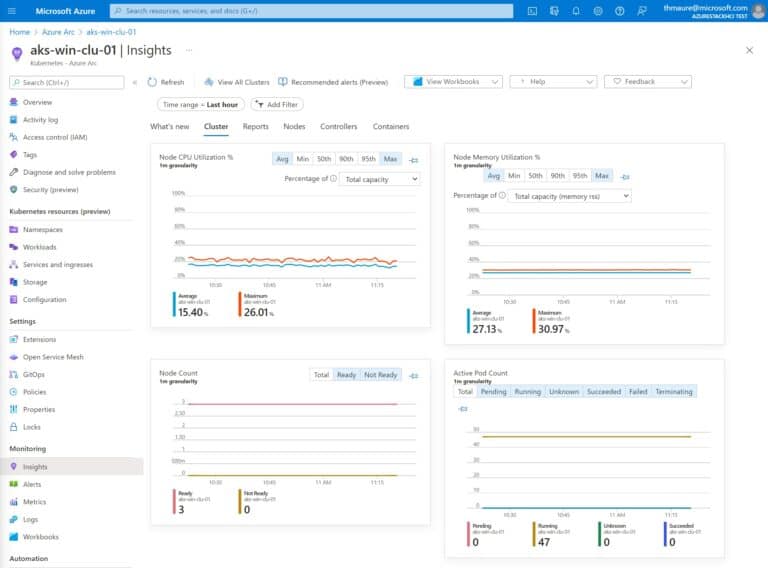

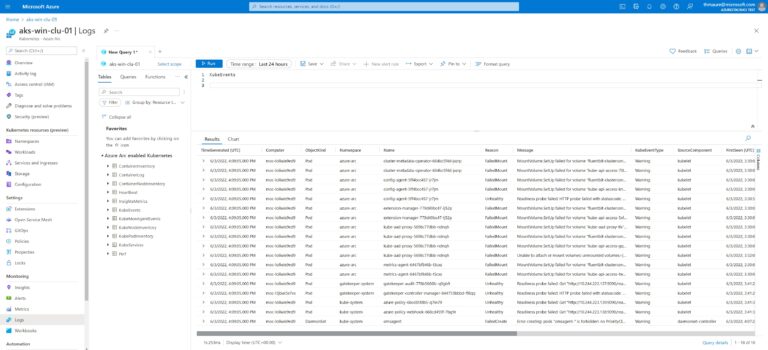
By enabling Azure Monitor you can also access the logs.
Scale a Kubernetes Cluster
If you need to scale your cluster up or down, you can change the number of control plane nodes using the Set-AksHciCluster command, and you can change the number of Linux or Windows worker nodes in your node pool using the Set-AksHciNodePool command.
To scale control plane nodes, run the following command.
Set-AksHciCluster -name mycluster -controlPlaneNodeCount 3To scale the AKS worker nodes in your node pool, run the following command.
Set-AksHciNodePool -clusterName mycluster -name linuxnodepool -count 3You can also use vertical node scaling in AKS on Windows Server & Azure Stack HCI to change the size of the virtual machines in each node pool to increase the resources available to your node pool.
# Show available VM sizes
Get-AksHciVmSize
# Set new VM size for the nodepool
Set-AksHciNodePool -ClusterName mycluster -name mycluster-linux -vmsize Standard_A4_v2
Security and GitOps for your Kubernetes cluster using Azure Arc
By connecting your Kubernetes cluster to Azure using Azure Arc, you can enable Microsoft Defender for Containers and Azure Policy to make sure your cluster is secure and compliant.
GitOps on Azure Arc-enabled Kubernetes or Azure Kubernetes Service uses Flux, a popular open-source tool set. Flux provides support for common file sources (Git and Helm repositories, Buckets) and template types (YAML, Helm, and Kustomize). Flux also supports multi-tenancy and deployment dependency management, among other features.
Run Azure services on-premises using Azure Arc
By deploying the Azure Kubernetes Service (AKS) on-premises and Azure Arc enabling it, you can also start running Azure services such as Azure Arc-enabled data services with SQL MI or Azure Arc-enabled application services on top of your Kubernetes cluster.
Conclusion
Setting up the Azure Kubernetes Service on Windows Server or Azure Stack HCI is super straightforward. You can easily set it up using the wizard in Windows Admin Center or PowerShell. And with the additional management capabilities with PowerShell, CLI, Windows Admin Center, Azure Arc, administration, and deployment of apps is super easy.
Tags: AKS, AKS on Azure Stack HCI, AKS on Windows Server, Azure, Cloud, Hybrid, Hybrid Cloud, Hyper-V, Kubernetes, Microsoft, Microsoft Azure, PowerShell, Virtualization, Windows Server Last modified: June 7, 2022


So do we need to run the AKS host on a bare metal Windows Server Hyperv machine? Or is it also feasible to run it on vmware vsphere?
It will need the hyper-v feature on the Windows Server machine. If you install it on VMware vSphere, you will need to install it using nested virtualization.
Btw if this is the scenario, also check out our latest announcement with AKS Lite: https://learn.microsoft.com/en-us/azure-stack/aks-hci/aks-lite-overview?WT.mc_id=modinfra-0000-thmaure
here you have a full overview post about the new stuff https://www.thomasmaurer.ch/2022/10/new-aks-hybrid-deployment-options-enabled-by-azure-arc-aks-lite-and-hybrid-benefit/
Would you consider trying to run this configuration again with a brand new server 2019 and use the latest WAC? I have had considerable issues getting first the AKS platform installed and then an AKS Cluster to install. All of this seems to revolve around issues in Az.Accounts 2.12.1 or 2.13.1 if you install PS7.
What i have had to do is follow what a lot of people reporting issues with Azure Automation and this same issue. I removed Az.Accounts down to version 2.6.0. Im not sure if that, or a further reboot resolved it all, but once i was there, I could deploy my cluster.
Also, you say here that your host has 32GB of RAM. I ran into issues with only 32GB RAM when i tried to deploy the AKS Cluster via WAC. When it tried to validate the environment, it told me it needed 16GB of RAM free to get any further. With the AKS Control Plane instance consuming 8GB RAM and several tabs open locally on the server, it was difficult to get that free. I ended up sticking more RAM in the PC.