Awhile back I created a blog post on how you can install Kubernetes on Windows Server, and since then I also got a lot of questions on how to install Kubernetes on Windows 11 or Windows 11 IoT running Linux and Windows Containers. So, in this blog post we are going to have a look at how to install Kubernetes (K8s or K3s) on Windows 11 and Windows 11 IoT with Azure Kubernetes Service (AKS) Edge Essentials. This allows you to run a Kubernetes cluster on your Windows machine or on your edge and IoT devices, as a supported version from Microsoft.
What is AKS Edge Essentials
Azure Kubernetes Service Edge Essentials is an on-premises Kubernetes implementation of Azure Kubernetes Service (AKS) that automates running containerized applications at scale. AKS Edge Essentials includes a Microsoft-supported Kubernetes platform that includes a lightweight Kubernetes distribution with a small footprint and simple installation experience, making it easy for you to deploy Kubernetes on PC-class or “light” edge hardware. AKS Edge Essentials makes it easier to get started with your containerized application, bringing cloud-native best practices to your edge application. Learn more about AKS Edge Essentials on Microsoft Learn.
With AKS Edge Essentials, you get the benefit of having a fully supported stack from kernel to cloud.
It allows you to run Linux and Windows containers and next to local management, it also brings Azure management to your Kubernetes cluster which helps you to provide a single control plane, operations, and developer experience for all your Kubernetes clusters.
AKS Edge Essentials includes the following features, managed by Microsoft:
- A lightweight, CNCF-conformant K8S and K3S distribution that is supported and managed by Microsoft. The key difference between AKS on HCI and AKS on Windows is that AKS on Windows has minimal compute and memory requirements (4 GB RAM and 2 vCPUs).
- Each Kubernetes cluster runs in its own Hyper-V isolated virtual machine and includes many features to help secure your container infrastructure.
- Microsoft-maintained Linux and Windows worker nodes virtual machine images adhere to security best practices. Microsoft also refreshes these images monthly with the latest security updates.
- Simplified installation experience with PowerShell cmdlets and agents to enable provisioning and control of VMs and infrastructure. Microsoft provides automatic updates for your Kubernetes deployment, so you stay up to date with the latest available Kubernetes versions.
Concepts
To run Kubernetes on Windows 11, AKS Edge Essentials creates one or two virtual machines for your management and worker nodes depending on if you only need Linux or if you also want to add a Windows worker node.
You can use an external or internal virtual switch on Hyper-V. An external virtual switch connects to a wired, physical network by binding it to a physical network adapter. It gives virtual machines access to a physical network to communicate with devices on an external network. An internal virtual switch connects to a network that can be used only by the virtual machines running on the host that has the virtual switch, and between the host and the virtual machines.
To learn more about the concepts of Kubernetes on Windows 11 and Windows 11 IoT with Azure Kubernetes Service Edge Essentials, check out Microsoft Learn.
Nested Virtualization
Deploying AKS Edge Essentials on top of a nested virtualization environment is not supported for production scenarios and is limited to developer purposes. This guide assumes you’re using the Hyper-V hypervisor. We do not support using a non-Microsoft hypervisor, such as KVM or vSphere.
Prerequisites
Let’s have a look at the requirements for AKS Edge Essentials on Windows 11. Now that said, this also works even on Windows 10 or Windows Server 2019 and Windows Server 2022.
Hardware and operating system requirements
- Operating System:
- Windows 10/11 Pro
- Windows 10/11 Enterprise
- Windows 10/11 IoT Enterprise
- Windows Server 2019
- Windows Server 2022
- CPU:
- 2 Cores (2 vCPUs) or 4 if Arc-enabled cluster
- clock speed at least 1.8 GHz
- Memory
- 4 GB with at least 2.5 GB free or 8 GB with at least 4.5 GB free if Arc-enabled.
- Disk space
- At least 14 GB free
For more details on requirements, check out the Microsoft Learn page.
Install Kubernetes on Windows 11 and Windows 10
First, download the installer for AKS Edge Essentials. Depending on which Kubernetes distribution you want to use download the K8s or K3s installer. If you’re creating an optional Windows worker node, you’ll need the Windows node files. To make it easy, I download all the files to C:\AKSEdgeE.
# Create Folder
mkdir C:\AKSEdgeE

# K8s installer
$urlK8sMSI = "https://aka.ms/aks-edge/k8s-msi"
$path = "C:\AKSEdgeE\k8s.msi"
Start-BitsTransfer -Source $urlK8sMSI -Destination $path

# K3s installer
$urlK3sMSI = "https://aka.ms/aks-edge/k3s-msi"
$path = "C:\AKSEdgeE\k3s.msi"
Start-BitsTransfer -Source $urlK3sMSI -Destination $path

# Windows Node Files
$urlWindowsFiles = "https://aka.ms/aks-edge/windows-node-zip"
$path = "C:\AKSEdgeE\windowsNodeFiles.zip"
Start-BitsTransfer -Source $urlWindowsFiles -Destination $path
In addition to the MSI, Microsoft provides a few samples and tools which you can download from the AKS Edge GitHub repo. Navigate to the Code tab and click the Download Zip button to download the repository as a .zip file. Extract the GitHub .zip file to a working folder. Or you can download it using the following PowerShell script:
# Download and expand AKS Edge Essential Tools
$urlTools = "https://github.com/Azure/AKS-Edge/archive/refs/heads/main.zip"
$path = "C:\AKSEdgeE"
Start-BitsTransfer -Source $urlTools -Destination $path
Expand-Archive -Path $path\main.zip -DestinationPath $path\main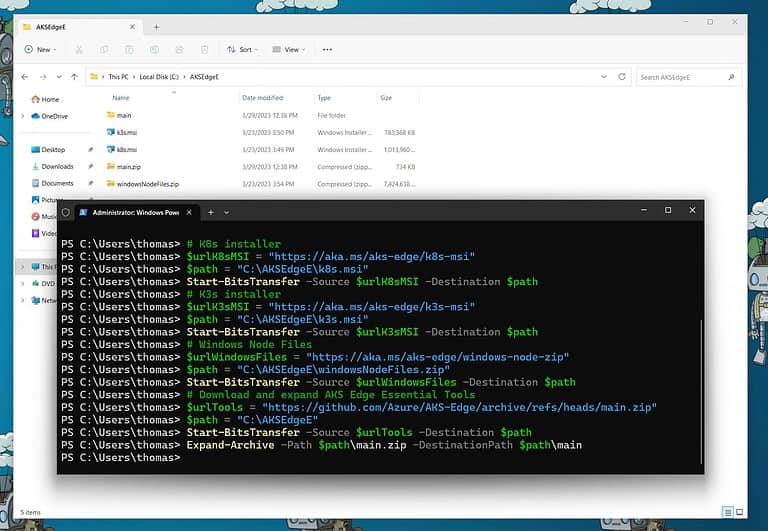
Now let’s install the AKS Edge Essentials on our Windows PC using the following commands.
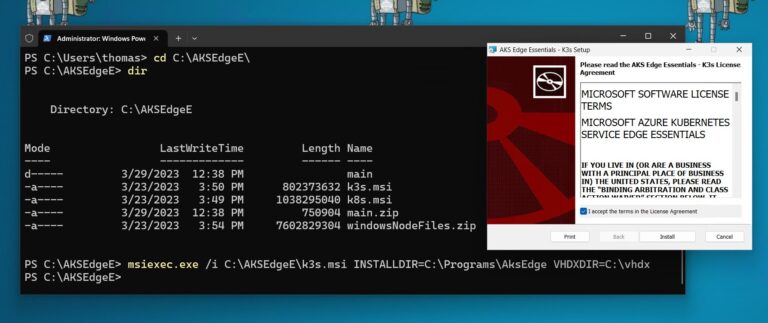
Without Windows Container support:
msiexec.exe /i AksEdge-kXs-x.xx.x.msi INSTALLDIR=C:\Programs\AksEdge VHDXDIR=C:\vhdxWith Windows Container support:
msiexec.exe /i AksEdge-kXs-x.xx.x.msi ADDLOCAL=CoreFeature,WindowsNodeFeature INSTALLDIR=C:\Programs\AksEdge VHDXDIR=C:\vhdxIn my case I am just running the installation for the K3s.msi stored in the C:\AKSEdgeE folder:
msiexec.exe /i C:\AKSEdgeE\k3s.msi INSTALLDIR=C:\Programs\AksEdge VHDXDIR=C:\vhdxAfter the installation you can check if the AKSEdge PowerShell module is available. You may have to close and reopen your terminal.
Set-ExecutionPolicy RemoteSigned
Import-Module AksEdge
Get-Command -Module AKSEdge | Format-Table Name, Version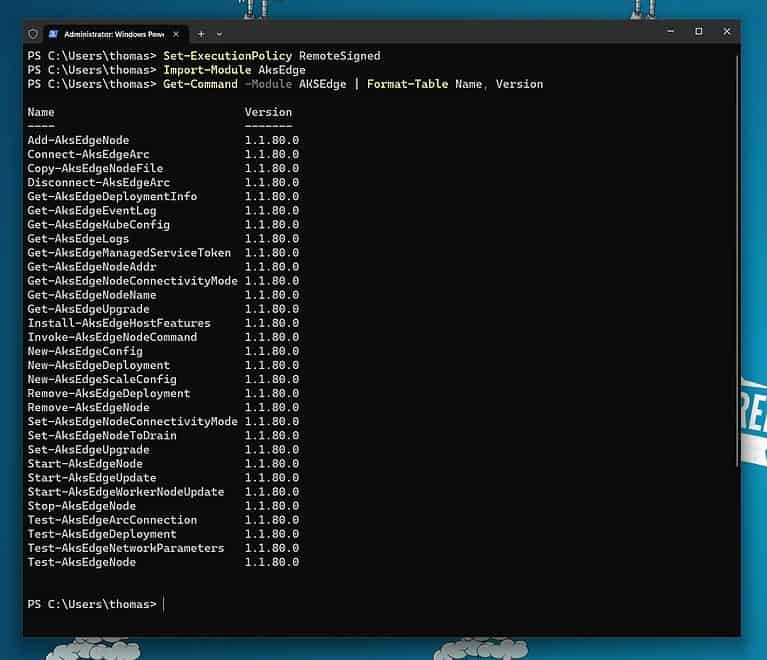
Now you can prepare the AKS Edge Essentials host features, such as Hyper-V, SSH, power settings, and much more. This might require a system reboot.
Install-AksEdgeHostFeatures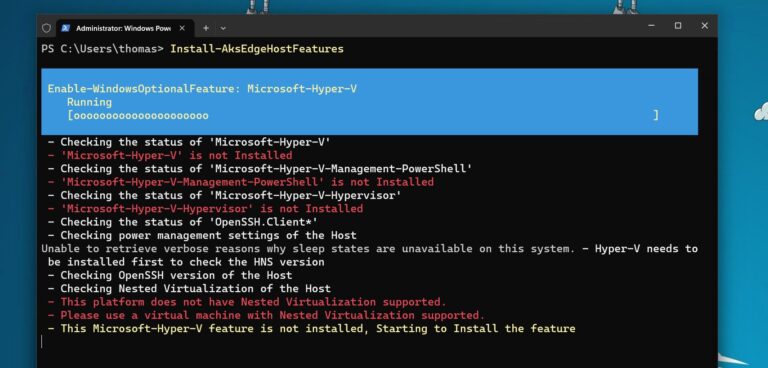
After the reboot you can rerun the command and it will show the following:
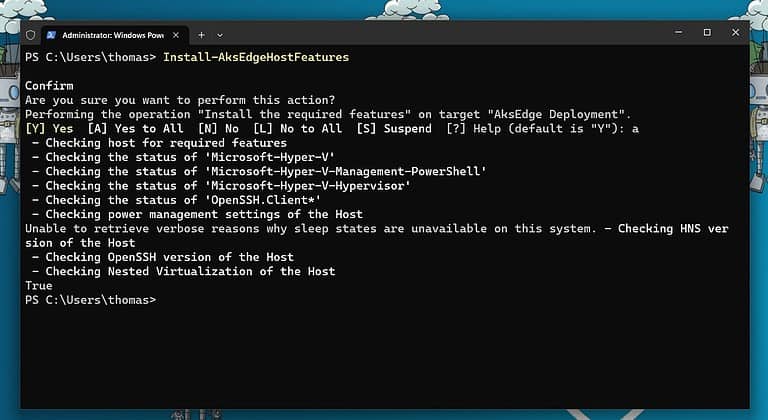
There are two installation options to deploy your Kubernetes cluster, you can choose between the single machine deployment or the full deployment, which allows you to use multiple machines. For our example we are going to choose the single machine deployment.
There are some simple steps to which allow you to use some default parameters to install AKS Edge Essentials Kubernetes on Windows. However, we can also add a couple of additional parameters to configure a little bit more such as memory or CPU count used by our Kubernetes clusters and worker nodes.
# Create AKS Edge Config File
New-AksEdgeConfig -DeploymentType SingleMachineCluster -outFile C:\AKSEdgeE\aksedge-config.json | Out-Null
Now you can edit the aksedge-config.json file and add parameters to customize the configuration. You can read more about this here.
After you have modified the config file, you can run the deployment which installs Kubernetes on Windows 10 and Windows 11.
New-AksEdgeDeployment -JsonConfigFilePath C:\AKSEdgeE\aksedge-config.json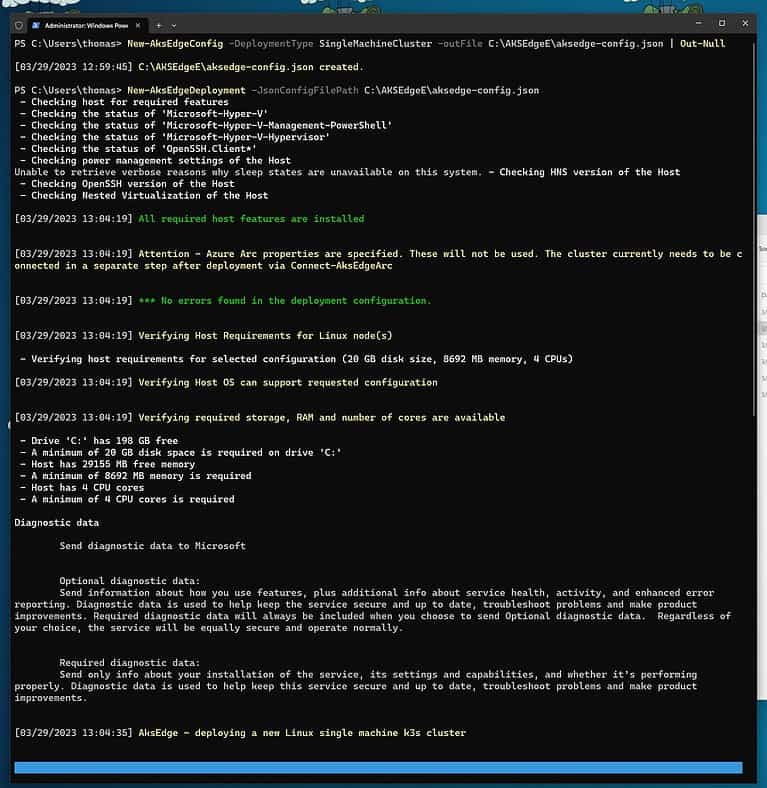
Confirm that the deployment was successful by running:
kubectl get nodes -o wide
kubectl get pods -A -o wide
Deploy a sample application
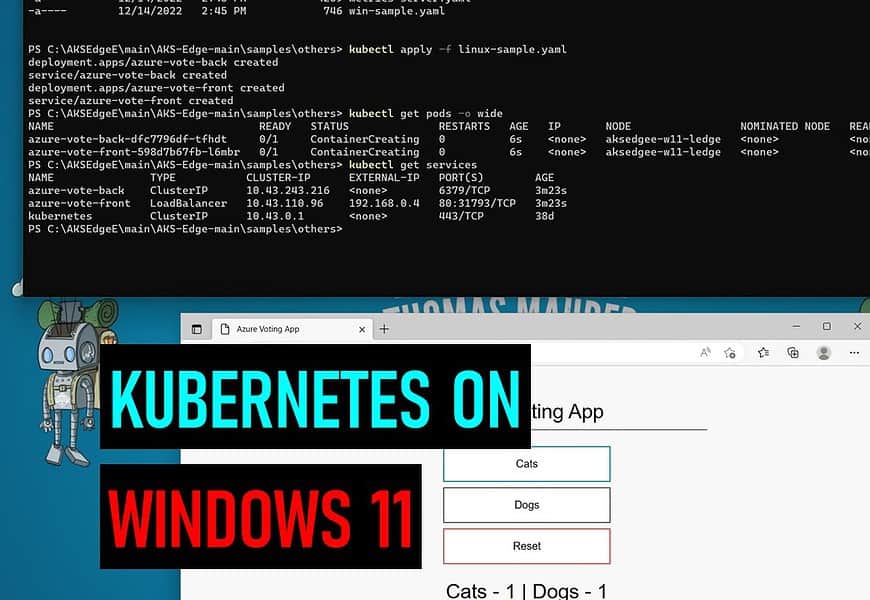
Now to test the deployment, Microsoft also offers a sample Kubernetes application, which is a simple voting app, with the container image for this application is hosted on Azure Container Registry (ACR). Since we already downloaded the AKS Edge Essential tools and sample from GitHub, you can just navigate to the following location:
cd "C:\AKSEdgeE\main\AKS-Edge-main\samples\others"With kubectl apply you can now deploy the app on the Kubernetes cluster:
kubectl apply -f linux-sample.yamlWait a few minutes for the pods to be in the running state:
kubectl get pods -o wideVerify the services:
kubectl get servicesWith after the deployment is finished the actual “public IP address” assigned to the service will show as EXNTERNAL-IP for the azure-vote-front service.
On single machine clusters, if you deployed your Kubernetes cluster without specifying a -ServiceIPRangeSize, you will not have allocated IPs for your workload services and you won’t have an external IP address. In this case, find the IP address of your Linux VM (Get-AksEdgeNodeAddr).
Get-AksEdgeNodeAddr -NodeType LinuxYou can now append the external port to the VM’s IP address (for example, 192.168.1.12:30432).
And now you can test your application in the brower.
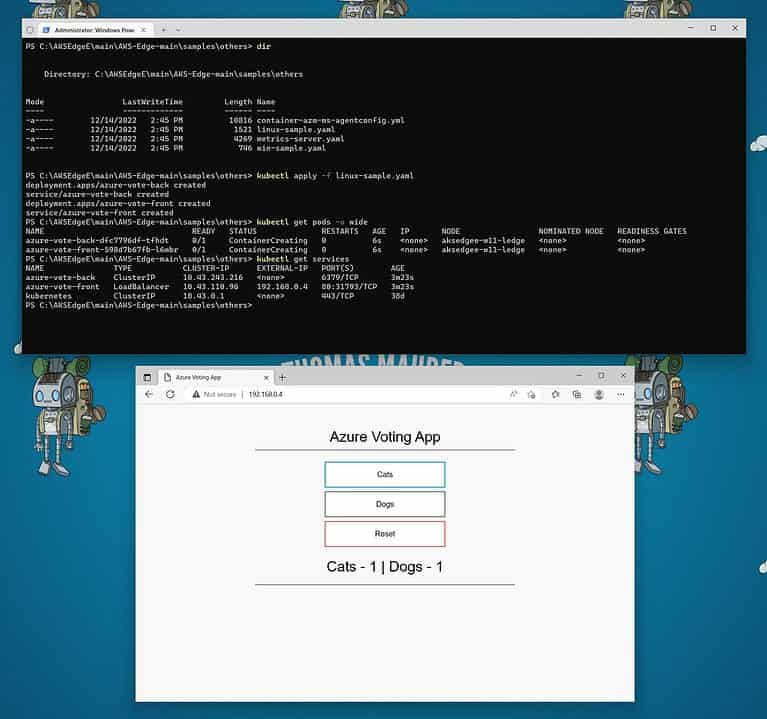
To remove the test application you can run the following command:
kubectl delete -f linux-sample.yamlManage AKS Edge Essentials from Azure using Azure Arc
One of the things you can do in the Azure ecosystem is to connect Kubernetes clusters to the Azure control plane using Azure Arc. Which will provide you additional capabilities and features.
Azure Arc-enabled Kubernetes supports the following scenarios for connected clusters:
- Single pane of glass to view all connected Kubernetes clusters running outside of Azure for inventory, grouping, and tagging, along with Azure Kubernetes Service (AKS) clusters.
- Deploy applications and apply configuration using GitOps-based configuration management.
- View and monitor your clusters using Azure Monitor for containers.
- Enforce threat protection using Microsoft Defender for Kubernetes.
- Ensure governance through applying policies with Azure Policy for Kubernetes.
- Manage access by using Azure Active Directory for authentication and authorization checks on your cluster.
- Securely access your Kubernetes cluster from anywhere without opening inbound port on the firewall using Cluster Connect.
- Deploy Open Service Mesh on top of your cluster for observability and policy enforcement on service-to-service interactions
- Deploy machine learning workloads using Azure Machine Learning for Kubernetes clusters.
- Create custom locations as target locations for deploying Azure Arc-enabled data services (SQL Managed Instances, PostgreSQL server (preview)), App Services on Azure Arc (including web, function, and logic apps), and Event Grid on Kubernetes.
To connect your AKS Edge Essential cluster to Microsoft Azure using Azure Arc-enabled Kubernetes, check out the following Microsoft article.
Conclusion installing Kubernetes on Windows
I hope this quick article shows you how you can Install Kubernetes (K8s and K3s) on Windows 10 and Windows 11 with AKS Edge Essentials. You can easily use this for small Kubernetes deployments on-premises, at the edge, or even other cloud providers, and run your containerized apps on top. With the Azure Arc integration, you also can take advantage of the Azure control plane and management services to use your cloud-native deployment processes from cloud to edge.
Tags: AKS, AKS Edge, IoT, K8s, Kubernetes, Microsoft, Microsoft Azure, PowerShell, Virtualization, Windows, Windows 10, Windows 11 Last modified: March 30, 2023
