In my first post about the System Center 2012 Unified Installer I wrote about the prerequisites you need, to do a System Center 2012 deployment with the Unified Installer. In the second part I will write how you have to prepare the Installer and the Target servers.
- System Center 2012 Unified Installer – Step by Step – Part 1
- System Center 2012 Unified Installer – Step by Step – Part 2
- System Center 2012 Unified Installer – Step by Step – Part 3
It’s still important: Neither the System Center Unified Installer nor this guide is made to deploy the System Center Suite in production. It is only for lab or demo environments.
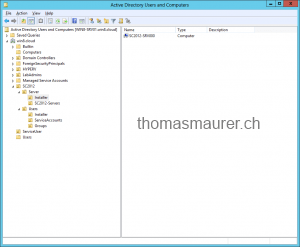
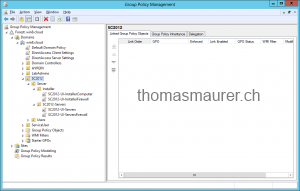
In my case I created two OUs to deploy my small lab. One for the Installer Computer and one for all the System Center servers. And I created some GPOs to save some time.
Preparing the Installer Computer for System Center 2012 – Unified Installer
- First I installed a Server with Windows Server 2008 R2 SP1 as the installer Computer and installed all the patches which came with Windows Updates.
- Now you have to do some configuration of WinRM. You can do this via Group Policy or CMD commands.
Computer Configuration / Administrative Templates / System / Credential Delegation / Allow Delegating Fresh Credentials (Enabled with the value: “WSMAN/*” and Concatenate OS defaults with input above selected)
Computer Configuration / Administrative Templates / System / Credential Delegation / Allow Delegating Fresh Credentials with NTLM-only Server Authentication (Enabled with the value: “WSMAN/*” and Concatenate OS defaults with input above selected)
Computer Configuration / Administrative Templates / Windows Components / Windows Remote Management (WRM) / WinRm Client / Allow CredSSP authentication (Enabled)
Computer Configuration / Administrative Templates / Windows Components / Windows Remote Management (WRM) / WinRm Client / Trusted Hosts (Enabled with a * in the TrustedHostsList option)
- You could also run the following comands
winrm set winrm/config/client/auth @{CredSSP="True"}
winrm set winrm/config/client @{TrustedHosts="*"}
winrm qc
- Now you you have to open some Firewall ports, you can do this also via Group Policy or in the local Windows Firewall settings.
Create a new Inbound role for the following ports:
TCP 81
TCP 1433
UDP 1434
ICMP v4
Because it is a demo or lab Environment you could also disable the Firewall
On the User’s Guide for System Center 2012 – Unified Installer you can get more Information how you can prepare the Installer Computer.
Preparing a Target Servers for System Center 2012 Components
- First I installed a Server with Windows Server 2008 R2 SP1 as the installer Computer and installed all the patches which came with Windows Updates.
- Like for the Installer Computer we also have to create some GPOs for the Target Servers.
Computer Configuration / Administrative Templates / Windows Components / Windows Remote Management (WinRM) / WinRM Service / Allow automatic configuration of listeners (Enabled and the for the values of IPv4 filter and IPv6 filter type *)
Computer Configuration / Administrative Templates / Windows Components / Windows Remote Management (WinRM) / WinRM Service / Allow CredSSP authentication (Enabled)
Computer Configuration / Administrative Templates / Windows Components / Windows Remote Shell / Allow Remote Shell Access (Enabled)
Computer Configuration / Administrative Templates / Windows Components / Windows Remote Shell / Specify maximum amount of memory in MB per Shell (Enabled and set MaxMemoryPerShellMB to 2048)
You could also run the following commands on the target servers.
winrm qc -q
winrm set winrm/config/service/auth @{CredSSP="True"}
winrm set winrm/config/winrs @{AllowRemoteShellAccess="True"}
winrm set winrm/config/winrs @{MaxMemoryPerShellMB="2048"}
Create Installer User and Service Users
I also created a Service Users for every System Center product, you could also just use the same user account for all products.
- svc-sc2012-scvmm
- svc-sc2012-scac
- svc-sc2012-sco
- svc-sc2012-scom
- svc-sc2012-sccm
- svc-sc2012-scsm
- svc-sc2012-scdpm
And I created a Installer User which has local Administrator rights on every machine. You also have to login to your Installer Computer and run the System Center Unified Installer with this account.
- sc2012-installer
This was the last preperation post, in the next post the “Fun” Begins and we can fire up the System Center 2012 – Unified Installer
Tags: Hyper-V, Microsoft, Private Cloud, SCAC, SCCM, SCDPM, SCO, SCOM, SCSM, SCVMM, System Center, System Center 2012, Unified Installer, Windows Server, Windows Server 2008 R2 Last modified: May 9, 2012