As you know, Azure Cloud Shell is a great management tool to manage your Azure resources. Azure Cloud Shell is an interactive, authenticated, browser-accessible shell for managing Azure resources. It provides the flexibility of choosing the shell experience that best suits the way you work, either Bash or PowerShell. You can learn more about Azure Cloud Shell here. If you wanted to manage Azure resources such as Azure virtual machines (VMs), you needed to connect to a public IP address of a virtual machine, which really didn’t work in all scenarios. With the latest update, you can now connect Azure Cloud Shell to an Azure virtual network (vNet). With the new method, you can now deploy the Azure Cloud Shell container within your virtual network (vNet), which now allows you to use PowerShell remoting, SSH, or other command-line tools such as kubctl using private IP addresses.
Requirements
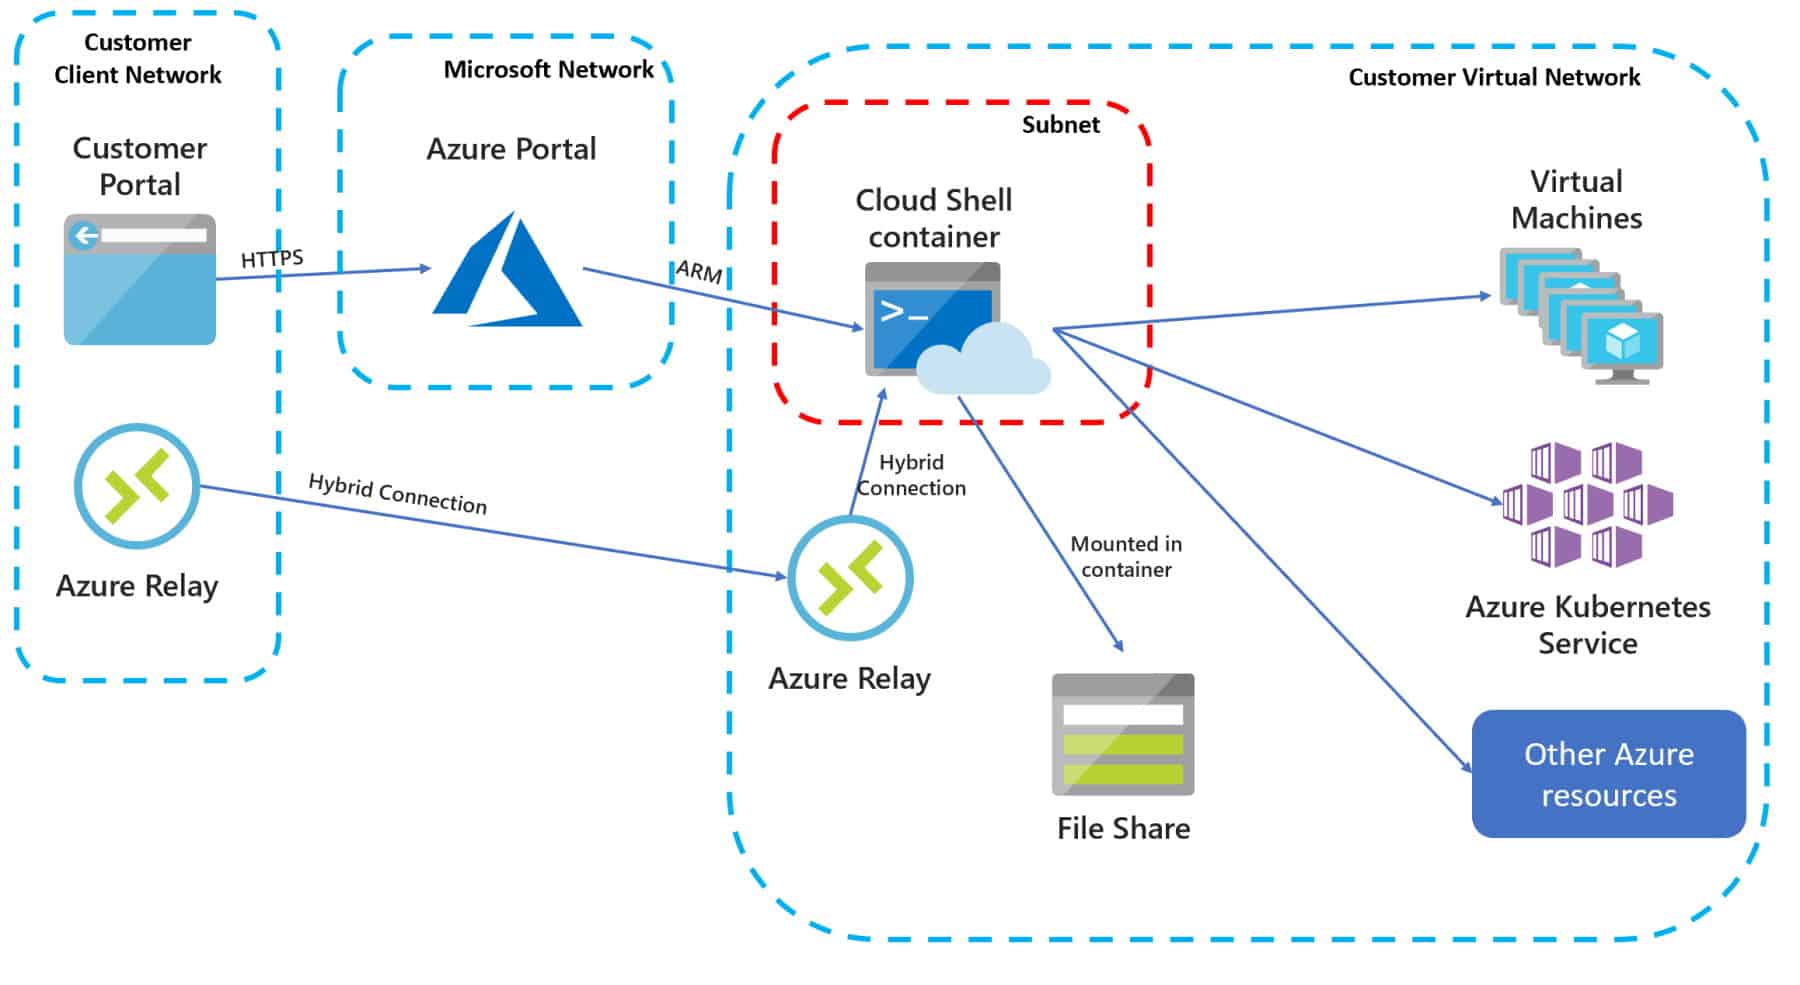
Before you can use Cloud Shell in your own Azure Virtual Network, you will need to create some resources to support this functionality.
- Virtual Network – The virtual network in which the resources are located you want to manage or the network that peers with a virtual network where your Azure resources are.
- Subnet – In that virtual network you will need a dedicated subnet to host Cloud Shell containers.
- Network profile
- Azure Relay – An Azure Relay allows two endpoints that are not directly reachable to communicate.
- Storage Account – The storage account needs to be accessible from the virtual network that is used by Cloud Shell.
There are also some considerations you need to be aware of, such as currently supported Azure regions during the preview, Azure Relay adds additional cost and slower startup speed of Cloud Shell containers. You can learn more about the requirements here.
Connect Azure Cloud Shell to a virtual network
To make the deployment easy, there are Azure Resource Manager templates available to deploy the necessary network and storage resources. In my step by step guide, I already have a virtual network deployed within my subscription with the resources I manage. If you don’t have that yet, and you want to try this out, you will need to create a resource group and a virtual network.
Simply the deploy the following two templates:

Deploy Azure Cloud Shell Network ARM template
You can get the Azure Container Instance OID by running the following command:
Get-AzADServicePrincipal -DisplayNameBeginsWith 'Azure Container Instance'
Also, make sure that the subnet ranges are part of the address range in your virtual network.
Reconnect Cloud Shell
If you have used Azure Cloud Shell before, you will need to reconnect that to the specific resources. You can simply run the command “cloudrive unmount” or “dismount-cloudrive”.
After that you can reconnect your Cloud Shell and select the isolated network option. Keep in mind this feature is currently in preview, and only available in West US and West Central US.

Connect Azure Cloud Shell to virtual network
This will then take a moment to deploy.

Requesting a container
After the Cloud Shell container is deployed within the virtual network, you can now start using private IP addresses within that virtual network or virtual networks that are peered.
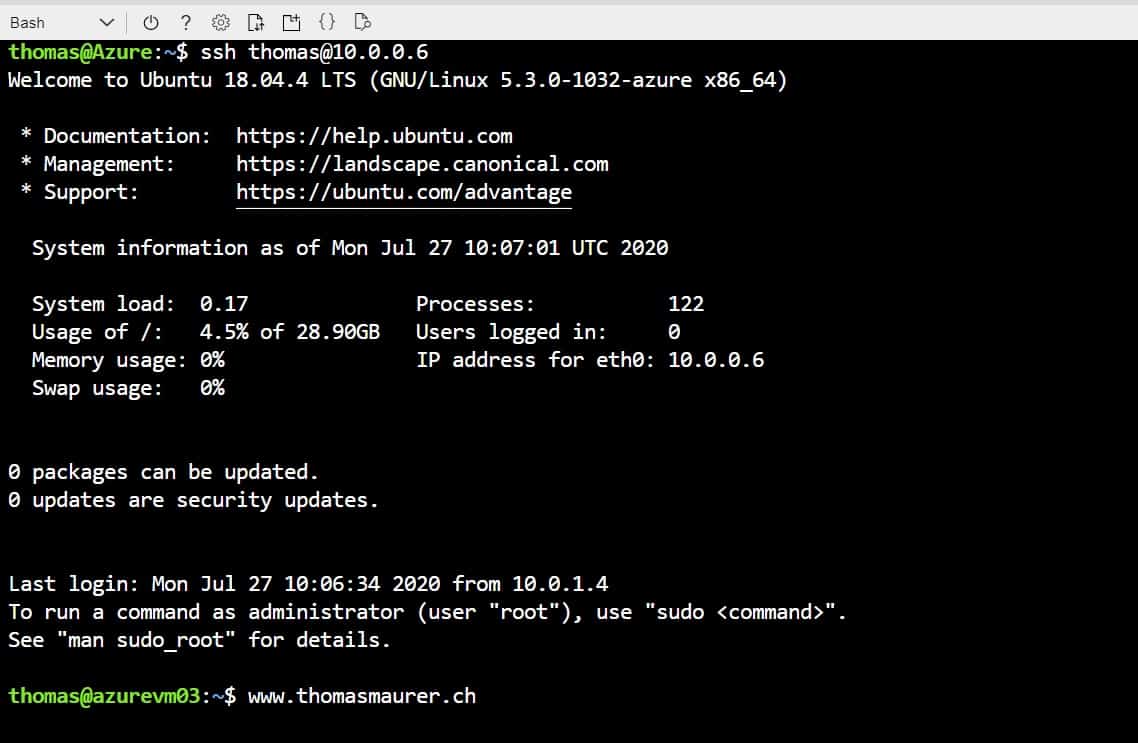
SSH into Azure VM with Private IP address from Cloud Shell
I hope this blog gives you a short overview of how you can integrate Cloud Shell in your private Azure virtual network. If you have any questions, feel free to leave a comment.
Tags: Azure, Azure Cloud Shell, Cloud Shell, connect, Integration, IP, Microsoft, Network, PowerShell, Private, shell, Virtual, Virtual Network, vNet Last modified: August 25, 2020


Hi Thomas,
Do I have to create and provision the relay and the Container Instance before I deploy the template
Hi Nasir
The ARM templates will do that for you.
Currently I am using management vm with Bastian to run kubectl commands in my aks private cluster.
So this can replace that?
Which is the best, secure and fast way to run kubectl commands?
[…] months ago, I bumped into a blog post from Thomas Maurer Connect Azure Cloud Shell to Virtual Network vNet, I found it was really interesting, and can potentially help me overcome a problem I had at that […]