This blog post covers how you can create a bootable USB media drive to install Windows Server 2022 on a physical server. This guide will only use built-in tools that you can find on Windows 10, Windows 11, or Windows Server. Depending on your system you can install it on a BIOS system or a UEFI-based system, which is slightly different since UEFI will use GPT disks and BIOS will use an MBR disk. Here is how you create a USB Drive for a Windows Server 2022 installation.
Getting ready to create a USB Drive for a Windows Server 2022 Installation
First, you will need to have all the prerequisites in place.
- Download the Windows Server 2022 ISO file, you can get it from various places. If you don’t have a license but you want to try out Windows Server 2022, you can download it from the evaluation center.
- Windows Server Evaluation Center offers options to try and download Windows Server 2022 download or to deploy it in Azure.
- Volume Licensing Service Center, where Volume License customers can download Windows Server 2022.
- An USB drive with at least 8GB size
Windows Server 2022 USB Thumb Drive for UEFI (GPT) systems
To create the USB drive to install Windows Server 2022 on a UEFI (GPT system, you do the following steps:
- The at least an 8GB USB drive has to be formatted in FAT32
- The USB needs to be GPT and not MBR
- You will need to split the wim file using dism since it is larger than 4GB
- Copy all files from the ISO to the USB drive
This is it, and here is how you do it. First, plug in your USB drive to your computer.
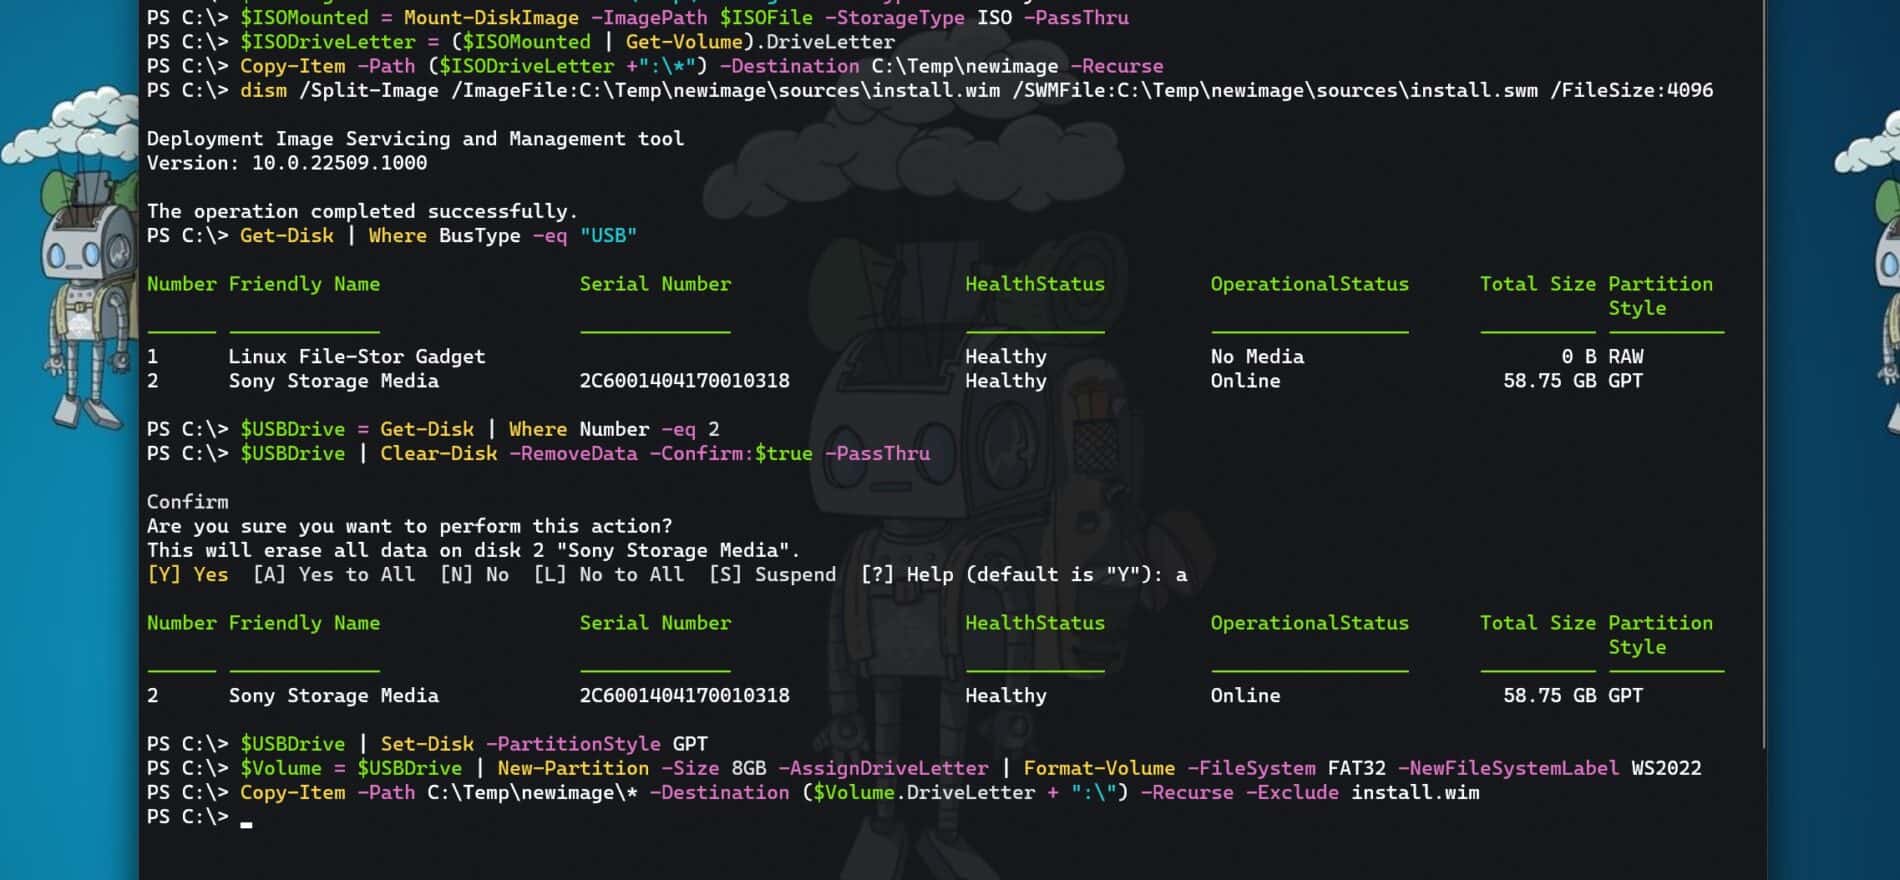
Open a PowerShell using the Run as Administrator option. You will need to change the path of the Windows Server 2022 ISO, and you will need to replace the disk number in the script before running the third command and make sure C:\Temp exists. From previous experiences with users, run the script line by line.
REMINDER: The following commands will wipe the USB Drive completely. So, backup everything before you run through the PowerShell.
# Define Path to the Windows Server 2022 ISO
$ISOFile = "C:\Temp\WindowsServer2022.iso"

# Create temp diectroy for new image
$newImageDir = New-Item -Path 'C:\Temp\newimage' -ItemType Directory

# Mount iso
$ISOMounted = Mount-DiskImage -ImagePath $ISOFile -StorageType ISO -PassThru

# Driver letter
$ISODriveLetter = ($ISOMounted | Get-Volume).DriveLetter

# Copy Files to temporary new image folder
Copy-Item -Path ($ISODriveLetter +":\*") -Destination C:\Temp\newimage -Recurse

# Split and copy install.wim (because of the filesize)
dism /Split-Image /ImageFile:C:\Temp\newimage\sources\install.wim /SWMFile:C:\Temp\newimage\sources\install.swm /FileSize:4096


# Get the USB Drive you want to use, copy the disk number
Get-Disk | Where BusType -eq "USB"

# Get the right USB Drive (You will need to change the number)
$USBDrive = Get-Disk | Where Number -eq 2

# Replace the Friendly Name to clean the USB Drive (THIS WILL REMOVE EVERYTHING)
$USBDrive | Clear-Disk -RemoveData -Confirm:$true -PassThru

# Convert Disk to GPT
$USBDrive | Set-Disk -PartitionStyle GPT

# Create partition primary and format to FAT32
$Volume = $USBDrive | New-Partition -Size 8GB -AssignDriveLetter | Format-Volume -FileSystem FAT32 -NewFileSystemLabel WS2022

# Copy Files to USB (Ignore install.wim)
Copy-Item -Path C:\Temp\newimage\* -Destination ($Volume.DriveLetter + ":\") -Recurse -Exclude install.wim

# Dismount ISO
Dismount-DiskImage -ImagePath $ISOFile
After that, you can safely remove the USB drive and use it to boot your server from.
Windows Server 2022 USB Thumb Drive for BIOS (MBR) systems
To create the USB drive to install Windows Server 2022 on BIOS (MBR) systems, you can follow these steps:
- The at least an 8GB USB drive has to be formatted in NTFS
- USB drive needs to us MBR
- The partition needs to be set active
- Copy all files from the ISO to the USB Drive
This is it, and here is how you do it. First, plug in your USB drive to your computer.
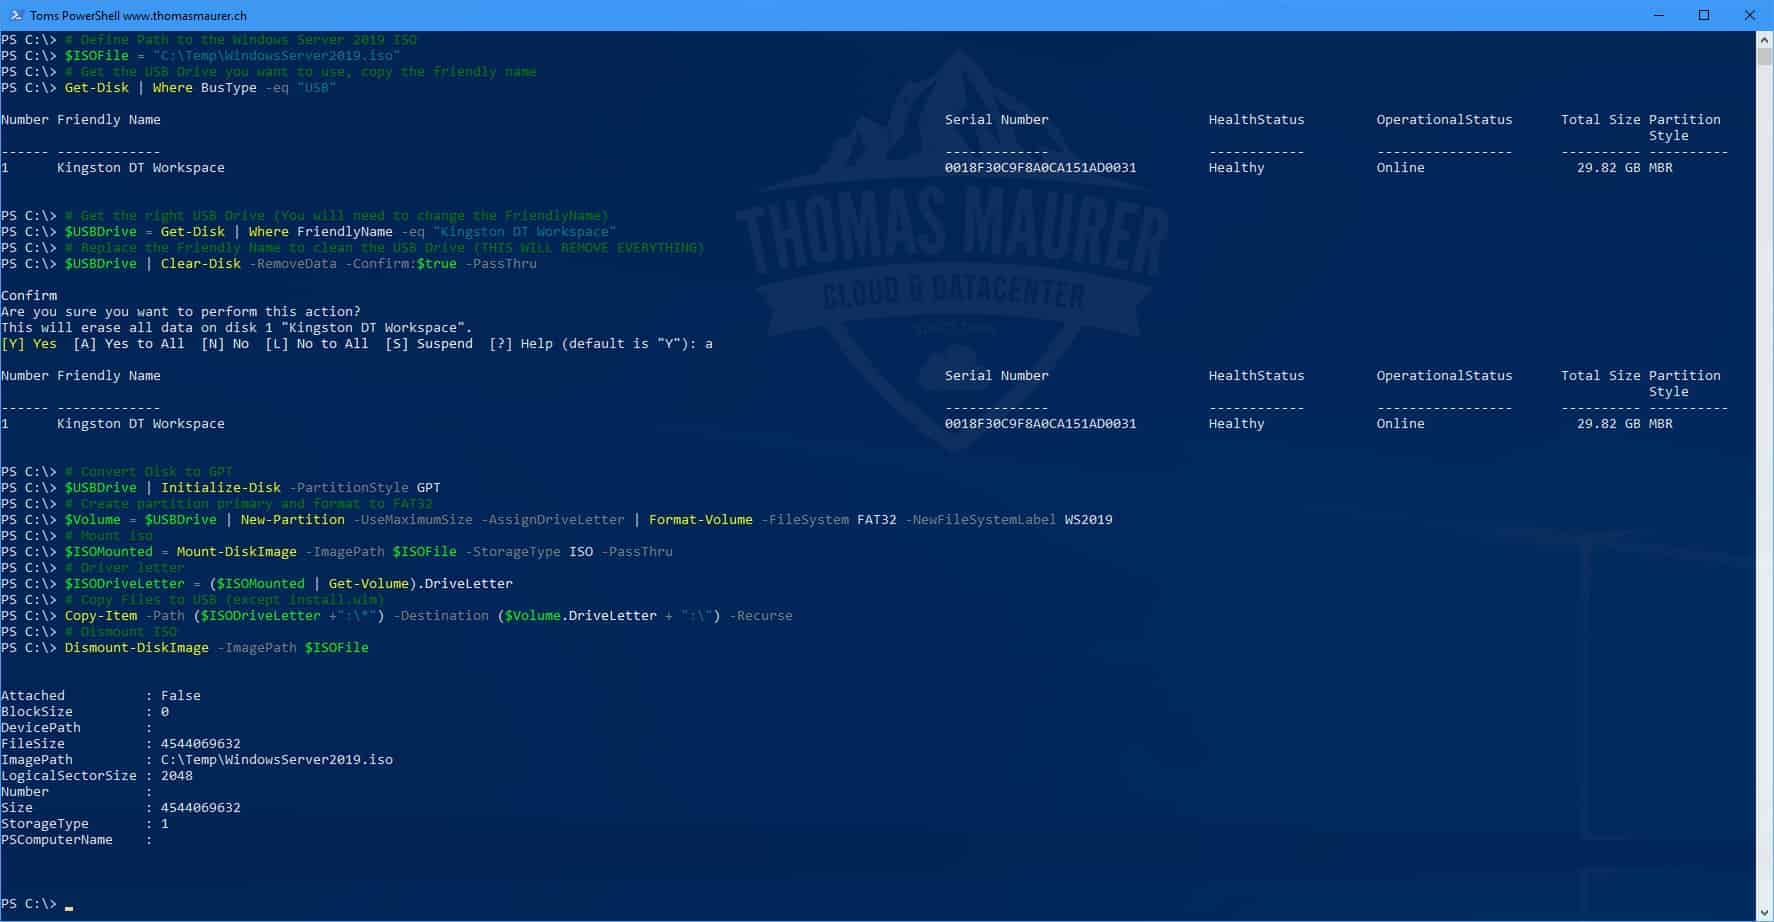
Open a PowerShell using the Run as Administrator option. You will need to change the path of the Windows Server 2022 ISO, and you will need to replace the disk number in the script before running the third command and make sure C:\Temp exists. From previous experiences with users, run the script line by line.
REMINDER: The following commands will wipe the USB Drive completely. Backup everything before you run through the PowerShell.
# Define Path to the Windows Server 2022 ISO
$ISOFile = "C:\Temp\WindowsServer2022.iso"

# Get the USB Drive you want to use, copy the friendly name
Get-Disk | Where BusType -eq "USB"

# Get the right USB Drive (You will need to change the FriendlyName)
$USBDrive = Get-Disk | Where FriendlyName -eq "Kingston DT Workspace"

# Replace the Friendly Name to clean the USB Drive (THIS WILL REMOVE EVERYTHING)
$USBDrive | Clear-Disk -RemoveData -Confirm:$true -PassThru

# Convert Disk to MBR
$USBDrive | Set-Disk -PartitionStyle MBR

# Create partition primary and format to NTFS
$Volume = $USBDrive | New-Partition -UseMaximumSize -AssignDriveLetter | Format-Volume -FileSystem NTFS -NewFileSystemLabel WS2022

# Set Partiton to Active
$Volume | Get-Partition | Set-Partition -IsActive $true

# Mount ISO
$ISOMounted = Mount-DiskImage -ImagePath $ISOFile -StorageType ISO -PassThru

# Driver letter
$ISODriveLetter = ($ISOMounted | Get-Volume).DriveLetter

# Copy Files to USB
Copy-Item -Path ($ISODriveLetter +":\*") -Destination ($Volume.DriveLetter + ":\") -Recurse

# Dismount ISO
Dismount-DiskImage -ImagePath $ISOFile
After that, you can safely remove the USB drive and use it to boot your server from to install Windows Server 2022.
Conclusion
I hope this post was helpful, and if you have any questions, please let me know in the comments.
Last modified: November 22, 2021

Fat32 for uefi and NTFS for bios, isn’t it the opposite ?
Seems odd to me, im puzzled .
Cool stuff – thanks for sharing.
good
thanks!
Hi
Really helpful but you need to add a line that initializes the USB Drive
I am not an expert but I think it should look like this
# Replace the Friendly Name to clean the USB Drive (THIS WILL REMOVE EVERYTHING)
$USBDrive | Clear-Disk -RemoveData -Confirm:$true -PassThru
# Initialize USB Disk
$USBDrive | Initialize-Disk -PartitionStyle MBR
# Convert Disk to MBR
$USBDrive | Set-Disk -PartitionStyle MBR
Brilliant. Worked well. thank you very much
I have an 8 GB USB stick but it fails at the $Volume = $USBDrive | New-Partition -Size 8GB -AssignDriveLetter | Format-Volume -FileSystem FAT32 -NewFileSystemLabel WS2022
with an error “New-Partition : Not enough available capacity”
The typical 8GB stick will not show a capacity available of full 8GB in the operating system measuring style. Changing that command to 7GB should work for you – that would match the free space available while still being sufficient for the contents to be copied onto.
Thx a lot.
Very precise instruction which works.
thank you Uwe for the comment )
It’s works. Thanks!
One moment for the info:
ISO image:
30.11.2022 14:44 5 008 531 456 SERVER_EVAL_x64FRE_ru-ru.iso
install.wim is small enought:
03.03.2022 07:45 4 292 461 727 install.wim
So, dism command
> dism /Split-Image /ImageFile:C:\Temp\newimage\sources\install.wim /SWMFile:C:\Temp\newimage\sources\install.swm /FileSize:4096
… causes a misleading message (in russian):
Cистема DISM
Версия: 10.0.19041.844
Ошибка: 87
Параметр задан неверно.
Файл журнала DISM находится по адресу C:\Windows\Logs\DISM\dism.log
That means- error 87, incorrect parameters, details in dism.log.
Nothing critical in log – starting/ending Dism.exe session.
Just for an information.
Thanks again!
thanks, you’re welcome :)
This is by far the best and most accurate post I have ever found about anything as technical as this. It just works. I’m over 60, so that’s a good indication about how long ‘ever’ is…
Thank you, Ludo, I appreciate the great feedback!
Simply excellent.
Finally can reinstall my OS after having tried many automatic tools that didn’t work with WS2016 (Rufus, Universal USB installer, Ventoy, Yumi).
Have a great day :) !
thank you, happy it worked :)
Hello Thomas
I have tried to improve the script “a bit”:
#Requires -RunAsAdministrator
param (
[Parameter(Mandatory = $true)]
[ValidateScript({
if (-Not ($_ | Test-Path -Type Leaf)) {
throw “The ISO-file doesn’t exists”
}
elseif ($_ -NotMatch “\.iso$”) {
throw “The file is not endning on .iso – Please verify if it is a valid ISO-File!”
}
return $true
})]
[System.IO.FileInfo]$ISOFile,
[Parameter(Mandatory = $false)]
[System.IO.DirectoryInfo]$ImageTempDir = “C:\Temp\newimage”
)
# Get the USB Drive you want to use, copy the disk number
$USBDrives = Get-Disk | Where-Object BusType -eq “USB”
if($USBDrives.count -ge 1){
Write-Host “================ Available USB-Drives ================”
foreach($USBDrive In $USBDrives){
Write-Host “Press ‘$($USBDrive.Number)’ for `”$($USBDrive.FriendlyName)`””
}
do {
$SelectedUSBDriveNumber = $(Read-Host “Select the USB Drive from about you want to write image to”)
} until ($SelectedUSBDriveNumber -match “^([0-9]){1,}$” -and ($($USBDrives | Where-Object { $_.Number -eq $SelectedUSBDriveNumber }).count -eq 1))
}
else{
Write-Error “No available USB-Drives found!”
exit
}
# Get the right USB Drive (You will need to change the number)
$SelectedUSBDrive = $USBDrives | Where-Object { $_.Number -eq $SelectedUSBDriveNumber }
# Replace the Friendly Name to clean the USB Drive (THIS WILL REMOVE EVERYTHING)
$SelectedUSBDrive | Clear-Disk -RemoveData -Confirm:$true -PassThru
# Convert Disk to GPT
$SelectedUSBDrive | Set-Disk -PartitionStyle GPT
# Create partition primary and format to FAT32
$USBDriveVolume = $SelectedUSBDrive | New-Partition -Size 8GB -AssignDriveLetter | Format-Volume -FileSystem FAT32 -NewFileSystemLabel WININSTALL
# Driver letter for selected USB
$USBDriveLetter = $USBDriveVolume.DriveLetter
# Create temp diectroy for new image
$ImageTempDir = New-Item -Path $ImageTempDir -ItemType Directory
# Mount iso
$ISOMounted = Mount-DiskImage -ImagePath $ISOFile -StorageType ISO -PassThru
# Driver letter for mounted ISO
$ISODriveLetter = ($ISOMounted | Get-Volume).DriveLetter
# Copy Files to temporary new image folder
Copy-Item -Path ($ISODriveLetter + “:\*”) -Destination $ImageTempDir -Recurse
# Split and copy install.wim (because of the filesize)
dism /Split-Image /ImageFile:”$ImageTempDir\sources\install.wim” /SWMFile:”$ImageTempDir\sources\install.swm” /FileSize:4096
# Copy Files to USB (Ignore install.wim)
Copy-Item -Path “$ImageTempDir\*” -Destination ($USBDriveLetter + “:\”) -Recurse -Exclude install.wim
# Dismount ISO
Dismount-DiskImage -ImagePath $ISOFile