Microsoft added some amazing new features and improvements to Hyper-V over the past few years. A lot of them you can use in Windows Server 2016 Hyper-V today, but there are also a lot of features hidden in the user interface, and they are also included in Windows 10 Pro or Enterprise. I think this list should you a good idea about some of them.
Nested Virtualization
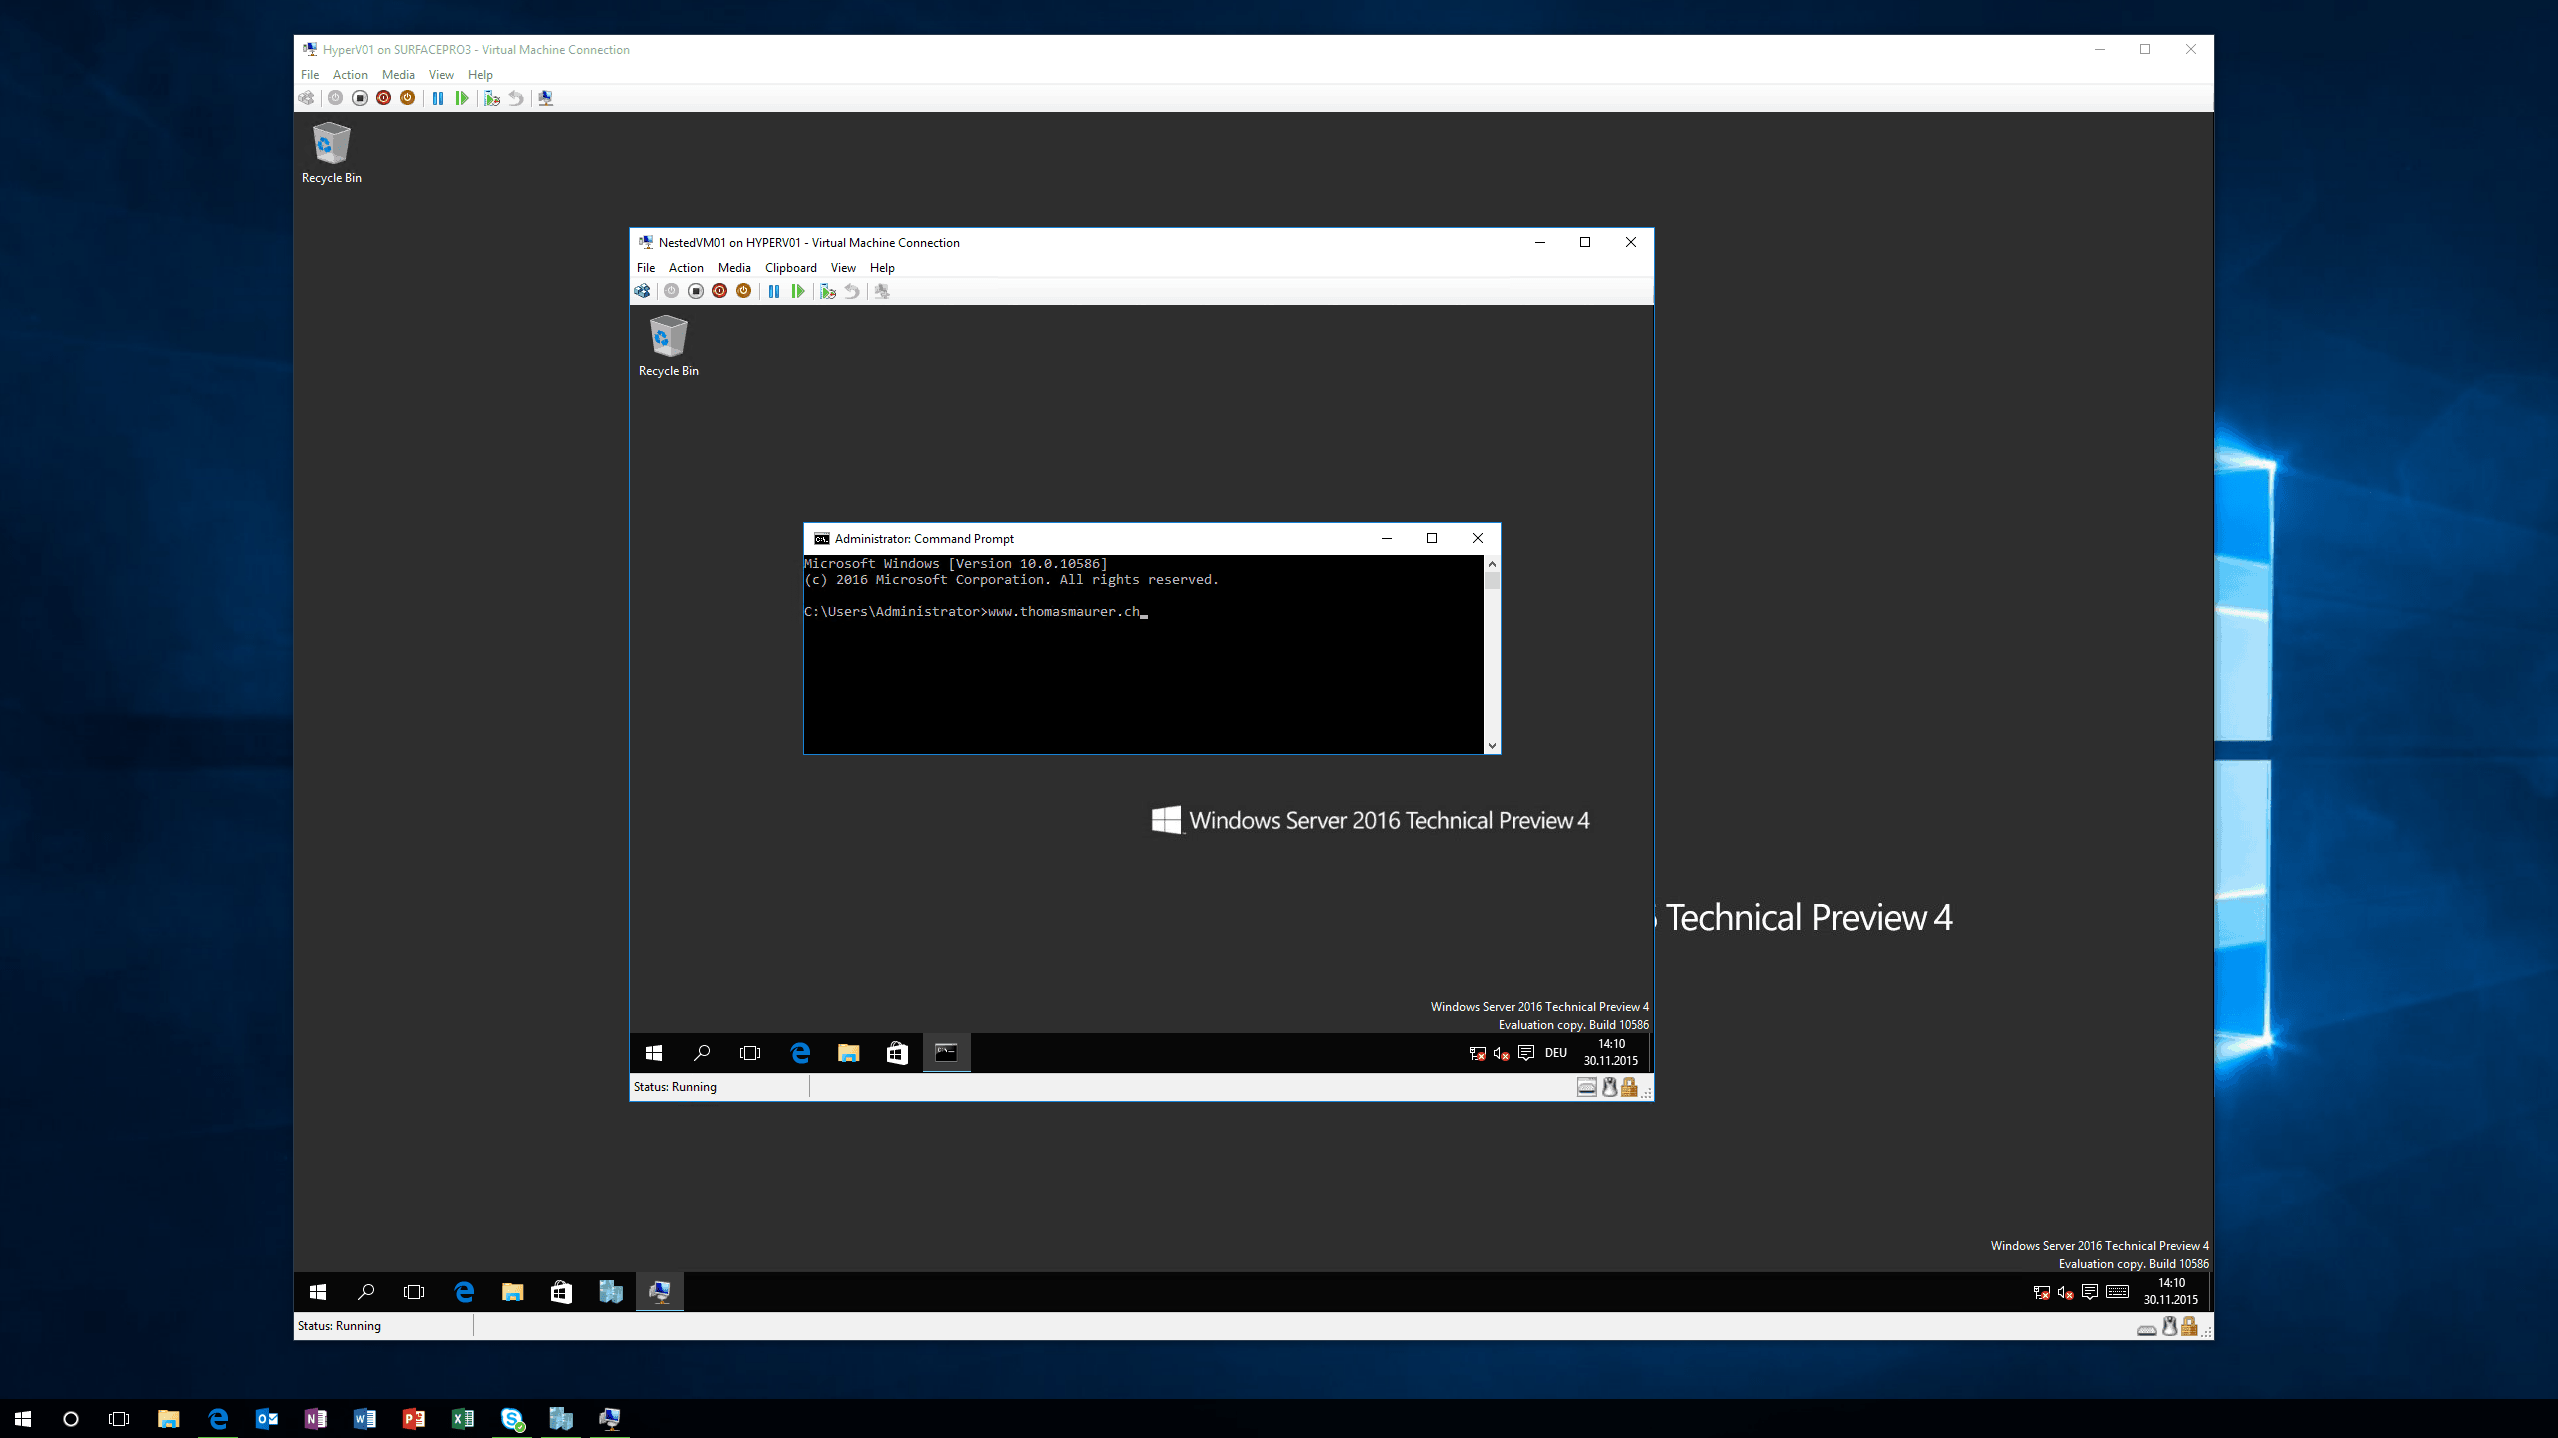
Hyper-V Nested Virtualization allows you to run Hyper-V in a Hyper-V Virtual Machine. This is great for testing, demo and training scenarios and it works on Windows Server 2016 and Windows 10 Pro and Enterprise. Microsoft Azure will also offer some new Virtual Machine which will provide the Nested Virtualization feature in the Azure public cloud. Nested Virtualization is not just great if you want to run virtual machines inside a virtual machine, it is also great (and I think this will be the most significant use case in the future) you can also run Hyper-V Container inside a Hyper-V or Azure Virtual Machine. Hyper-V Containers are a feature that will bring the isolation of a Virtual Machine to a fast, light, and small footprint container. To enable Nested Virtualization, you have the following requirements:
- At least 4 GB RAM available for the virtualized Hyper-V host.
- To run at least Windows Server 2016 or Windows 10 build 10565 (and higher) on both the physical Hyper-V host and the virtualized host. Running the same build in both the physical and virtualized environments generally improves performance.
- A processor with Intel VT-x (nested virtualization is available only for Intel processors at this time).
- Other Hypervisors will not work
Configure the Virtual Machine for Nested Virtualization, follow the following steps:
- disable Dynamic Memory on Virtual Machine
- enable Virtualization Extensions on the vCPU
- enable MAC Address Spoofing
- set Memory of the Virtual Machine to a minimum of 4GB RAM
To enable the Virtualization Extensions on the vCPU you can run the following PowerShell command
Set-VMProcessor -VMName "VMName" -ExposeVirtualizationExtensions $true
PowerShell Direct
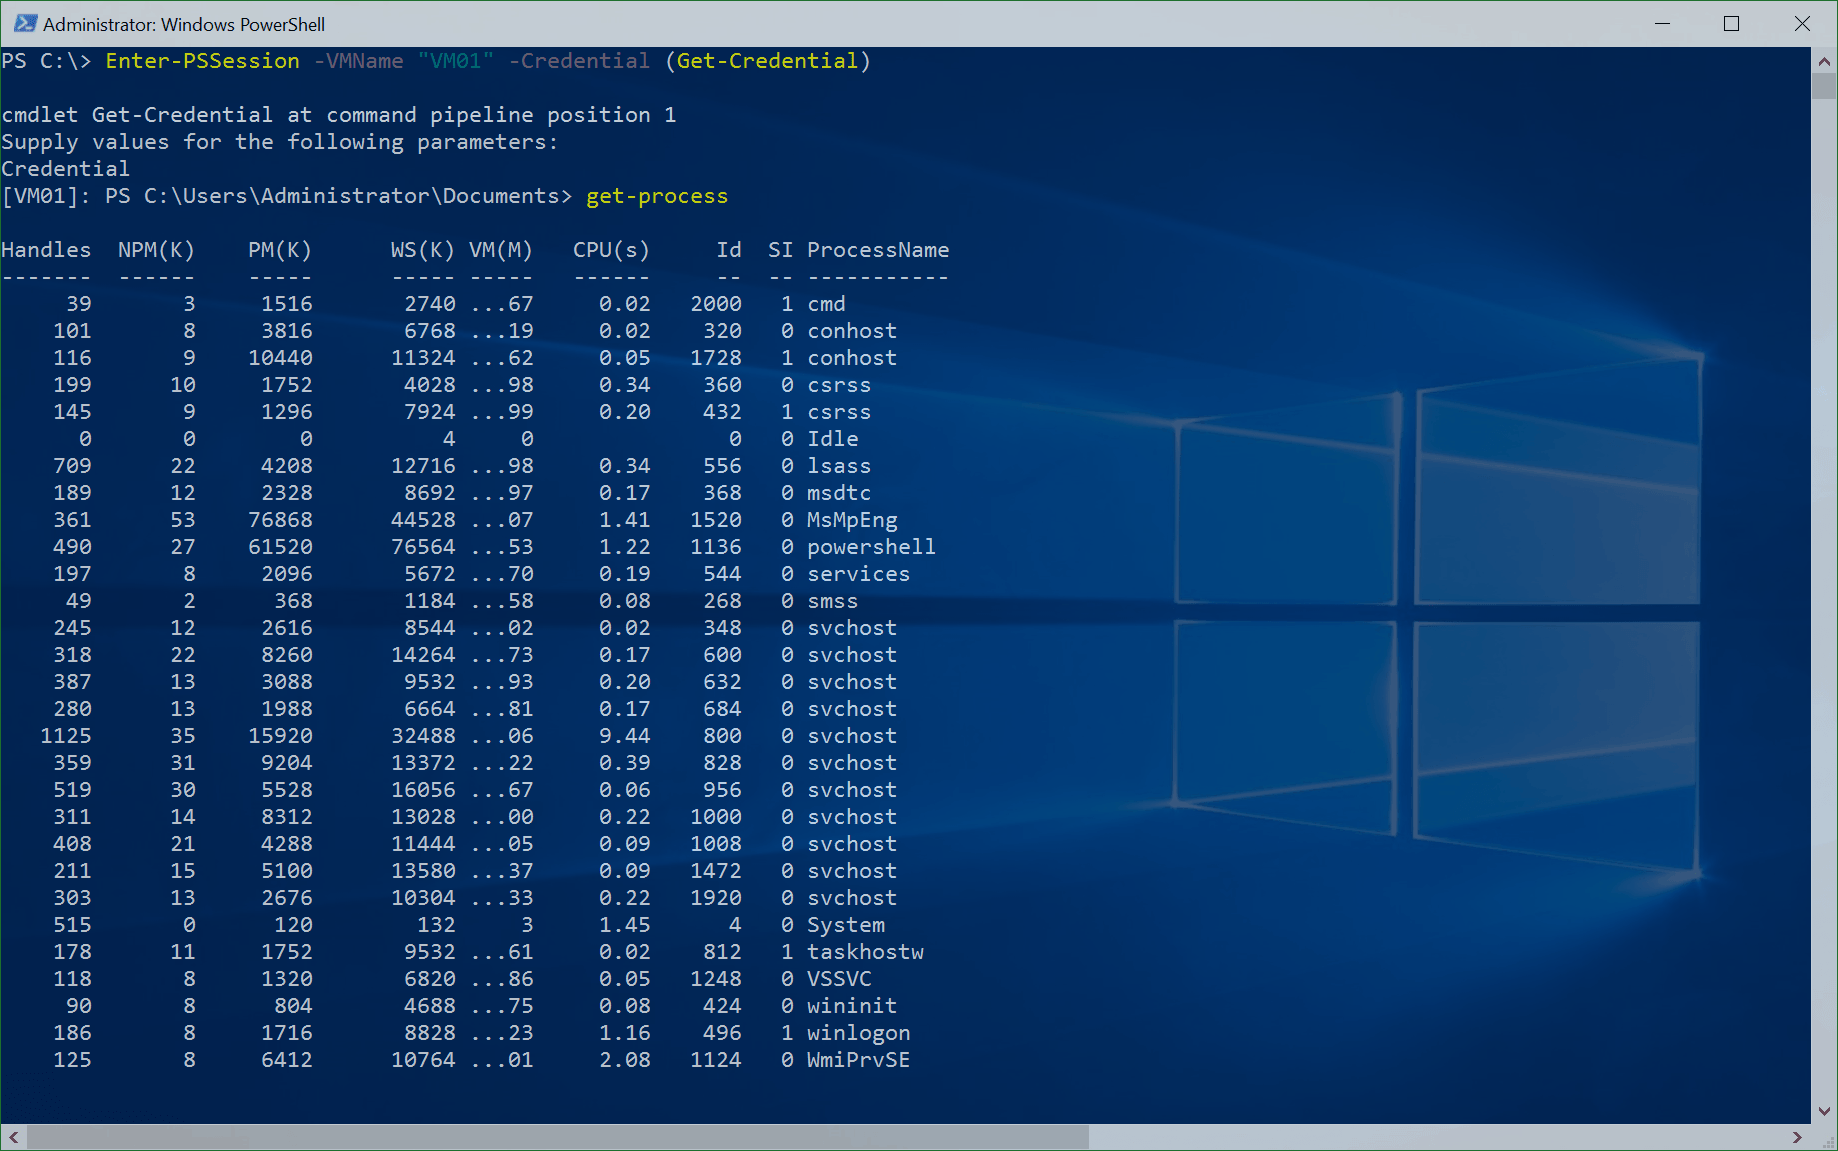
Hyper-V PowerShell Direct is also one of the great new features in Windows 10 and Windows Server 2016 Hyper-V. PowerShell Direct allows you to connect to a Virtual Machine using PowerShell without connecting over the network. Instead of the network, PowerShell Direct uses the Hyper-V VMBus to connect from the Hyper-V host to the virtual machine. This is handy if you are doing some automation or you don’t have network access to the virtual machine. In terms of security, you will still need to provide credentials to access the virtual machine.
To use PowerShell Direct, you have the following requirements:
- The virtual machine must be running locally on the Hyper-V host and must be started.
- You must be logged into the host computer as a Hyper-V administrator.
- You must supply valid user credentials for the virtual machine.
- The host operating system must run Windows 10, Windows Server 2016, or a higher version.
- The virtual machine must run Windows 10, Windows Server 2016, or a higher version.
To use PowerShell Direct, you can use the Enter-PSSession or Invoke-Command cmdlets with the -VMName, -VMId or VM parameter.
Enter-PSSession -VMName "VM01" -Credential (Get-Credential)
Hyper-V Virtual Switch using NAT
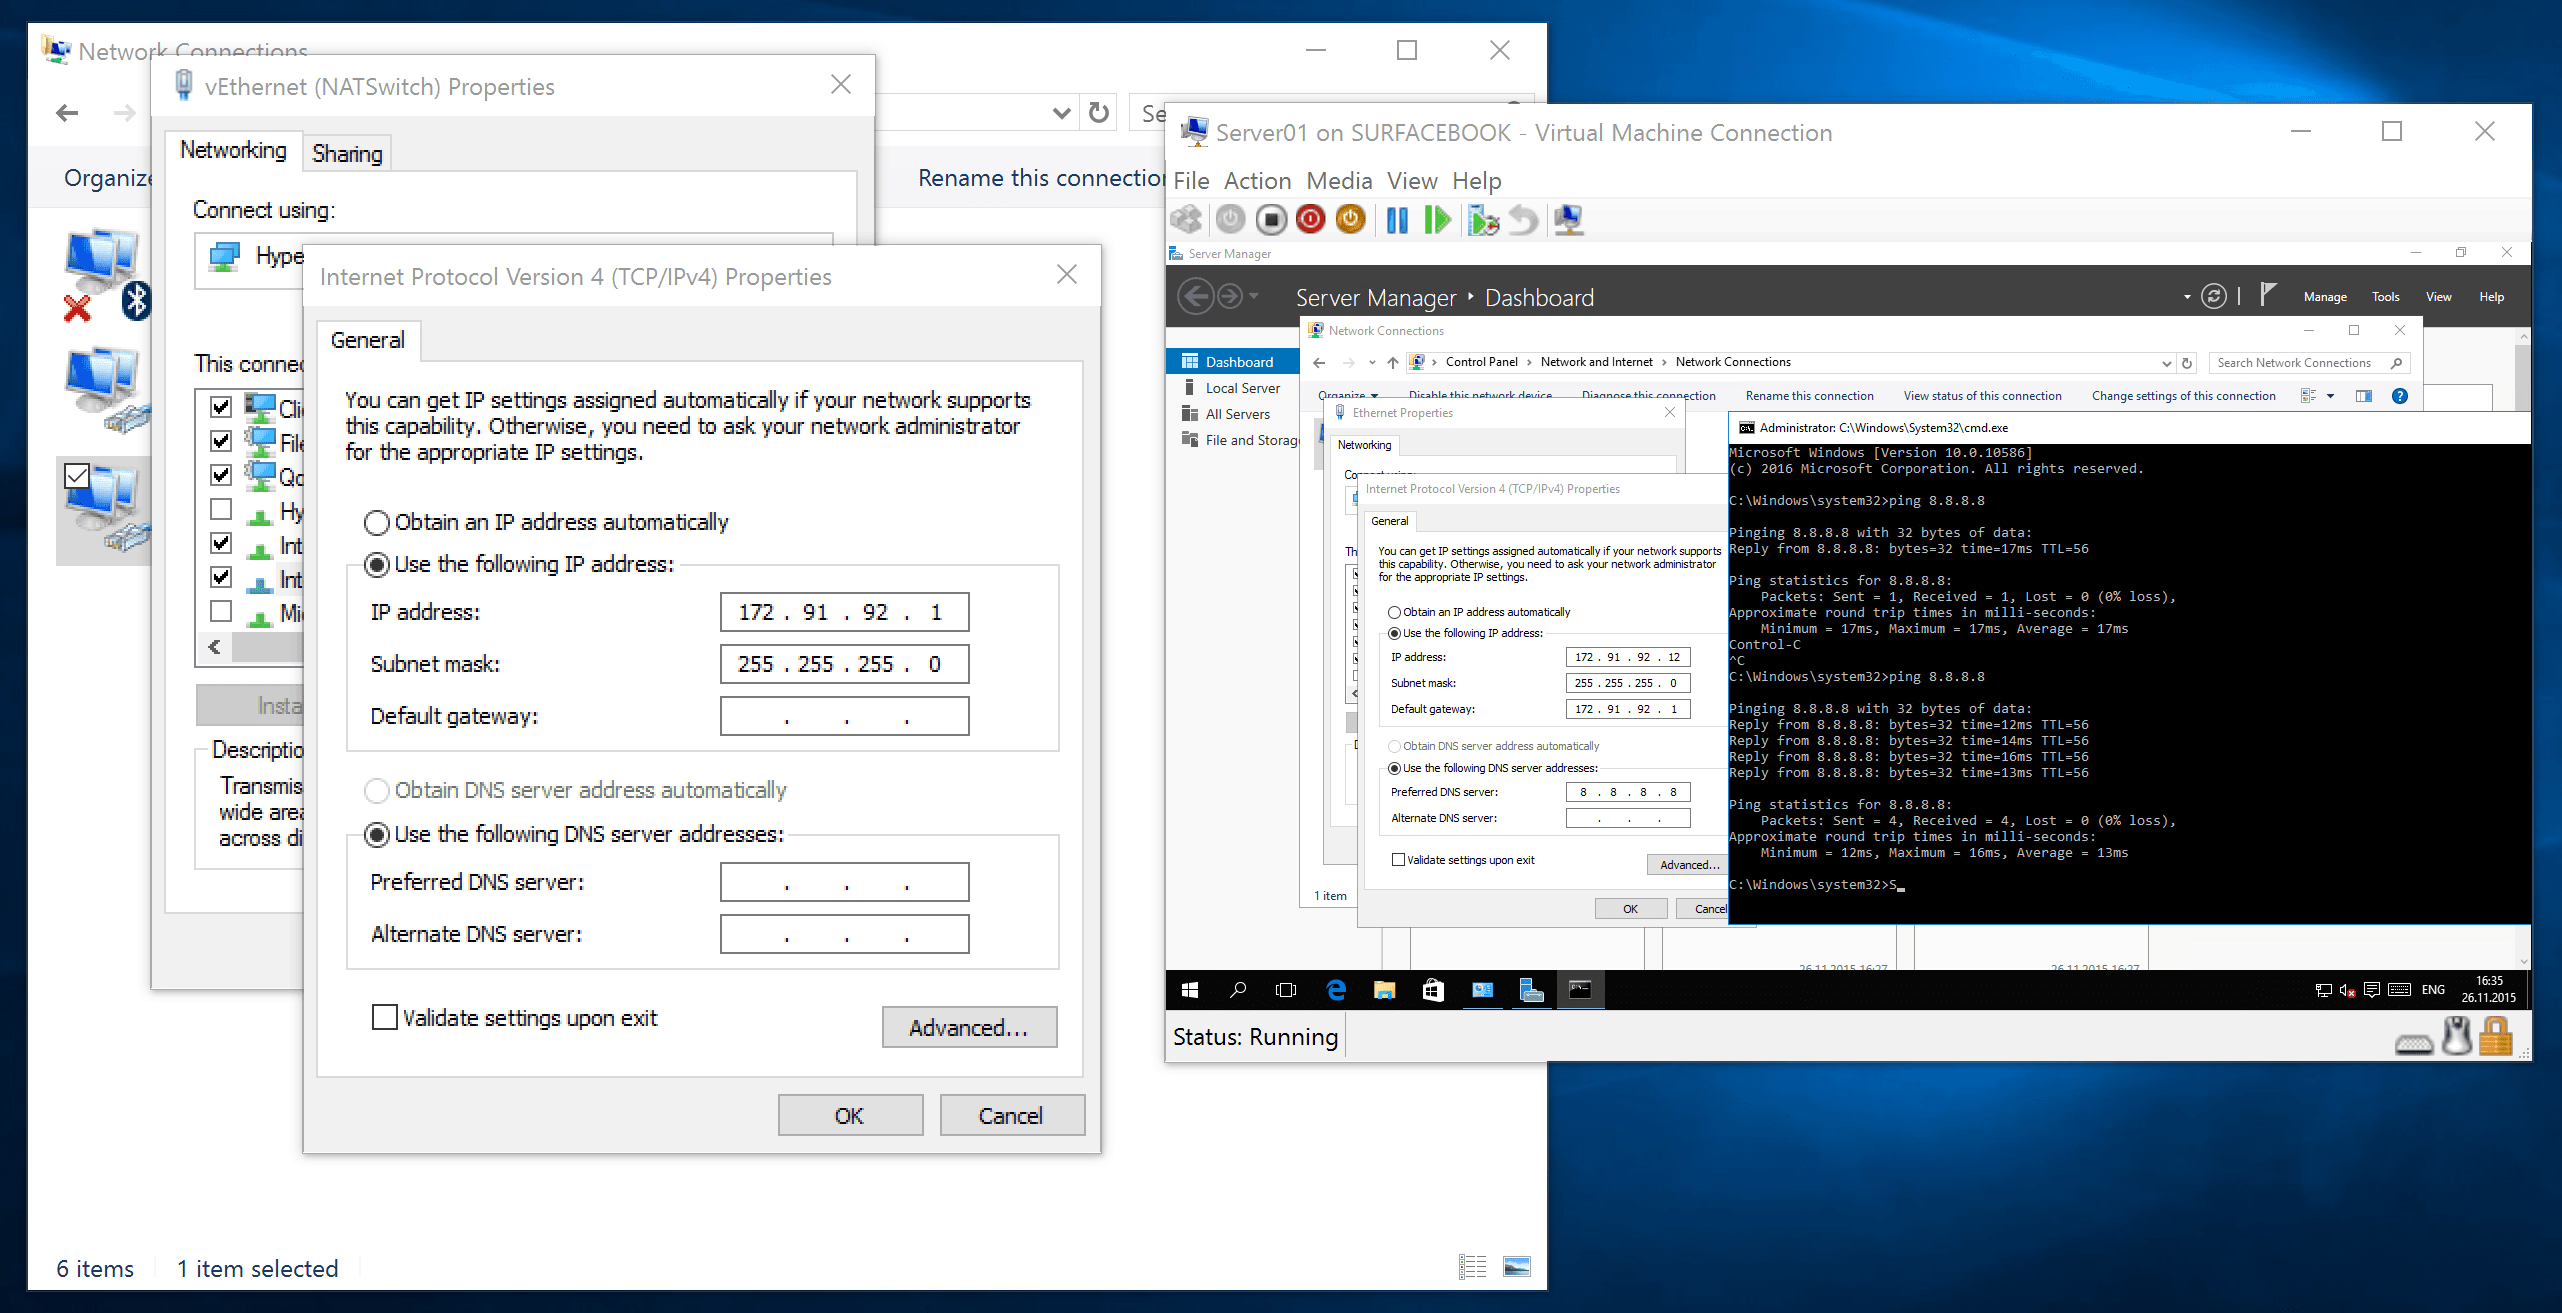
If you are running Hyper-V on your workstation or laptop, you know that networking could have been a problem. With the Hyper-V Virtual Switch using NAT, you can now create an internal network for your virtual machines and still allow them to for example have internet access, like you would run your virtual machines behind a router. To use this feature, you have the following requirements:
- Windows 10 and Windows Server 2016 build 14295 or later
- Enabled Hyper-V role
To enable the NAT Switch, you can first create an internal switch using PowerShell, then the IP Address on the Virtual NIC on the Management OS and then set the NAT configuration:
New-VMSwitch –SwitchName “NATSwitch” –SwitchType Internal

New-NetIPAddress –IPAddress 172.21.21.1 -PrefixLength 24 -InterfaceAlias "vEthernet (NATSwitch)"

New-NetIPAddress –IPAddress 172.21.21.1 -PrefixLength 24 -InterfaceAlias "vEthernet (NATSwitch)"
To create NAT forwarding rules you can, for example, use the following command:
Add-NetNatStaticMapping -NatName “VMSwitchNat” -Protocol TCP -ExternalIPAddress 0.0.0.0 -InternalIPAddress 172.21.21.2 -InternalPort 80 -ExternalPort 80
Virtual Battery for Virtual Machines
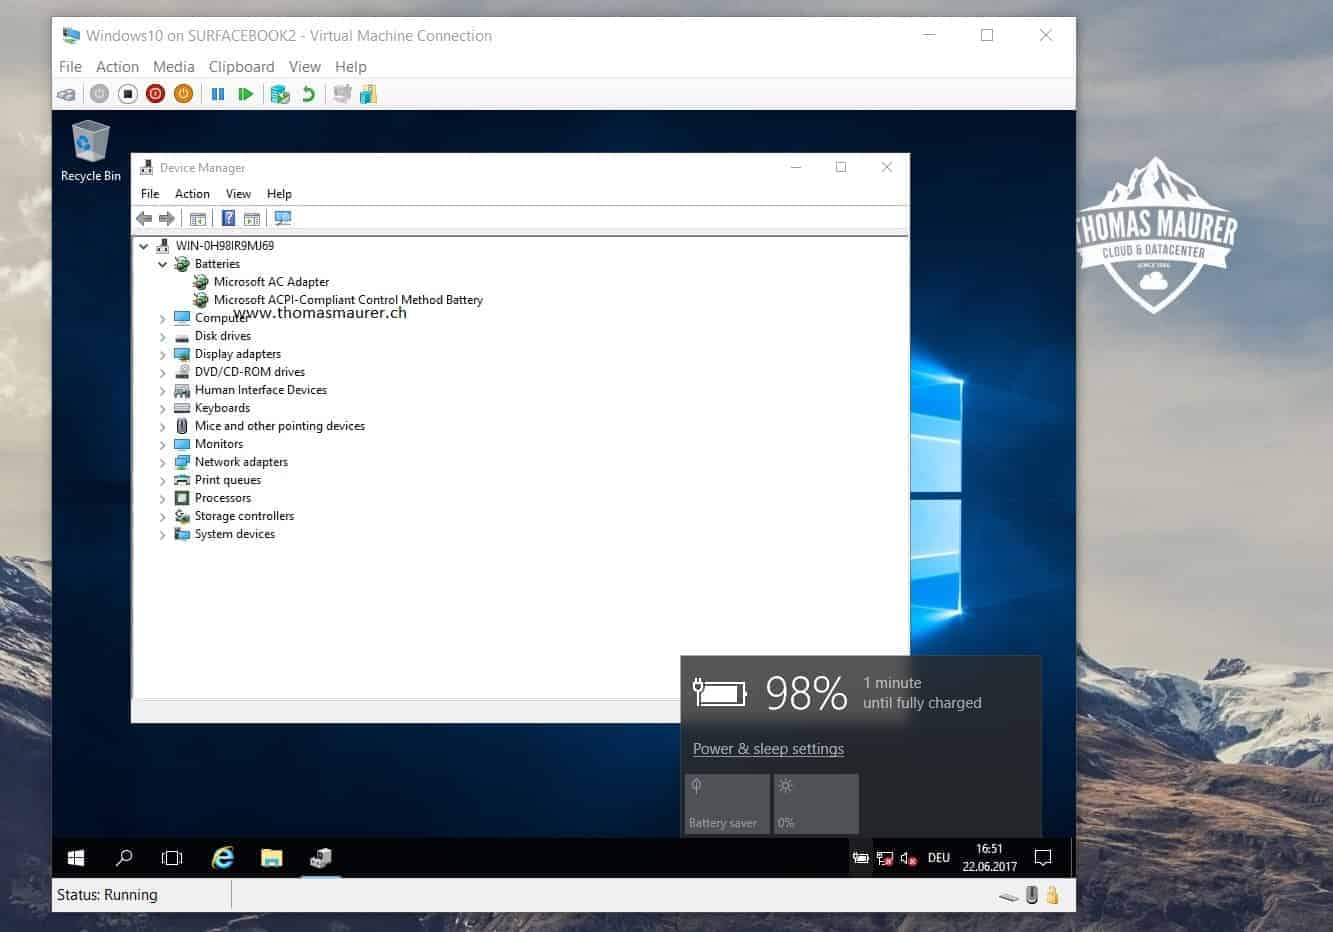
With the Windows 10 Insider Build XXXX and later with the release of the Windows 10 Fall Creators Update, Microsoft enabled a Virtual Battery feature for Hyper-V Virtual Machines. This will allow Hyper-V VMs to see the battery status of the host. This is great when you are running Hyper-V on a notebook or if you have a battery on your server
Hyper-V VMConnect – Enhanced Session Mode

Interacting with Virtual Machines can be difficult and time consuming using the default VM console since you can not copy paste or connect devices. VMConnect lets you use a computer’s local resources in a virtual machine, like a removable USB flash drive or a printer and in addition to this, Enhanced session mode also lets you resize the VMConnect window and use copy paste. This makes it almost as if you would use the Remote Desktop Client to connect to the Virtual Machine, without a network connection, instead you will make use of the VMBus.
The Enhanced Session Mode feature was introduced with Windows Server 2012 R2 and Windows 8.1. Enhanced session mode provides your Virtual Machine Connection with RDP (Remote Desktop Protocol) capabilities over the Hyper-V VMBus, including the following:
- Display Configuration
- Audio redirection
- Printer redirection
- Full clipboard support (improved over limited prior-generation clipboard support)
- Smart Card support
- USB Device redirection
- Drive redirection
- Redirection for supported Plug and Play devices
Requirements for the Enhanced Session Mode are:
- The Hyper-V host must have Enhanced session mode policy, and Enhanced session mode settings turned on
- The computer on which you use VMConnect must run Windows 10, Windows 8.1, Windows Server 2016, or Windows Server 2012 R2 or higher
- The virtual machine must have Remote Desktop Services enabled, and run Windows 8.1 (or higher) and Windows Server 2012 R2 (or higher) as the guest operating system.
You can use it, by pressing the enhanced session button (if you have all the requirements) on the Windows 10 Client this is enabled by default on the “host”. On Windows Server, you have to enable it first in the Hyper-V Manager under Hyper-V Settings
Hyper-V Manager Zoom Level
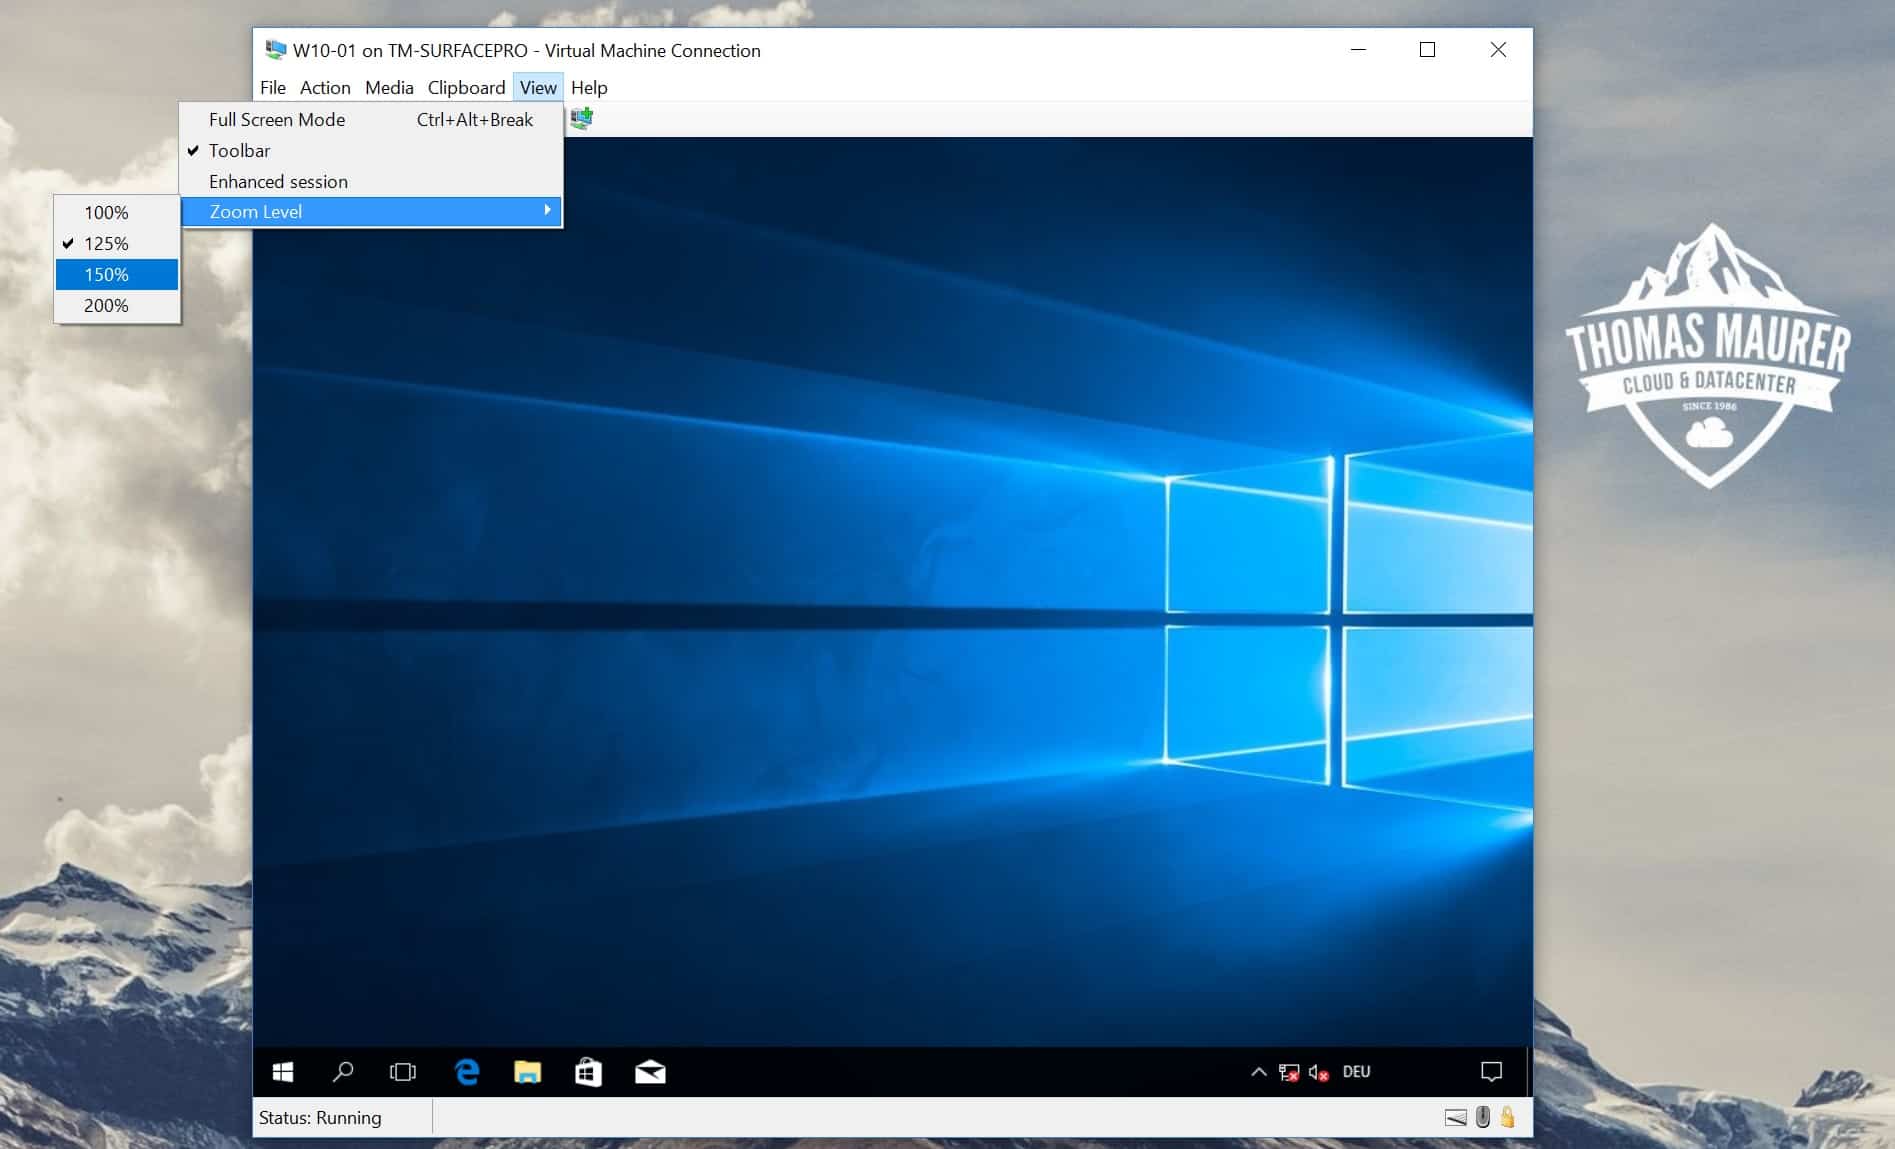
In the Windows 10 Creators Update, Microsoft introduced a new feature to the VMConnect Console. This feature allows you to control the zoom level of the Virtual Machine console, and this is especially handy if you have a high DPI screen.
Virtual TPM Chip
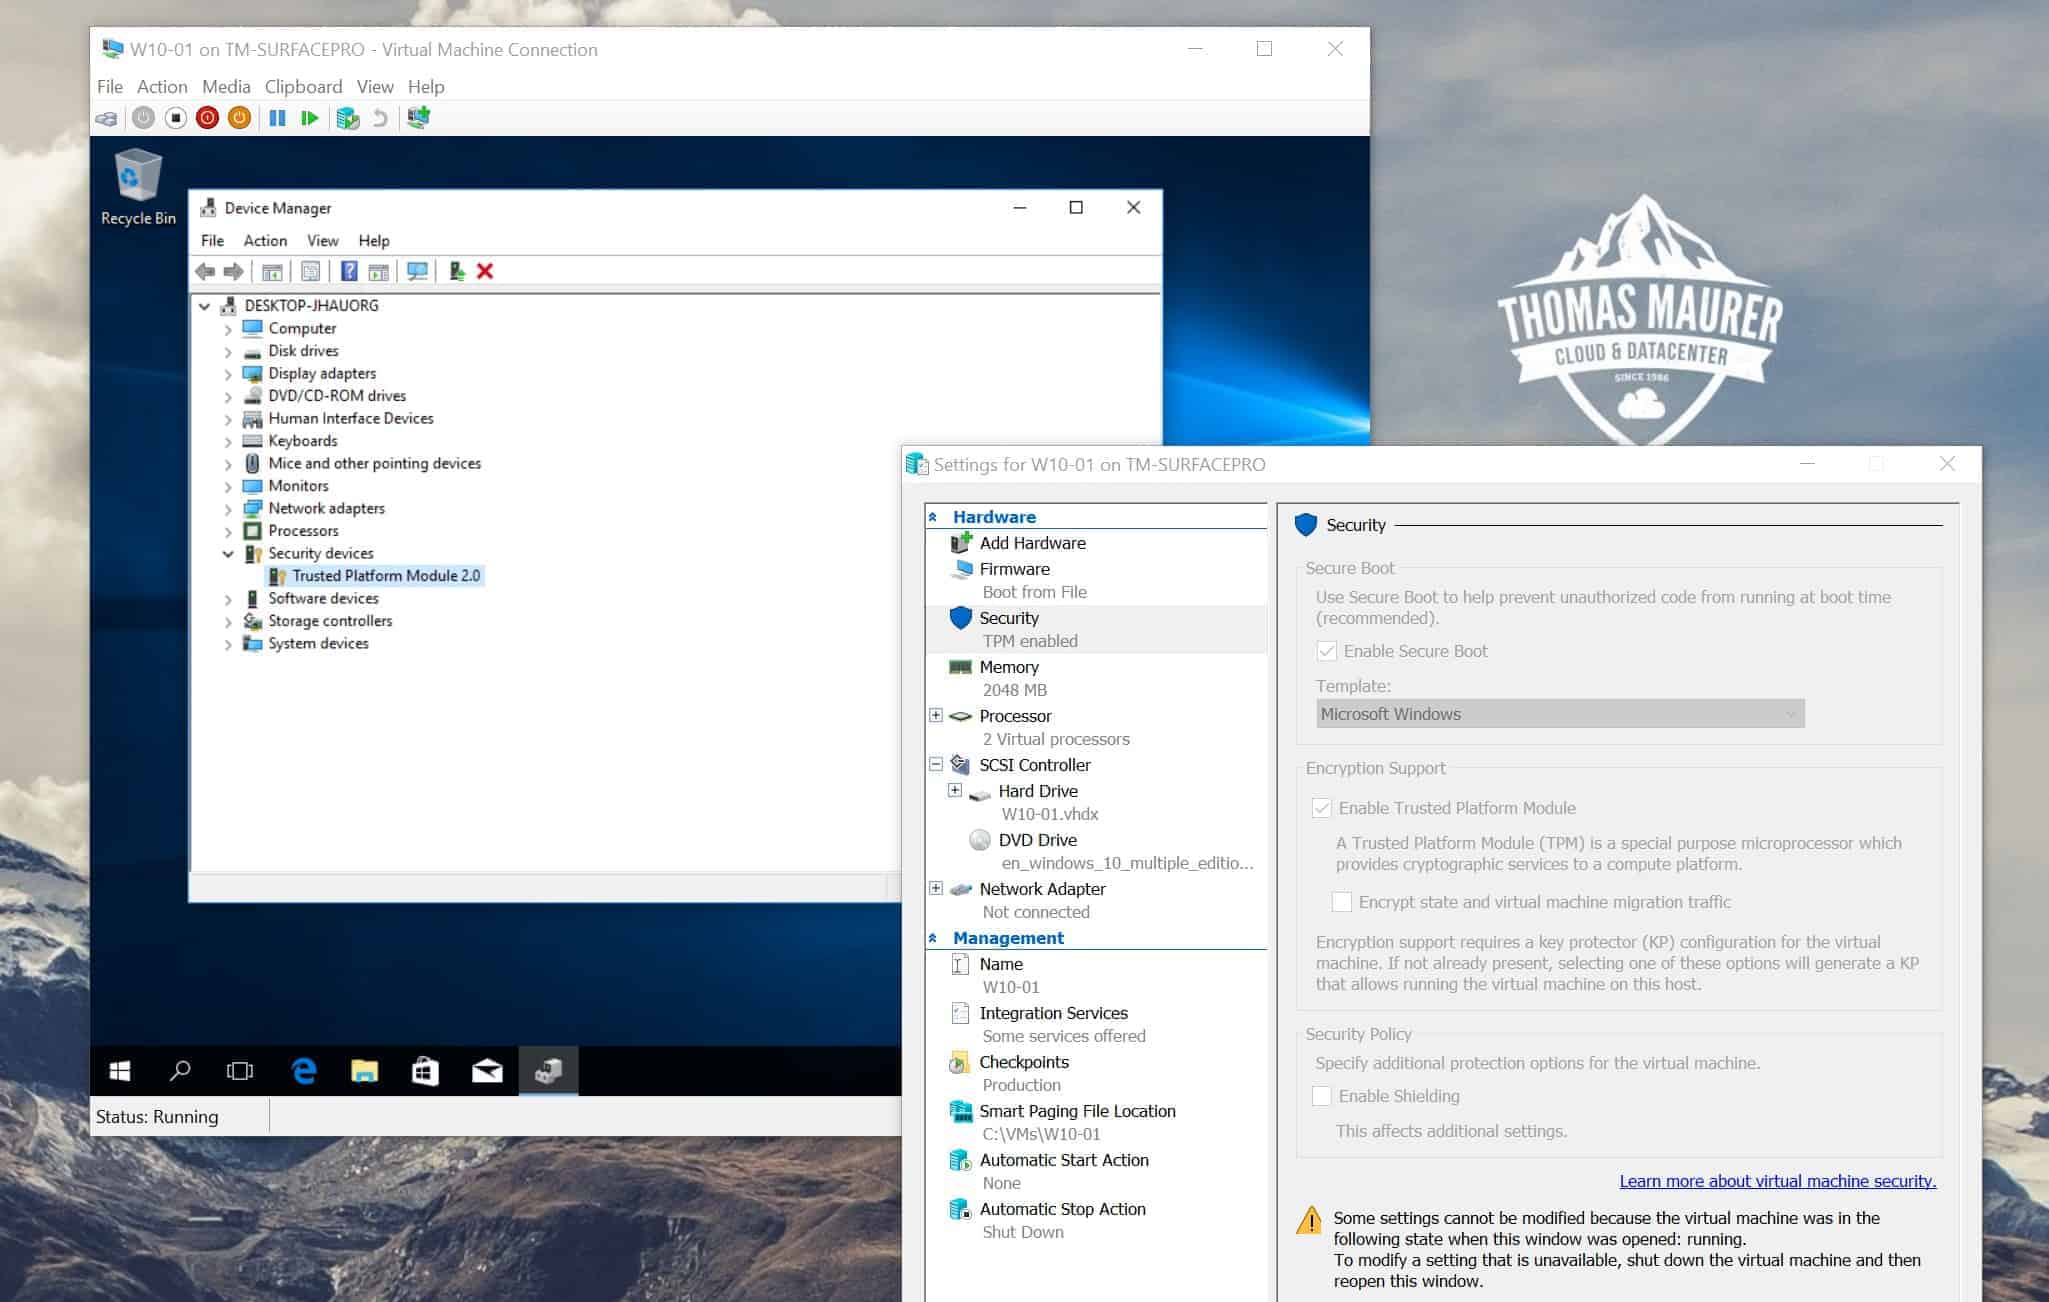
If you are running Windows 10 or Windows Server 2016 or higher, you can make use of a feature called Shielded Virtual Machines. This allows you to protect your virtual machines from being accessed from the outside. With this feature, Microsoft added different levels of security enhancements. One of them is the possibility to add a Virtual TPM chip to the virtual machine. With that enabled, you can use BitLocker or another encryption technology to encrypt your virtual machine disks from inside the VM.
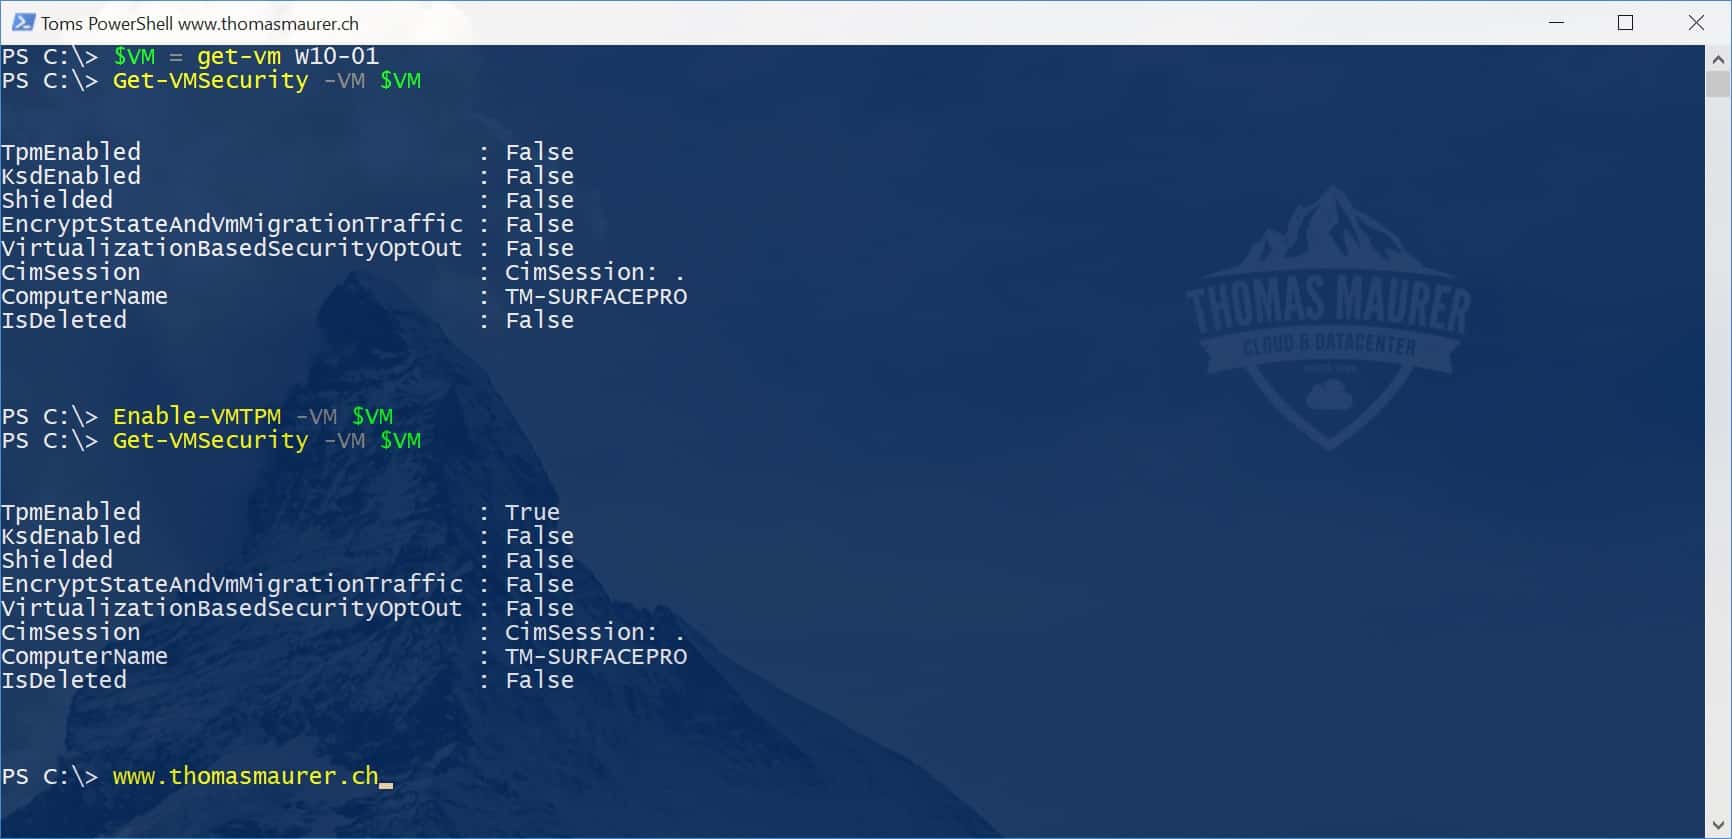
You can enable the Virtual TPM chip using the Hyper-V Manager or PowerShell. The virtual machine needs to be shut down.
Enable-VMTPM -VMName W10-01
If you need full protection, have a look at Shielded Virtual Machines with the Host Guardian Service (HGS).
VM Resource Metering

With Windows Server 2012 Hyper-V Microsoft introduced a new feature in Hyper-V called VM Resource Metering which allows you to measure the usage of a virtual machine. This will enable you to track CPU, Memory, Disk, and network usage. This is a great feature, especially if you need to do chargeback or maybe even for troubleshooting.
You can enable VM Resource Metering using PowerShell
Enable-VMResourceMetering -VMName WS2016DX
To measure the virtual machine, you can use the following command
Measure-VM -VMName WS2016DX
Export and Share Hyper-V Virtual Machines
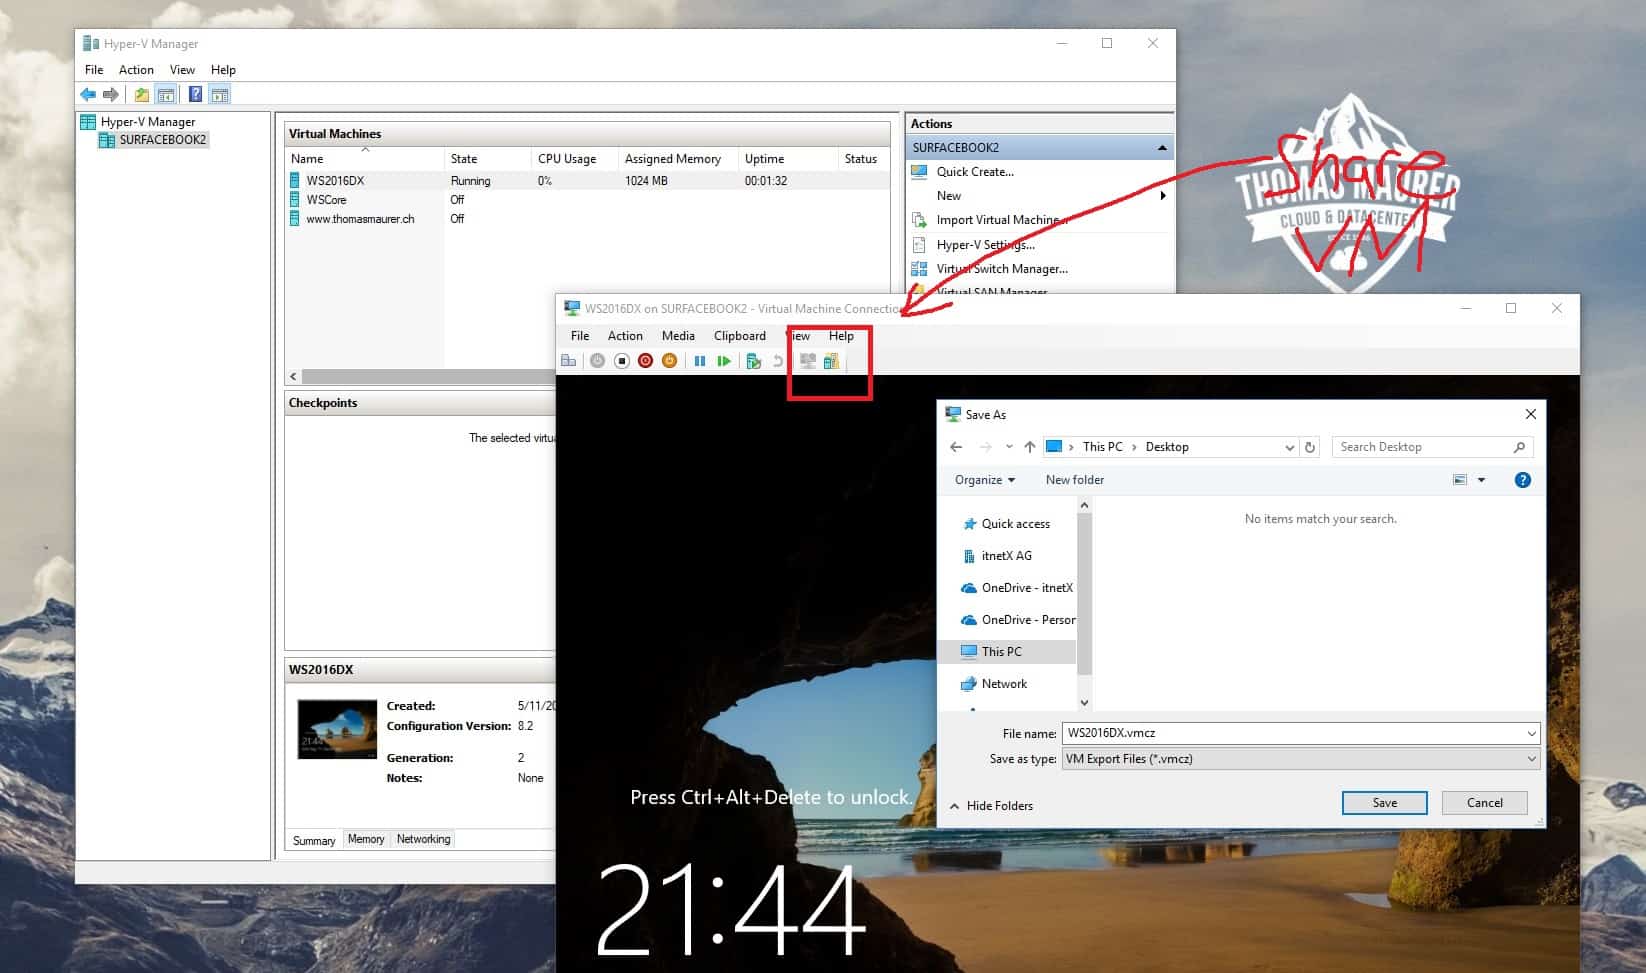
Another feature a lot of people do not know about is that you can export Hyper-V Virtual Machines to copy them to another computer or server. The great thing about this, this can even be done while the virtual machine is running and you can also export the state of the virtual machine with it. You can use the UI to do this, or you just run PowerShell using the Export-VM cmdlet.
Export-VM -Name TomsVM -Path D:\
In the Windows 10 Fall Creators Update, Microsoft also added a button to share the Virtual Machine. This does not only export the virtual machine, but it also creates a compressed VM Export File (.vmcz).
Hyper-V Containers
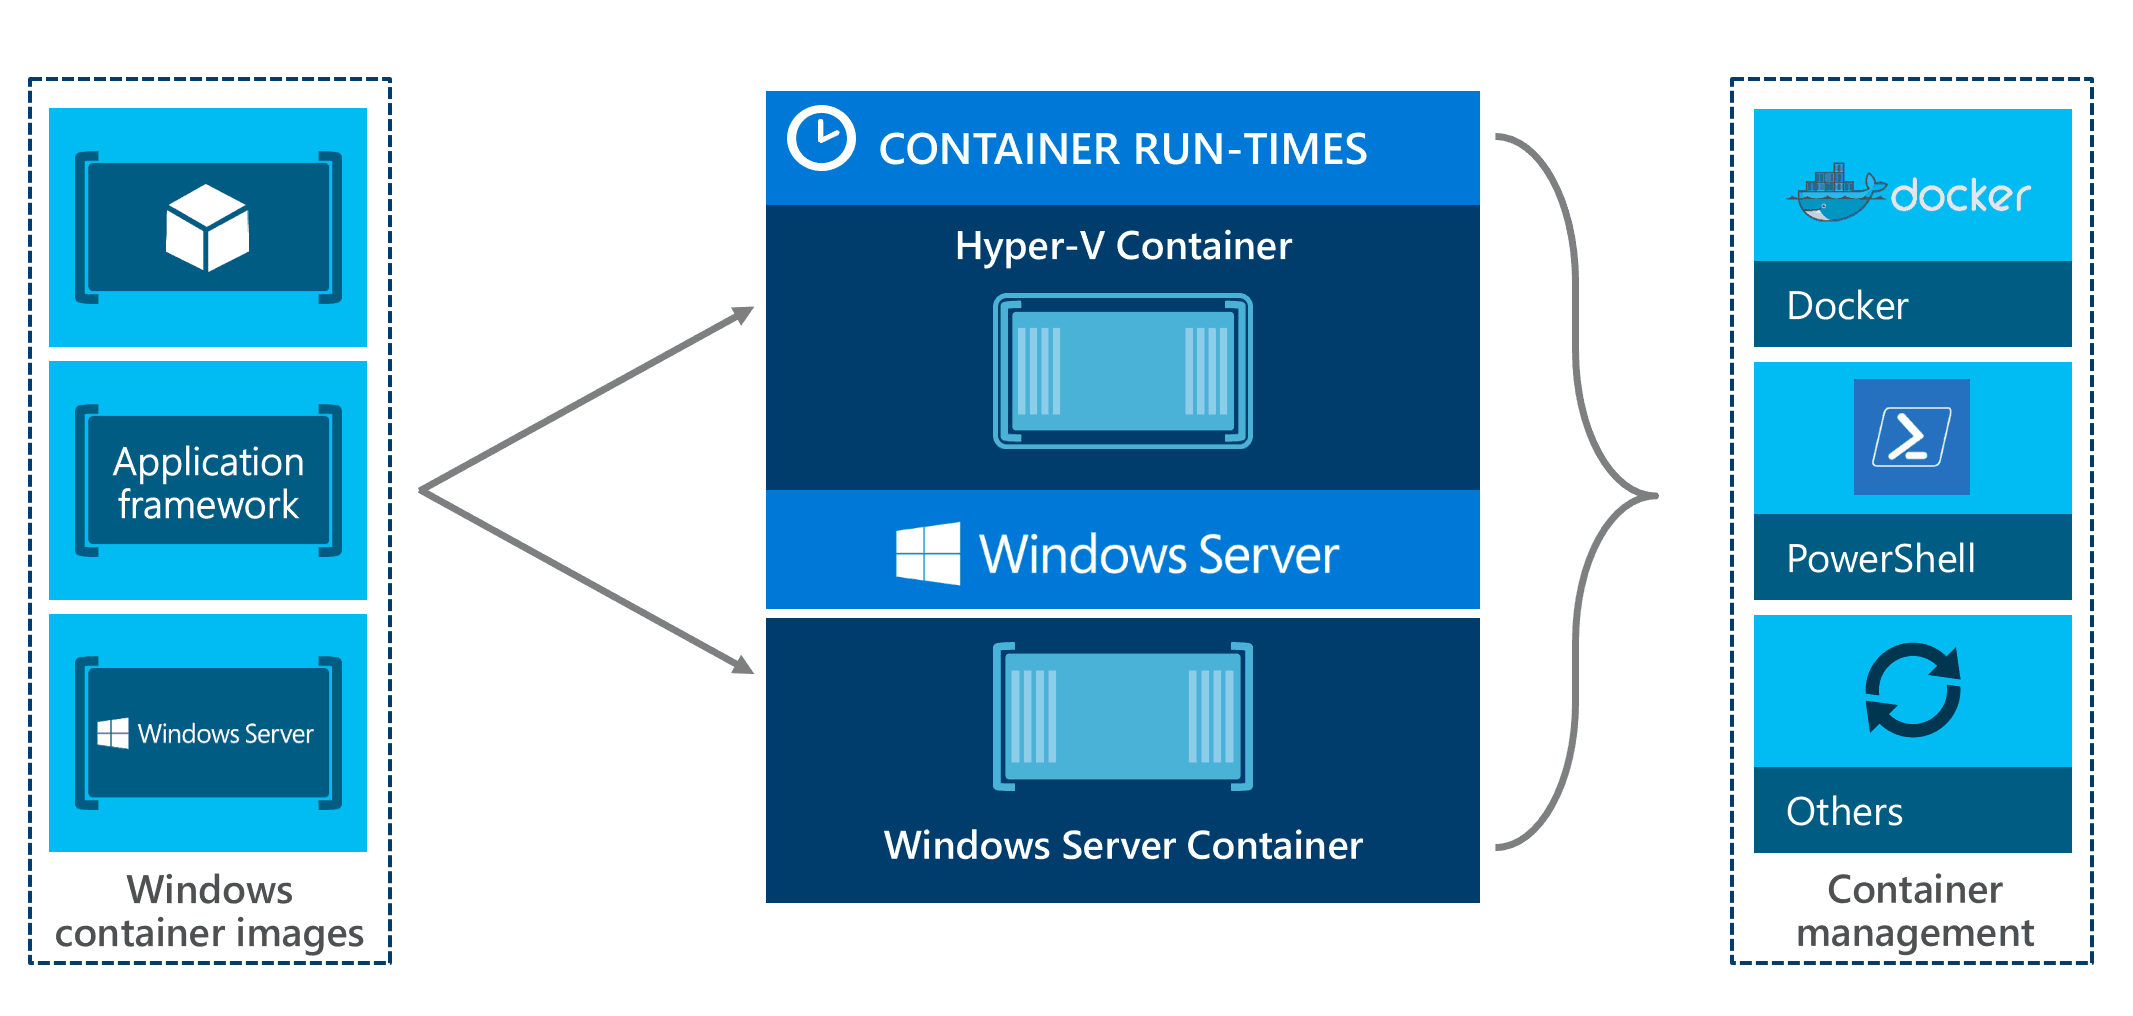
In Windows 10 and Windows Server 2016 you can run Windows Containers using Docker. While on Windows Server you can choose between running a Windows Container or a Hyper-V Container, you will always run a Hyper-V Container on Windows 10. While Hyper-V Containers and Windows Containers are fully compatible with each other, that means you can start a Windows Container in a Hyper-V Container runtime and the other way around; the Hyper-V Container gives you an extra layer of isolation between your containers and your operating system. This makes running containers not just much more secure but since the Windows 10 Fall Creators Update and Windows Server RS3 (Redstone 3), it will also allow you to run Linux Containers on a Windows Container Host, which will make Windows the best platform to run Windows Containers and Linux Containers side by side.
I hope this short list was helpful and showed you some features you didn’t know were there in Hyper-V. Some of these features are still in preview and are might not available in production versions of Hyper-V. Leave your favorite secret Hyper-V features in the comments!
Tags: Cloud, Container, Docker, Enhanced Session Mode, features, Hyper-V, Hyper-V 2016, Hyper-V Manager, Microsoft, NAT Network, NAT Switch, Nested Virtualization, PowerShell, PowerShell Direct, Secret, Virtual Battery, Virtual Machine, Virtual TPM, Virtualization, VMConnect, vTPM, Windows Server, Zoom Level Last modified: June 19, 2019


How do I isolate traffic from networks that are connected to this NAT from my home network? Even inserting a vlan tag into the virtual switch and vm’s network interface can I still ping my physical machine, how to isolate one from the other?
Well if you are using NAT then the host is always connected. If you want to complete Isolate, you will need to use an external Switch with a VLAN Tag and disable the Management Network Adapter option in the Virtual Switch settings.
what is a quick way to have the VM get access to the local hard drives of the server?
I think the best and easiest way, is to use Enhanced Session mode from the Host and map the local harddrive. However, this is session-based, and not for a consistent long-term access. Would that be enough for you?
Hello Thomas Sir, i created one External NAT and connected my nested vm’s with External Virtual Switch. Now i want to reach to my nested vm’s with RDP from outside, How can i reach them from outside ??
You will need to create NAT rules and Port Mappings.
You will find more information here: https://www.thomasmaurer.ch/2016/05/set-up-a-hyper-v-virtual-switch-using-a-nat-network/
How to connect USB devices from hyper-v machines, USB hardware is not detect in hyper-v machine, but its shows in main machine… i have a USB devices, its not a storage.. please advice
The option you have is to use enhanced session mode. This will bring a popup (looks similar to the RDP connection). There you can select local devices such as USB drives etc to connect to the VM. However, if you close the enhanced session mode windows, the connection is lost.
Hi Thomas, I need to prevent creating a clone of my VM, so I tried to find a unique identifier for Hyper-V VM. I checked /etc/machine-id (I’m using Ubuntu on my VM), dmidecode, smbios-sys-info-lite and all of them gave me the identical results for original & clone VM (I used Export to create a clone). Do you know a way to provide a unique ID for every new VM and get access to this ID from inside VM OS? Thank you!
so is somebody spying on me or not -.- i couldn’t make it past the enhanced session mode lol