Update:
This blog post is blog post is for older Windows 10 builds, for newer Windows 10 (1607) and Windows Server 2016 builds please follow this blog post:
Set up a Hyper-V Virtual Switch using a NAT Network
In the latest Windows 10 build 10586 (Threshold 2) and Windows Server 2016 Technical Preview 4, Microsoft included a great new feature which is NAT mode for the Hyper-V Virtual Switch. This was mostly build for Windows Containers scenarios, but also has great value for Client Hyper-V. As of today Hyper-V had 3 different VMSwitch types called, Internal, Private and External. With the latest releases of the Windows 10 and Windows Server 2016 Technical Preview 4, Microsoft included a new VM Switch Type called NAT, which allows Virtual Machines to have a Internal Network and connect to the external world and internet using NAT. This feature right now is not included in the UI but you can use PowerShell to create the NAT Virtual Switch.
Create a new Virtual Switch using NAT:
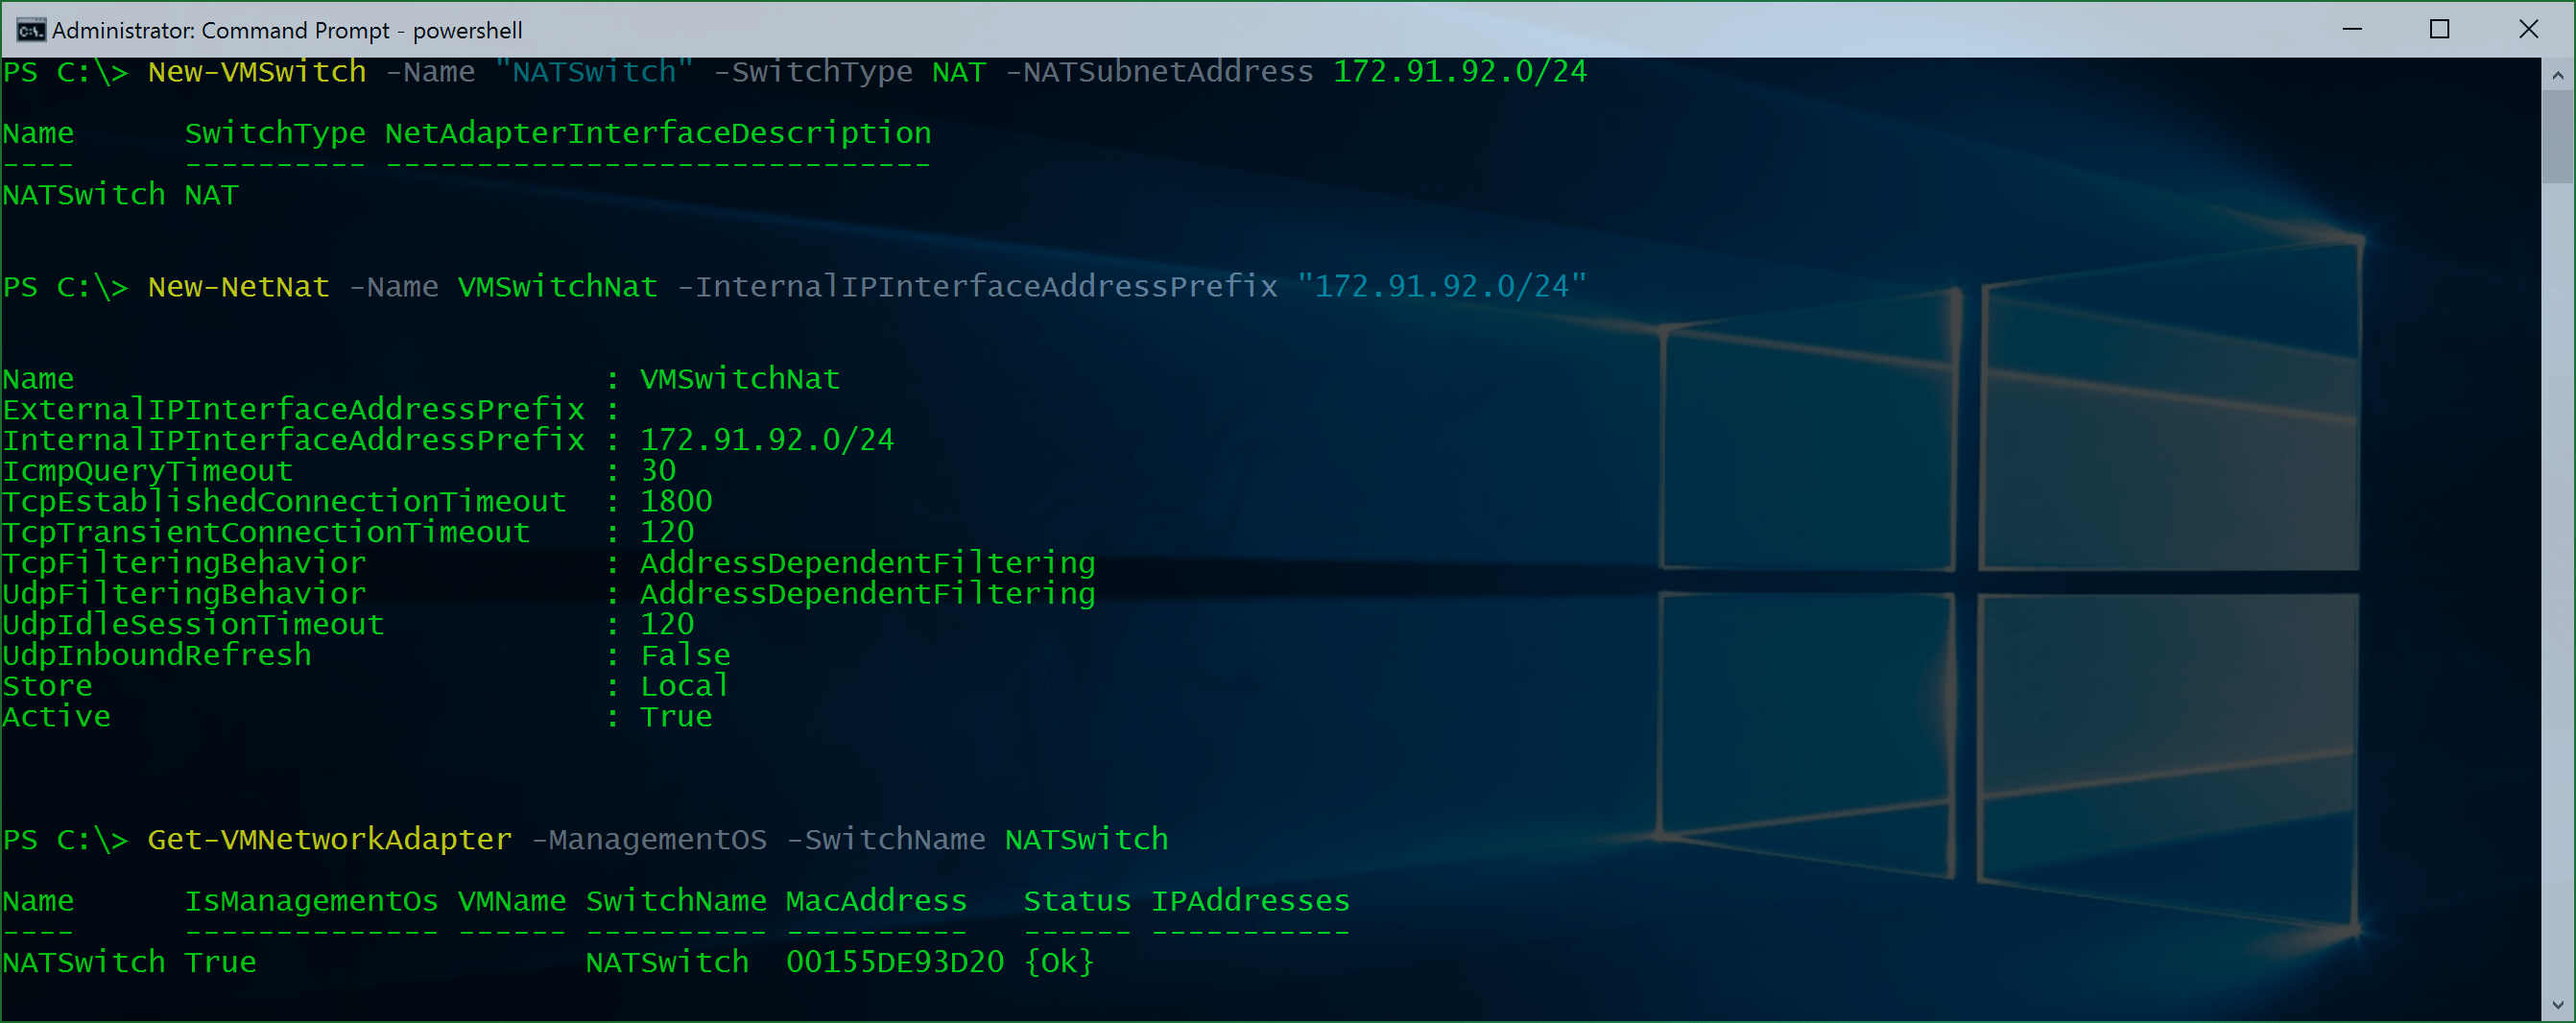
New-VMSwitch -Name "NATSwitch" -SwitchType NAT -NATSubnetAddress 172.29.92.0/24
Setup the NAT configuration:
New-NetNat -Name VMSwitchNat -InternalIPInterfaceAddressPrefix "172.29.92.0/24"
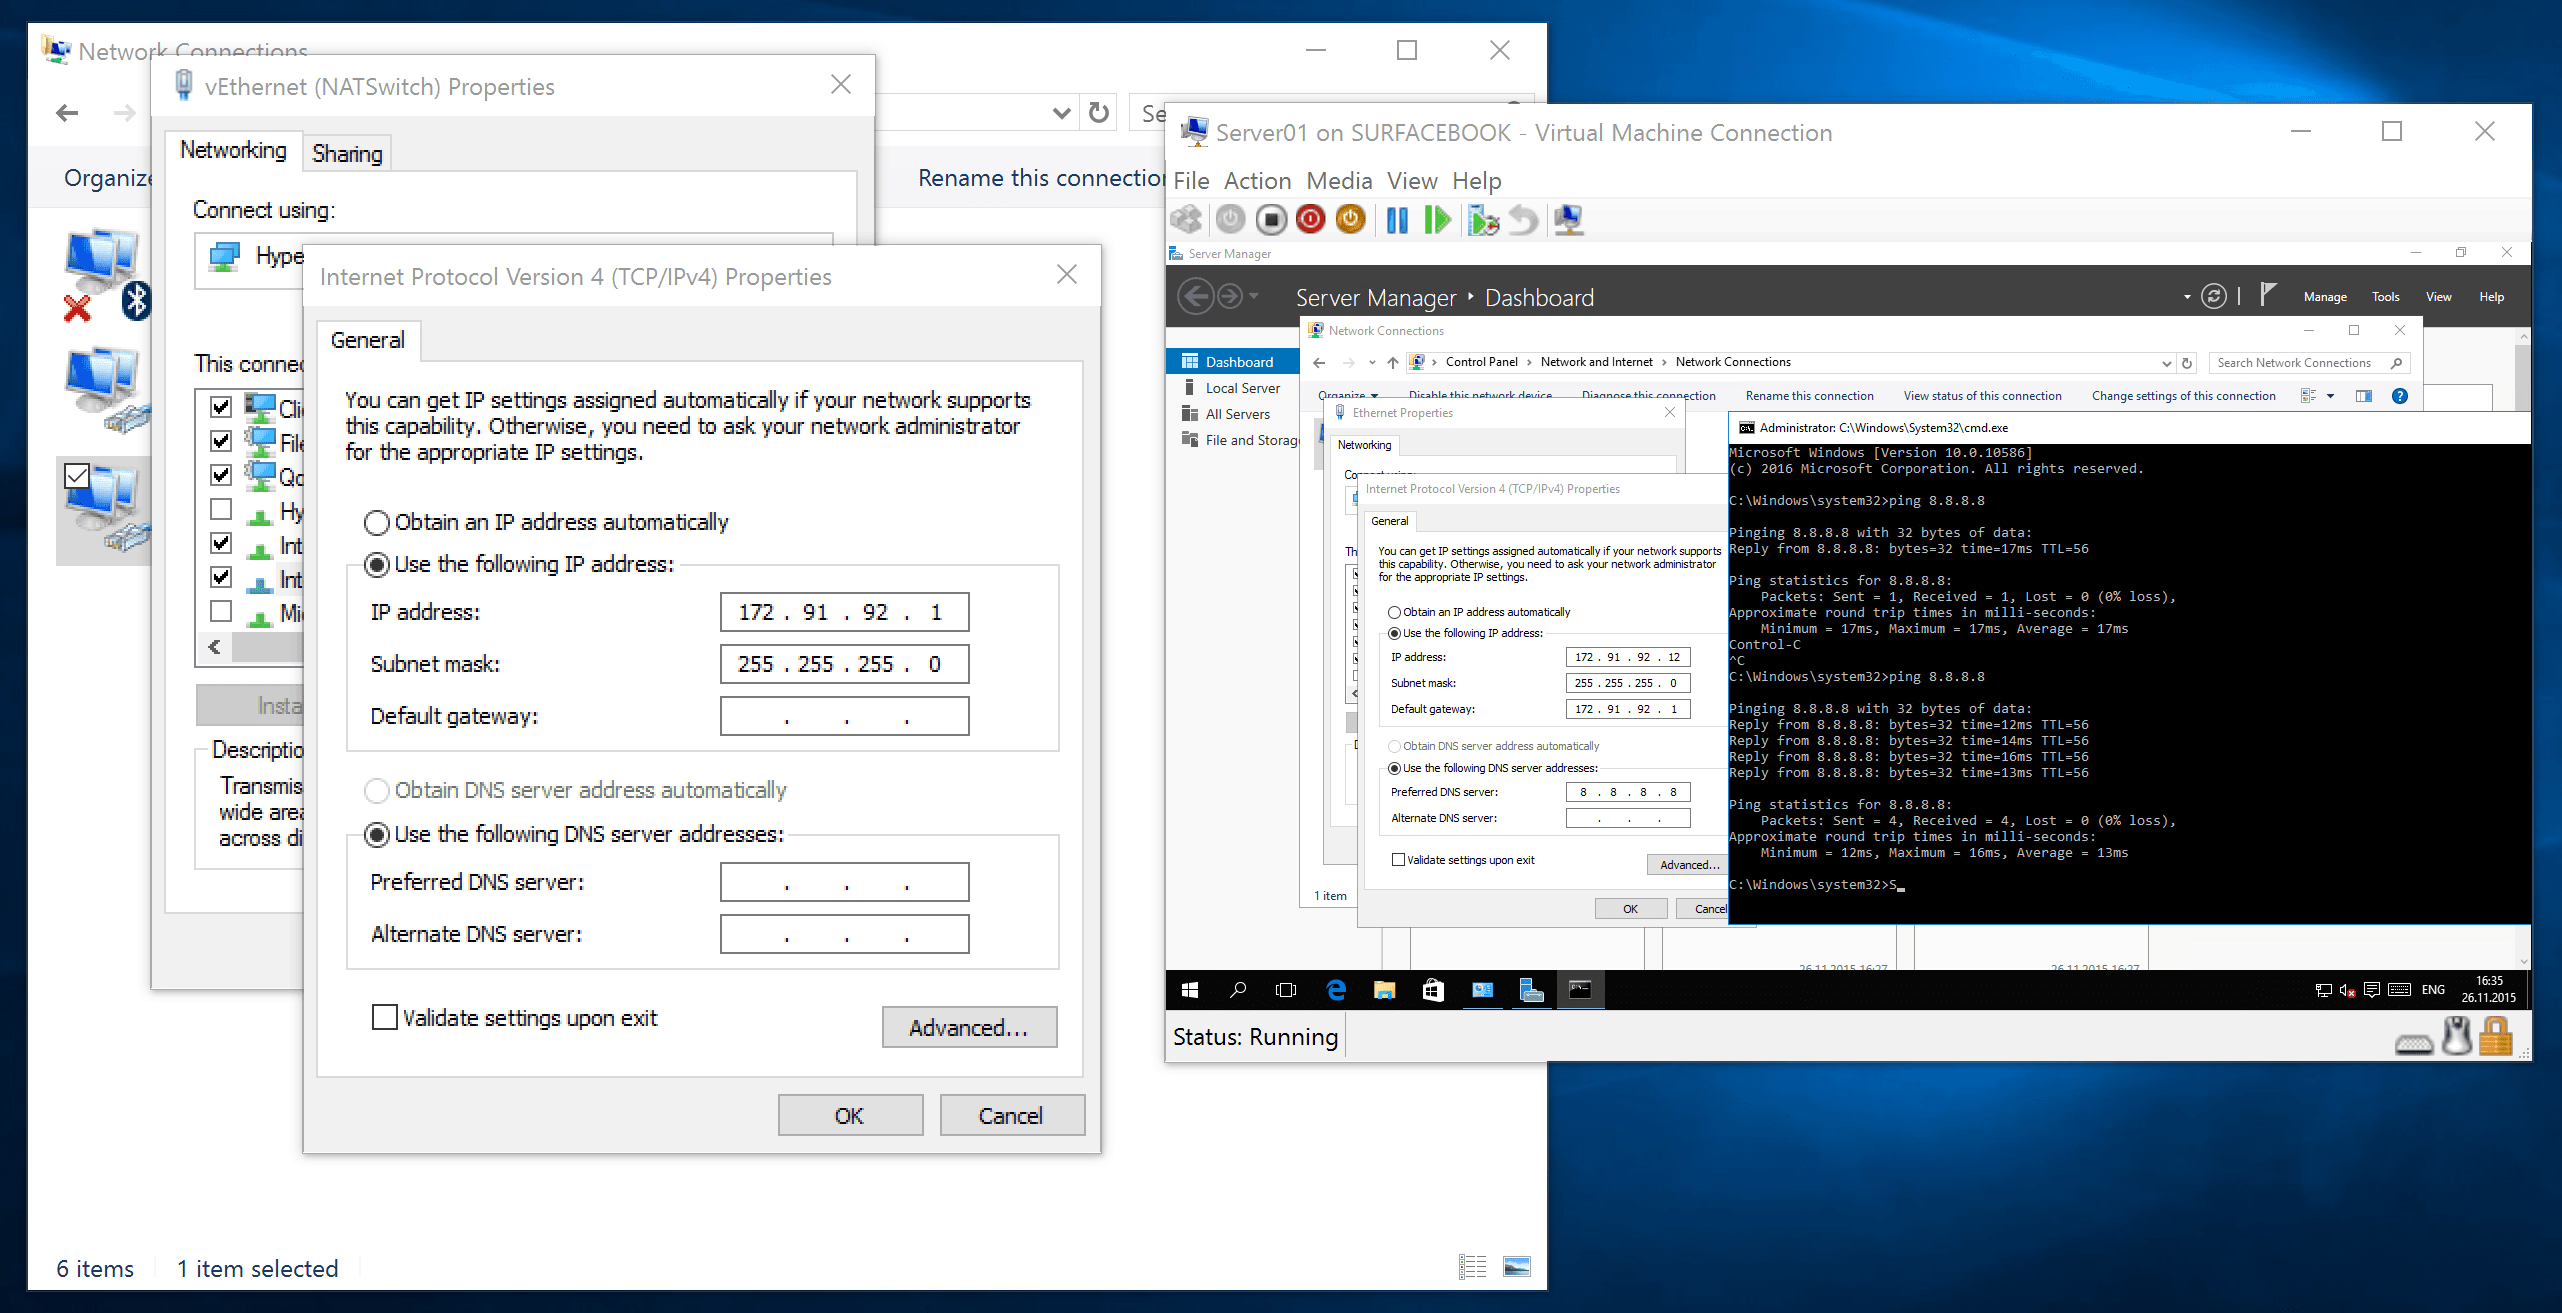
This will create a new VM Network Adapter on the host using the 172.29.92.1 IP Address. You can now use the NATSwitch to connect Virtual Machines. You can now set IP Addresses inside Virtual Machines to the 172.29.92.0/24 subnet and add 172.29.92.1 as the default gateway and you are good to go.
Create a new NAT forwarding
To forward specific ports from the Host to the guest VMs you can use the following commands.
This example creates a mapping between port 80 of the host to port 80 of a Virtual Machine with an IP address of 172.29.91.2.
Add-NetNatStaticMapping -NatName "VMSwitchNat" -Protocol TCP -ExternalIPAddress 0.0.0.0 -InternalIPAddress 172.29.92.2 -InternalPort 80 -ExternalPort 80
This example creates a mapping between port 82 of the Virtual Machine host to port 80 of a Virtual Machine with an IP address of 172.29.91.3.
Add-NetNatStaticMapping -NatName "VMSwitchNat" -Protocol TCP -ExternalIPAddress 0.0.0.0 -InternalIPAddress 172.16.0.3 -InternalPort 80 -ExternalPort 82
This also works with Windows and Hyper-V Containers.
Update – 4/27/2016 #1
As many of the people mentioned, the option of the SwitchType NAT is gone in the latest Windows Insider Preview builds of Windows 10. If you have created a NAT Switch in Windows 10 before the upgrade to a Windows 10 insider build, the switch is still working. There is no comment at the moment from Microsoft on this. But Microsoft announced Hyper-V Container support for Windows 10, and since the NAT Switch makes totally sense when you are using containers, I guess the SwitchType for NAT will be coming back.
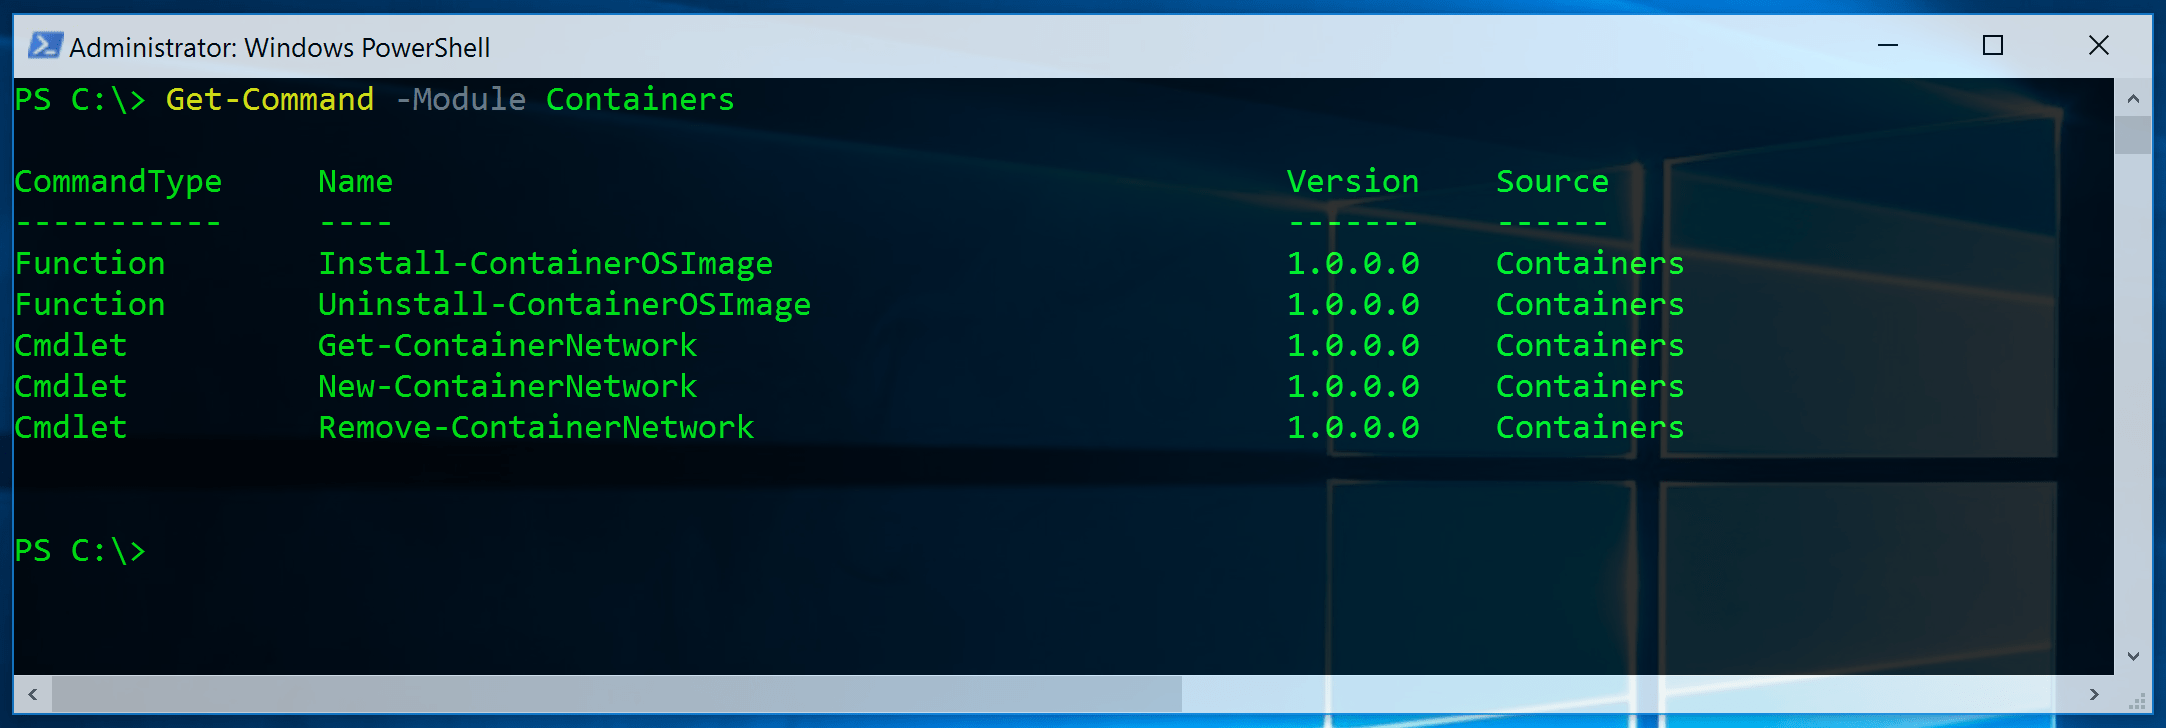
Update – 4/27/2016 #2
With the latest Windows 10 Insider Build 14332, I saw some Container Network PowerShell cmdlets, which maybe will replace the Hyper-V Switch NAT cmdlet options for the future. But this is just guessing.
Update – 5/3/2016
Here is a updated version how you can configure the Hyper-V NAT Switch in newer Windows 10 and Windows Server 2016 builds.
Have fun and enjoy! Thanks to Ben Armstrong (Microsoft VirtualPCGuy) for the info.
Tags: Hyper-V, Microsoft, NAT, PowerShell, Virtual Switch, Virtualization, VMSwitch, Windows, Windows 10, Windows Server, Windows Server 2016 Last modified: September 2, 2018


Hi Thomas. What would be the advantage of this switch – running Hyper-V without a firewall towards the internet – or for LAN to LAN Vpns? Private Cloud? Azure? Just wonder what the advantages are of this in a time where IPv4 public IP adresses is hard to get :)
Well this can be used for several environments and of course Containers.
One of the great additions here is for example if you have an environment running on your notebook where your VMs need internet access. You had two updates
1. Create an external network (but if the external IP Addresses change, the IP Address of the Virtual Machines have changed as well. If you are connected to a Public WiFi you may not get so many IP addresses you need, or you got blocked anyway.
2. You created a VM with one network adapter in an external Switch and one connected to the Private Switch where are all the other VMs were connected as well. But same issue here and you needed an extra VM.
Now with the NAT you can use VMs using internal IP addresses and using the Network Connectivity of the Host.
hope this helps you :)
Hello Thomas,
I have run the 2 commands as you described, and the switch was created. But the VMs get not connection through is interface. Have I missed something?
Cheers
Andre
Did you configure the IPs and the Gateway in the Virtual Machines correctly?
Sure, configured an IP in the same network and the IP of the host as gateway.
Also the Host can ping the client and resolve the name… also i disabled the Windows Firewall on the host – no difference.
Could it be that the NAT configuration does not support wireless host adapters? It only seems to work here when my laptop is plugged in, not when using wireless.
For me it works with both, it doesn’t really change if I am using a Wireless or Wired connection.
I figured out that it works with the IP Range from the sample in the blog post. When I use another one, it will not work for me.
WIFI and Wired works both for me.
But with my DELL XPS13 I get a bluescreen when I’m using bridged networking over my wireless adapter.
There still seems to be a non-route issue in guests if Cisco AnyConnect VPN-tunnel is active on the host. At least with AnyConnect v3.1.07021 and a non-split VPN-tunnel.
With previous Hyper-V versions the problem was that AnyConnect couldn’t establish a VPN-tunnel, when ICS (Internet Connection Sharing ) was used to simulate NAT in Hyper-V.
Not including a DHCP service (the “new” NAT in W10 Treshold 2) is a nuisance, since you need to manually reconfigure guest TCPIP stacks when copying/handing over a guest to your colleagues – unless all hosts have identical NATswitch ip address spaces.
So, the only “set it and forget it” option (i.e if you want/must use Hyper-V) is still to purchase/install VMware player 12, install it and leave only the VMware NAT Service and the corresponding virtual NIC (VMnet8) running. See http://thomasvochten.com/archive/2014/01/hyper-v-nat/ (and no, I don’t think it is obsolete at all for me, since it works also with AnyConnect active my laptop).
Hello,
First, Thanks for the post !
Do you know if the newly created NAT Object can be also used with any Non-Hyper-V Device ? For example a WiFi Hosted Network Virtual Adapter or is it only usable with Hyper-V NAT Switch ? It’s very easy to configure this with RRAS (Both HPV and Wi-Fi Hosted Network Card as Private) on Windows Server.
Thx !
Regards,
AVB
I’m afraid I don’tremember my networking classes all that well. Could you explain a little bit about why you chose the IP addresses and subnet mask mentioned above? Could it be any 172.x.x.0/24 address?
Thank you,
Chaim
it should be possible to use any subnet :)
I ran these two commands verbatim, and I can confirm that they are not working as intended. My VM is on the NATSwitch, and I configured a static IP with 172.92.91.1 as the default gateway. They can ping the default gateway (i.e., my host). However, they cannot access the Internet. It seems like my host does not know how to route the packets. I am currently on wireless; unfortunately I am at a client and have no way to plug into wired Ethernet.
did you also run the NAT command?
OK, so I got things working. Here’s what I found: Hyper-V does not like it if you already have your wireless NIC associated with an external VMSwitch at the time that you create this NAT VMSwitch. So, if you have an external VMSwitch “bridged” to your wireless NIC, tear that down before creating this NATed one.
If it’s too late and you already made the same mistake that I did, remove the NAT (Remove-NetNat) and the NAT VMSwitch (Remove-VMSwitch), then remove your external VMSwitch (again, Remove-VMSwitch), then recreate the NAT VMSwitch and NAT per the commands in this article.
Once I did that, this seemed to worked like a charm… my VM can ping the Interwebs! More testing to come.
UPDATE: My computer updated to insider build 14251 over the weekend, and I noticed that my NAT is not working. I decided to rebuild the NAT, but the Remove-NetNat command is failing:
PS C:\WINDOWS\system32> Remove-NetNat VMSwitchNat
Confirm
Are you sure you want to perform this action?
Performing operation Delete on Target VMSwitchNat PolicyStore Local
[Y] Yes [A] Yes to All [N] No [L] No to All [S] Suspend [?] Help (default is “Y”): y
Remove-NetNat : The requested operation is not supported.
At line:1 char:1
+ Remove-NetNat VMSwitchNat
+ ~~~~~~~~~~~~~~~~~~~~~~~~~
+ CategoryInfo : InvalidOperation: (MSFT_NetNat (In…VMSwitchNat;0″):root/StandardCimv2/MSFT_NetNat) [Re
move-NetNat], CimException
+ FullyQualifiedErrorId : Windows System Error 50,Remove-NetNat
I am betting that these NAT settings are not properly carried over between builds. I would recommend tearing down the NAT configuration before upgrading your build to the next insider preview release, if you’re in the program.
Both issues have been submitted via Windows Feedback. Please upvote if you have the same issue.
unfortunately, the NATSwitch does not seem to use the system routes… while internet traffic is working in the guest, the guest cannot conenct to any of my local network machines or the servers at work when a vpn is connected. am I missing something?
Why do I get the following message after issuing “New-VMSwitch -Name “NATSwitch” -SwitchType NAT -NATSubnetAddress 172.29.92.0/24″
New-VMSwitch : Cannot bind parameter ‘SwitchType’. Cannot convert value “NAT” to type
“Microsoft.HyperV.PowerShell.VMSwitchType”. Error: “Unable to match the identifier name NAT to a valid enumerator
name. Specify one of the following enumerator names and try again:
Private, Internal, External”
At line:1 char:45
+ New-VMSwitch -Name “NATSwitch” -SwitchType NAT -NATSubnetAddress 172 …
+ ~~~
+ CategoryInfo : InvalidArgument: (:) [New-VMSwitch], ParameterBindingException
+ FullyQualifiedErrorId : CannotConvertArgumentNoMessage,Microsoft.HyperV.PowerShell.Commands.NewVMSwitch
Hi guys, the 8.8.8.8 seems to be very important in the guest as the DNS server. After that it worked all fine for me.
Tim, did you solve your problem with “Cannot bind parameter SwitchType”?
I have the same. I use Windows 10, build 14295.
I have gotten it to work before, did they remote the SwithType NAT in later builds?
Microsoft removed the NAT VMSwitch type in build 14295 with no explanation or acknowledgement. I am very unhappy with them about this.
Search the Feedback Hub for my feedback on this problem and please upvote it. We need them to bring this back!
Also see:
https://twitter.com/FrankLesniak/status/713724135759679488
https://twitter.com/FrankLesniak/status/715887258373591040
https://twitter.com/FrankLesniak/status/715574620909281286
Microsoft removed the NAT VMSwitch type in build 14295… Why… :(.. this was so usefull.
I just discovered all this today and got it running with Win 10 Enterprise Ver 1511 (OS Build 10586.164) – I think this is a pretty current “normal” release type thing. Doing other work I am not bleeding edge focusing on OS, so I guess you guys are why ahead of me.
Do recent comments indicate I am in a for a bad day in the near future when some update guts my setup and I can’t reach my NAT VMSwitch mapped Hyper-V system? As a non-insider and non-preview build user is there somewhere I should chime in, because searching it seems Feedback Hub is for special folks?
Thanks for the great posts! I successfully got NAT working and my containers (hosted on nano server TP4) were able to server Http to clients on the same physical network as the host (by using port mapping and firewall exceptions). So container 1 was accessible from [external host adapter IP address]:81, container 2 was was accessible from [external host adapter IP address]:82 and so on. However I wanted to make the containers available on different external host ip addresses,…so I bound mutliple ip addresses to the host ethernet adapter and attempted to create a new NAT VMSwitch but unable to create new NetNat object for this attempt..
Fail!
Succeeded creating newe new switch, but failed to create new netnat.
New-NetNat -Name “ContainerNat204” -InternalIPInterfaceAddressPrefix “10.0.0.0/8”
New-NetNat : The parameter is incorrect.
+ CategoryInfo : InvalidArgument: (MSFT_NetNat:root/StandardCimv2/MSFT_NetNat) [New-NetNat], CimException
+ FullyQualifiedErrorId : Windows System Error 87,New-NetNat
I dont know if there is a limit to the amount of NAT virtual switches or NATinstances you can have.Or indeed if you can have more than 1 NAT switch on the same physical card. Does anyone know this?
It looks like they screwed something up in the insider release of Win10, causing the NAT VMSwitch to not be available anymore. If you use powershell to create an External vSwitch however, you get an error message stating that a vSwitch can only be of type ‘internal’, ‘private’ or ‘NAT’….
I expect this to be just a bug in the insider release of Win10, that will be fixed by the time it hits general release.
For my 2 cents: it works flawlessly on my 10586.218 build of Win10Pro.
I want to use NetNat in windows server 2012 r2, there is module of NetNat in this OS, but there is not NAT type switch. Who encountered this problem and know how to achieve the same goal? Very appreciate your help! Thank you.
Yes Unfortunately there is no NAT Switch in Windows Versions older than Windows 10 and Windows Server 2016
I create an internal switch, attach it with one vm; then configure ipv4 of vm, set its ip, subnet mask, default gateway and DNS, And then 1: new-netnat, 2: Add-NetNatExternalAddress, 3:Add-NetNatStaticMapping, “ExternalIPAddress” is the ip of external address, “InternalIPAddress” is the ip of vm. Is there something wrong with my steps? No matter how I change the configuration, the vm still can’t connect to internet.
I don’t manage to create the NAT forwarding
Do I need to type in the hosts IP address under -ExternalIPAddress ? Or is it supposed to be like this: -ExternalIPAddress 0.0.0.0 ?
I am using the VMs IP address like this _InternalIPAddress 10.0.0.5
Is it the -ExternalIPAddres I have messed up with?
Hi Thomas, do you ever try to use NetNat without NAT switch? Because in previous versions of OS, there is only NetNat module, not NAT switch.
It Looks like NAT Switches are gone after upgrading to Version 1607.
This works with version 1607: https://www.thomasmaurer.ch/2016/05/set-up-a-hyper-v-virtual-switch-using-a-nat-network/
Newest Windows 10 Update and the feature is gone ;(
As mentioned in the Update you can use this here to have the same effect: https://www.thomasmaurer.ch/2016/05/set-up-a-hyper-v-virtual-switch-using-a-nat-network/