This HowTo should show you how to install a VPN Server on Windows Server 2008 R2. This is a HowTo for a small environment or a stand-alone hosted Server.
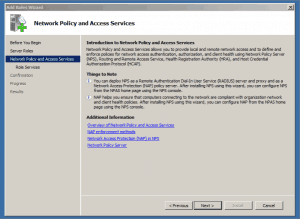
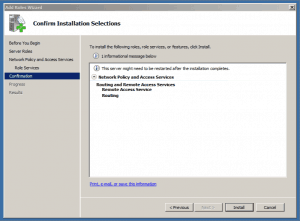
- Install the Role “Network Policy and Access Services” with the Server Manager
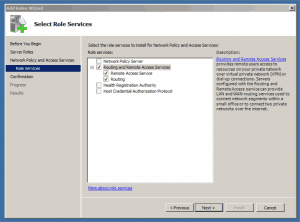
- Select the Role Services “Routing and Remote Access Services”
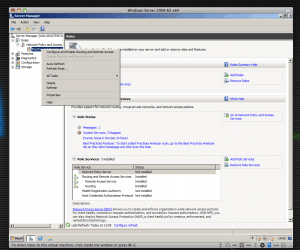
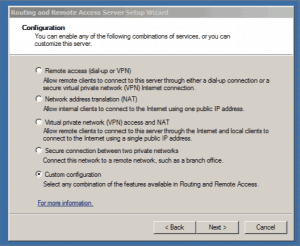
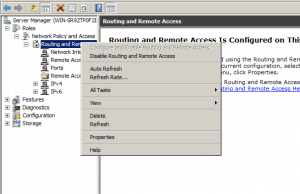
- Configure and Enable Routing and Remote Access in the Server Manager.
- Choose “Custom Configuration” if you just have one Network Interface in the Server
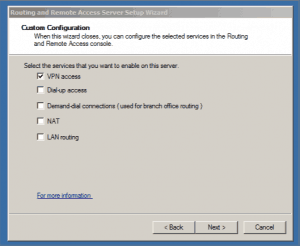
- Choose “VPN access”
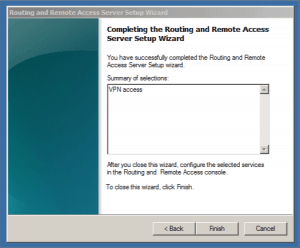
- Finish and click next
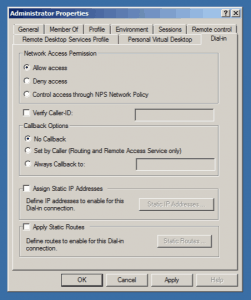
- Allow access for users “Network Access Permission”. You can set that in de Dial-In Tab under the User Premission.
- Open Ports in your FirewallFor PPTP: 1723 TCP 47 GRE
For L2TP over IPSEC: 1701 TCP 500 UDP
For SSTP: 443 TCP
Optional: If you don’t have a DHCP Server in your local network you have to add a static address pool. This could be if you have a stand-alone Server by your provider.
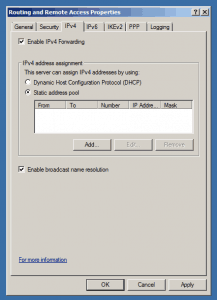
- Right click on “Routing and Remote Access” and open Properties
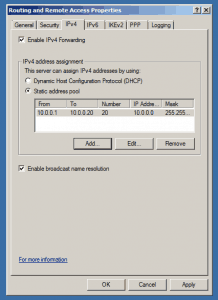
- Click on the IPv4 Tab and check “Static address pool”
- Add a static address pool of private IP addresses
- Add secondary IP Address to the Server network interface which is in the same subnet as this pool.
I also have other posts for about installing VPN on Windows Server:
- How to Install VPN on Windows Server 2012
- How to Install VPN on Windows Server 2012 R2
- How to Install VPN on Windows Server 2016
- How to Install VPN on Windows Server 2019






Hello,
I tried your proposition to have VPN connection on Windows Server 2008 R2, but I am afraid to miss some points:
1. VPN on Windows 2008 R2 require Active directory configuration or not?
2. i tried to build at home this solution, but you didn’t confirm that we need some action in rest of infrastructure (Internet Box, routeur, etc….) – is it normal?
thanks for your tutorial.
Best Regards,
Bertrand.
hello
1. You don’t need a Active Directory
2. At home you maybe need to add a NAT rule on your router to let PPTP, L2TP or SSTP connections trough your router to your server..
http://en.wikipedia.org/wiki/Network_address_translation
Hi Thomas,
I would like to configure IPSec VPN server in Window 2008 R2. I have 50 mobile phones that are using internet (VPN) to tunnel to the server and for i am using NCP Secure Entry client for mobile vpn client software. Do i need to perform additional step out of the above step that you have explained ?
Additional, i use NLB for network load balancer.
Kindly help to advise.
Many Thanks in advance
Regards,
Handoko
Do you have a HowTo for a medium environment or a network servers.
Not at the moment but if I do it for a next time I will post it here.
I want see/access all the network (Servers, PCs, Printers). Your HowTo is for a server connection only. Can you help me about see/access all the network?
I followed your steps but I cannot see the network or cannot ping a hostname, I can ping an IP address only. Why?
im wondering as how to port open / foward the gre 47 port ?
im having some trouble connecting from the client side to the vpn , ive added all the other ports into the serverside firewall
Hi, in a lot of Firewalls this is called PPTP passthrough
Maybe this could be interesting for a lot of people, which have to deploy a VPN solution.
https://www.thomasmaurer.ch/2011/06/directaccess-for-smb-and-lab-environments-–-design-step-by-step-and-troubleshooting-guide/
> Allow access for users “Network Access Permission”. You can set that in de Dial-In Tab under the User Premission.
and where the fuck that dialog should be open from?????
hi Thomas, thanks fro the write up … one thing while I go through the steps… you say
“Allow access for users “Network Access Permission”. You can set that in de Dial-In Tab under the User Premission.”
how do I get to this window ?
regards
The Dial-in dialogue can be found using Active Directory Users and Computers. Click on a user and you will see the dial-in tab.
Active Directory Users and Computers -> OU where your users are -> Properties of the user you want to have access -> tab “Dial-up”
Hi, i tried setting up my server 2008 r2 using your guide.
then i tried to connect to my server using windows 7
but i get error 800: the remote connection was not made because the attempted VPN tunnels failed.
can you help me on this one?
thanks
Did you check if all Firewall ports are you need are open and forwared (if you use NAT)
Thanks for this. Worked like a treat. No Active Directory required to make this work. To complete the setup by adding dial in access, the window entitled ‘Administrator properties’ in the screenshot above, is simply the properties of the Administrator user account on the server. Server Manager-Configuration-Local Users and Groups-Users-Administrator
I want to use server internet connection but cant access internet true vpn..
can you help me.
Hello,
can you please help me, i did the same exact steps however i can’t connect it keeps giving me error 800, i think it may be something to do with my router.
thank you for the article
Did you allow VPN pass through on your router?
http://www.howtonetworking.com/vpnissues/error800.htm
Hello,
thank you for your reply i did i created port forwarding rule, i have a linksys router which has tomato firmware but the problem is not solved yet
can you help me out?
thank you
Does Tomato Firmware Support pptp passthrough?
http://www.linksysinfo.org/index.php?threads/tomato-pptp-passthrough.30774/
maybe here in the comments you can find a solution:
http://nerdia.net/2010/01/17/pimp-my-router/
“The computer that will handle incoming PPTP connections is setup with a static IP-adress. Then I just configure a Port forward -> Basic of port 1723 to that IP-address. Then under Advanced -> Conntrack/Netfilter under Tracking / NAT-helpers check the GRE / PPTP box. “
thank you so much it worked :)
hey,
whrere i can find “user permission”?
if you use a standalone server Server Manager –> Configuration –> Local Users and Groups –> User properties
if you are using this in a active directory enviroment, Active Directroy Users & Computers etc… Users properties
Thank you so much for this training guide – it worked perfectly the first time, I found it very easy to understand, and I’m now establishing VPN connections easily! Do you have a guide on permissions though? I have set all the permissions for as broad access as possible (administrator group), but I still can’t modify anything in the mapped VPN drive – only view it. Thank you!
Thank you. Very useful post.
Thank you so much for your useful post. I just refer to the screen shot and successfully installed the Remote Access Service and VPN in my server running Windows Server 2008 R2 with Active Directory in less that 30 minutes.
I didn’t know it would be very easy to setup the above connection.
Thank you very much. Keep up your good work.
hi thanks for your post. i think is not complete could you introduce me another stage for configure vpn server?
please
thanks
i am having only one server 2008 r2.Can i install vpn server in same machine itself?
thanks and regards
basically yes
Hi, just having a bit of trouble knowing what to do for the very last two steps…
– Add a static address pool of private IP addresses
– Add secondary IP Address to the Server network interface which is in the same subnet as this pool.
I have a single server VPS, I don’t have a separate DHCP server, so I will need to employ this solution. Which address pool range should I configure? I only have a single static IP address (the one assigned to the VPS).
I don’t have a secondary IP address.
Where do I go from here?
Many thanks
any one help me to inforn how a remote user connects or used the main office server using vpn.
Thanks for this tutorial, but I have a few remarks/questions…
People say they could setup their VPN in 30 minutes… It’s been days I’m trying, reading about routeur specifications, certificates, protocols, security…
For instance, I’m surprised you don’t talk about the routeur setup. I’ve had lots of trouble to configure it and I can’t be sure it has been done right: it has a DHCP server, a firewall (I need to set a rule there) and a vpn option to setup (to say what to forward where, declare the shared key you want to use – very messy in my opinion).
Also, it seems people don’t agree on which ports/protocole to open. For instant, Windows open 1701 UDP and you talk about 1701 TCP (for L2TP). Others talk of UDP port 4500 and protocol ESP… And nobody says if it would better to shut the ports used by protocol you don’t want to use. Indeed, if I’m going for L2TP, should I close protocol GRE ?
Can you help me with these questions ? Can you tell me why it is so damn hard to find a complete and coherent source of information ?
Hi,
Thanks for the tuto. What if I want to create a group, let’s say “External Users” and tell the VPN Server to only accept connections from the users in this group? The goal is to avoid going on each users’ AD properties and select “Allow Access” in Dial Up tab…
Thanks in advance.
Can you kindly write a tutorial explaining setting up of a SSTP VPN.
I am running my Windows 2008 Server on Cloud and though i can forward TCP/UDP ports through their Web Interface, there is no way to forward GRE.
For there reasons i am now trying to setup a VPN using SSTP.
I am finding trouble with the Certificate Part.
I generated a self signed certificate but my client won’t connect
citing the certificate not trusted error.
Thanks!
– Mad :)
Hello every one!!
i want to set up remote access vpn server..mean a remote server that can be accessed like a person is using in lan…
scenario is :
1 – single server
2 – 2 NICs(one is configured with live ip(provided by the ISP) and the other with Static IP for LAN)
3 – DSL router (modem) provided by the ISP that is configured with the live IP from the Live IP POOL (zyxel).
4 – RRAS server is installed.AD in installed,
but i’m unable to access the server remotely…i’m also confused about the configurations of IP etc
please just guide me in a simple way that i can set up my server and it could be remotely accessed like a vpn server
Hi Thomas thanks for the post. I followed the instructions but when my Win7 Client tried to connect this VPN, it throws Error: 720 “A connection to the remote computer might not be established. You might need to change the network settings for this connection.”
do you know what might cause this and what’s the solution?
Hard to say.
Maybe this KB clould help: http://support.microsoft.com/kb/314869/en-us
worked very well for me, thank you so much. Needed to set static address pool even though I have DHCP server. before setting static address pool I received error 720.
Worked like a charm, thanks!
Very nice and it even works ;-)
But after the setup I have a working PPTP VPN, have you something about setting up an IPSec VPN on Win2K8Server, every tutorial I followed until now does not work.
Thanks, Elerdin.
I did the whole procedure, the machines are connected, I can ping the other computers and network printers, but I can not see the computers in the network environment, only the server, still typing \ \ server \ folder. Have any tips?
Hello everyone,
i need some Help installing a pptp-vpn on a windows web server 2008R2 at 1&1
the option which is given above “Network Policy and Access Services”
is missing on my server. Also Routing and Ras is missing. I looked also under Features too.
so i made it with this tutorial
“http://www.sevenforums.com/tutorials/4517-virtual-private-network-vpn-enable-incoming-vpn-connections.html”
Evrything seems to be functioning very well. BUT !
somehow are Hackers in my VPN and trying to login in on the server. Everytime i get disconnected while someone else is on the server. I see this message everytime i get disconnected. What could i do?
Please need Help
I have a windows server 2008 r2 machine that is connected to a domain.
The server also has DHCP installed.
I followed your instructions step-by-step. Clients can connect to the VPN, but
1) the client’s gateway on the client is set to 0.0.0.0. This doesn’t SEEM right to me, but maybe it is.
2) the client is not assigned an IP from the DHCP pool unless I specifically set a static IP range in RSAS
3) if I allow the client to use the vpn’s default gateway (which gets set to 0.0.0.0), then the client loses all connection to the internet AND the VPN’s network. The client can’t ping ANYTHING except the one VPN server (no other servers on the VPN’s network can be reached).
4) if I uncheck “Allow client to use VPN’s default gateway” on the client, then I can ping everything in the world… However, the servers on the VPN network cannot ping the IP assigned to the VPN client (ex: 10.0.0.128).
Any ideas what is going on?
@Sean M : I have exactly the same problem. This is SSTP on Windows 2008. VPN client gets IP but cannot ping anything on the private network. It can ping the NICs on the VPN server and it can ping other VPN clients. Network packet trace shows that an ICMP request from vpn client reaches the private servers and they repond with ICMP reply back to the MAC address of the internal NIC on VPN. It seems the RRAS does not know how to route from the private NIC on VPN server to the Internal adapter of RRAS. Were you able to solve your issue?
Dude, awesome.. I have been looking for a solution to provide my iPhone access to my home network when I am away.. this was perfect.. now I can use the iPhone built in VPN and connect to my network, then I use netportal to access my servers workstations and files etc.. I cant thank you enough..
the only change I had to make was in the “Static Address pool” I used a small portion of the 192 addressing that I already use for my private network (NAT) etc.. so now it rocks.. great Howto…
@Sean M : I had this same problem I fixed it going to Network and Sharing Center and changing the RAS (Dial In) Interface from Public to Private.
Thanks Thomas you rock!
Thanks! Could you explain how do i make authentication? so that people that connect to my server via wireless antenna, since this will be a hotspot server need to make an account.. need sql for that? can it be done directly? thanks!
thank you and please tell me what other procedures i do for connect my lap to our server through vpn
You have to create a New VPN Connection in the Network and Sharing Center :)
Thanks for the excellent guide Thomas. I got this working for administrators now.
I also need to give “normal users” access to this; but if I do that I’m getting the following message: RAS 800 or RAS 812.
Can you please help me out?
Thanks Thierry
Fantastic, easy to follow guide!
I’ve got it all setup but can’t seem to access the internet through my VPN. Any suggestions?
Thanks sir…..!
It’s so easy to understand..
no problem ;-)
Cool Website!
Like This Yoo
Your instructions work for a standalone PPTP and L2TP VPN server but on a standalone server I can’t add a certificate for the SSL Certificate Binding property under the Security tab. I’m resigned to the idea that Microsoft won’t accomodate a stand alone SSTP VPN server under its Network Policy and Remote Access Service. Do you know if this is true? Also if I try to set up a VPN server on an Amazon EC2 Windows 2008 R2 instance, I’m limited to a single NIC and am not allowed to add a secondary IP address to it. Any ideas as to whether a stand alone Windows VPN server in this scenario is do able or not is appreciated.
I’m in a migration process. I hope this will help to setup the VPN.
Thank You Sir, this could really help to me..
for the ports can u specify if i need to put same as inbound and private port??
Hi Thomas.i just to know how many client server connection will be allowed if win 2008 server act as a vpn server.
We have a DSL modem in our office, a wireless ASUS router and a file server. I need to provide 5 people access through VPN to a share on the file server (2008 r2). The router supports VPN server. So, i have set it up to allow up to 10 clients and has an ip pool assigned to VPN clients. Do i also need to setup VPN access per your article on the server? If yes, then do the logins for the VPN server on the router (username and password) need to be the same as the computer account logins?
hi thanks
error 812???????
radious port set ????
my network workgroup
Very nice,.., Easy to understand.,,.,.:)
Thanks Thomas !
Tried it but server crashed. Meaning nobody could have access to shared drives .
Did you place the server in the DMZ or did you open the listed ports towards your internal server.
If you placed the server in the DMZ, did you do it with one network connection (only DMZ) or with 2 connections (one DMZ one Internal Network)?
With best regards
Markus
Hi. I have made a simular installation. But with a dynamic DHCP cause I have a DHCP on the same server. My problem is that I wish to use other IP adresses then whats on my Server Vlan. I have 4 other Vlans for ekonomy, produktion, IT, Guest. I wish to assign ip adress after what group the user that loggs on to the VPN is assignd too. is that possible?
the only solustion I have found yet is. set up 4 diffrent VPN connections and assign diffret access in a Network access policy. With that a static pool of addresses but I am afraid the result will be addess will be blocked in ether switch or router cause it comes from the wrong vlan. another problem is that it will conflict with the addresses in the DHCP and might cause an ip conflict. Is it possible to make it access a spessific DHCP POOL on the server? to avoid that problem?
Hi Thomas,
May you explain more about this point”
“4 – Add secondary IP Address to the Server network interface which is in the same subnet as this pool.”
Well on the network interface you may have a public IP address from your hoster. You also have to added a secondary private IP address to the interface
Hi Thomas,
Is there any possible to configure VPN to allow only with SSTP ? ( Clients must have certificate to access the VPN)
Hi thomas,
As per your screen shots, i have done everything & one IP has been given as the secondary Ip in the interface also.
Now Can I know that My server has the VPN?
Step 7 is important even if you have set an inclusive (Domain users permitted) remote access policy in the RRAS mmc. The policy seems to be ignored or overridden on a 2003 DC. Giving the user explicit permission in ADU&C works.
you forgot to mention to port 3389 TCP (RDP port) to get it working but that’s ok cuase after 5 hours figuring GRE is not a port but a protocol (ne need to configure port for that) i stumbled on a youtube video showing the RDP port and guess what BINGO!!!
Hi Thomas,
Great tutorial, very helpful indeed! Would you be able to help me with configuring my VPS to start with? I use Windows Server 2008 R2 and have a private, static IP.
Thanks a lot!
Hi, thanks for tutorial, nice!
Im trying to configure in the server, a printer installed in a client of VPN.
My server is in 192.168.0.0 network
In the VPN client computer, network have the same pool, 192.168.0.0
Which is the correct configuration for this case?
I was testing different configurations, but if I configure a DHCP server on win2k8, with same pool (192.168.0.110/190), I can see from the server the printer of client, but the client loose connection with your network. If the client computer have a network printer, this one will be offline when the VPN is connected!
I have a server 2008 r2 .how could i connect this server for using cloud server.what should i do as a administrator and what necessary device i needed.please give the total solution.
Hi Thomas
Can you please explain me what configurations are required on a DSL router to connect an internal RAS server with private IP address. The RAS server is running with 2k8 R2. The users are at remote locations they want to connect using the Public IP of DSl router.
Thank You
Hello,
I have to configure VPN server on windows server 2008 R2. I am having static IP. But the static ip connection terminates at my router. From the router we are accessing the Internet. I have few questions.
1)To configure VPN Server, do we need seperate Static ip connection which terminates at Public interface card? Should I connect the Public Internet cable directly to the Public interface card or Can I assign the Public IP(which terminates at router) on Public interface card?
Please suggest me, I dont have much idea about networking. I was given a task to configure VPN server. I am new to widows server. Week ago I have established VPN server by using the forums in google but now I am unable to access my private network. Earlier I have accessed my private network through VPN server. I have given the Public IP(which was terminated at router) on public interface card and enabled port forwarding to the private IP which I have configured on Windows server Private interface.
2)Is it mandatory that we need to configure 2 IPs(Public and private) for VPN server setup. Please help me out.
we have one server, it has been intalled 2008 r2 and Remote access , join in a domain , the server has 2 netcard, one connected the intranet(10.8.1.200, 255.255.255.0, GW 10.8.1.1), the other is connected the internet(203.208.211.172, 255.255.255.248, gw 203.208.211.169), reference this guide, deployed VPN only, the client is dailed vpn success, however, client ping 203.208.211.172 is ok, ping 10.8.1.x is ok , ping 10.8.2..x is not ok, we checked the intalltion process, The installation process did not find an error, check the port (1723,47,1701,500,443) are open, Now the reason can not find the problem, please help speculate about the possible direction of the problem, thanks a million!
47 is not a port for GRE. 47 is the protocol ID for GRE. You only need to open TCP port 1723.
thanks bussy….:)
Instructions are pretty vague.
Took me several minutes to find the “Administrator Properties” window. Why not tell people where it is? For anyone wondering, it’s in: Server Manager > Roles > Active Directory > AD users > [your domain] > Users
Then you say to open some ports for different protocols. Am I supposed to do all 3? Pick one? If I pick one, where am I supposed to specify that protocol on the VPN?
I can connect to the VPN, but don’t have internet access on my client machine. Looks like the default gateway is the problem I think. I have added an IP in the 10.0.0.0 subnet to the network adapter. I have also activated NAT, which I have seen other users mention is also required. But still no internet access on my client machine, though it is connected fine to the VPN. I don’t want to set my connection locally to not use the remote server’s default gateway, because the whole point of setting this up is so I can use the server’s fixed IP for some development projects that require me to specify a single fixed IP as a security lockdown.
What is the required setup for having RDP connections being available *only* through a connected VPN-connection/network?
Opening RDP is fine (and easy), but what to do if you want RDP access at all only to an established VPN connection?
Regards
Thomas, you rock. This worked like charm with my DynDns. I really appreciate it.
“The remote connection was denied because the user name and password combination you provided is not recognized, or the selected authentication protocol is not permitted on the remote access server.”