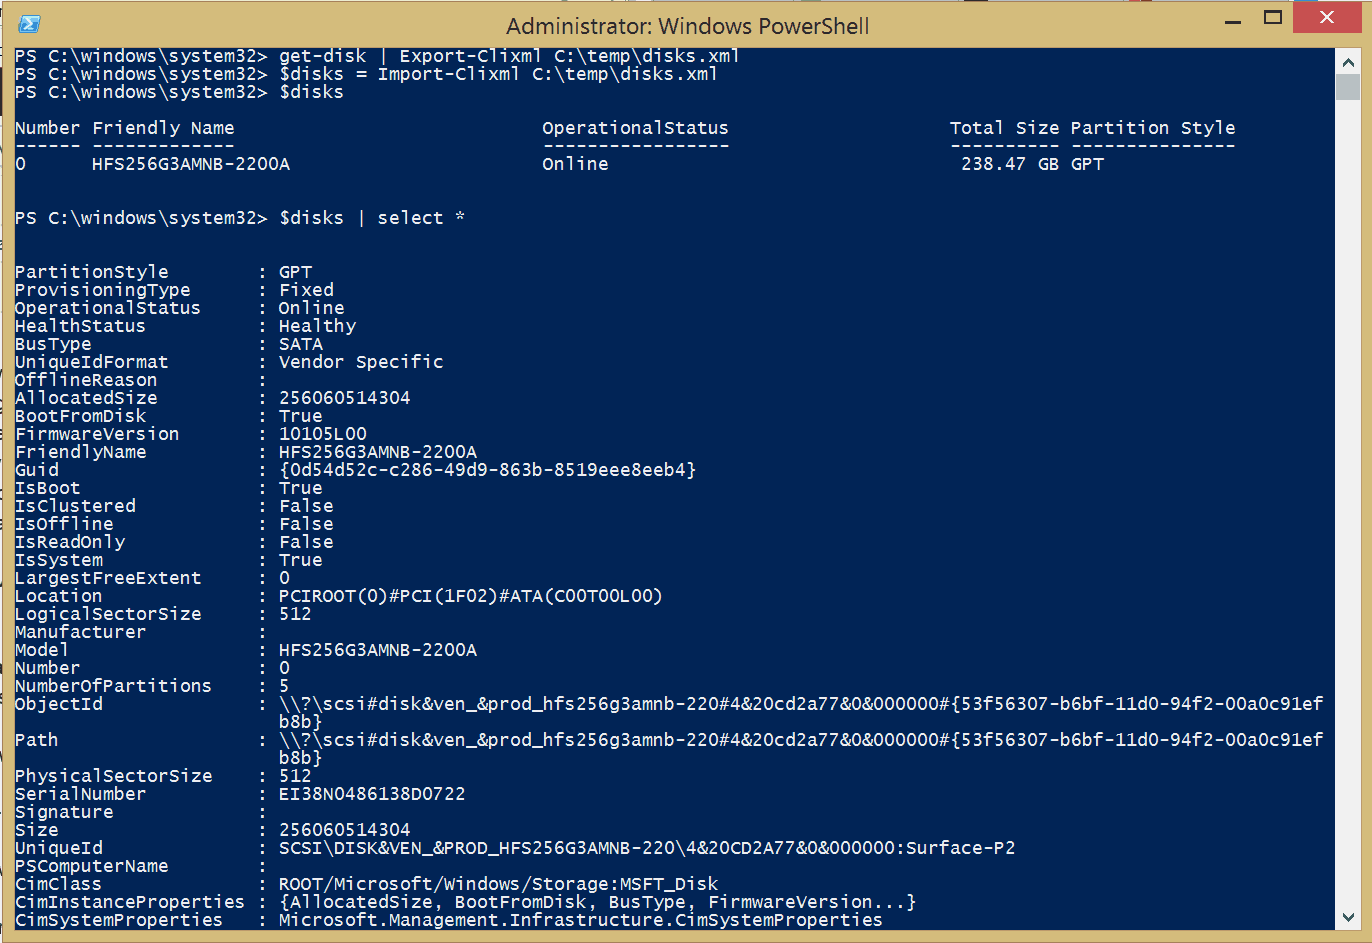
Configure Hyper-V Host Network Adapters Like A Boss

Hyper-V R2 SP1

If you are working a lot with Hyper-V and Hyper-V Clustering you know that something that takes a lot of time is configure the Hyper-V Host Network Adapters. First because most of the time you have a lot of NICs build into your host for the different Hyper-V and Cluster networks and secondly Windows names the NICs in a random way and this makes it hard to find out which network card is the right one. Maybe your first NIC on your Hyper-V Host01 is called “Local Area Connection 2″ and on your second Hyper-V Host with the same hardware configuration the “same” NIC is called “Local Area Connection 3″. One of the possibilities to find out which network card is the right one is to check the MAC address of the network adapter. But for this you still have to know which MAC address is on which network adapter port.

Another way to do it is to plug in the network cables one by one. So you can see which port is active and then you can rename the network adapter. Now some times this one is one of the only solutions, but it takes a lot of time to do this on every host. And if you build Clusters up to 16 Hosts you really don’t want to do that.

Now there is a solution, you can sort your NICs by PCI bus and PCI slot. Maarten Wijsman did a blog post how you can do this on the Hyper-V.nu blog. With this knowledge you can start to automate this very easy.

networkcable

I have created two Windows PowerShell scripts which make my life a lot easier.

First I configured the first Hyper-V host and renamed all the Network adapters. If you have a GUI server you could do that via GUI or if you have a Windows Server Core or Hyper-V Server you can do this via netsh.

netsh interface set interface "Local Area Connection 2" newname="Management"

If I have done that I use my  Windows PowerShell script called Get-NICInformation.ps1 to get the information about the network adapters.

get-nicinformation

This gives me a lot of information about the NICs in my first hosts. But the important part is the order of the NICs. In my example I know that the order is this:

  • Management
  • VMNet
  • CSV
  • LiveMigration
  • iSCSI01
  • iSCSI02

Since my other hosts have the same hardware they will have the same PCI Bus order.

# ---------------------------------------------------------------------------------------------- #
# Powershell Get-NICInformation $Rev: 748 $																 	 
# (c) 2011 Thomas Maurer. All rights reserved.											     
# created by Thomas Maurer	
# www.thomasmaurer.ch
# www.itnetx.ch																     
# last Update by $Author: tmaurer $ on $Date: 2012-02-24 14:07:36 +0100 (Fr, 24 Feb 2012) $		 
# ---------------------------------------------------------------------------------------------- #


#region [INFO BLOCK]
# INFO
Write-Host "                               " -BackgroundColor Black -ForegroundColor White
Write-Host " PowerShell Get-NICInformation " -BackgroundColor Black -ForegroundColor White
Write-Host "                               " -BackgroundColor Black -ForegroundColor White
Write-Host " by Thomas Maurer              " -BackgroundColor Black -ForegroundColor White
Write-Host " www.thomasmaurer.ch           " -BackgroundColor Black -ForegroundColor White
Write-Host "                               " -BackgroundColor Black -ForegroundColor White
#endregion

$adapters = Get-WMIObject Win32_PNPSignedDriver | Where-Object { $_.DeviceClass -eq “NET” -and $_.HardWareID -like “*PCI*” } | Sort-Object location
 
foreach ($adapter in $adapters ) {
 
    $adapterName = Get-WMIObject Win32_NetworkAdapter | Where-Object { $_.PNPDeviceID -eq $adapter.DeviceID }
    $adapterConfiguration = Get-WmiObject Win32_NetworkAdapterConfiguration | Where-Object { $_.index -eq $adapterName.Index }
 
    Write-Host ‘Adapter Name :’ $adapterName.NetConnectionID
    Write-Host ‘PCI BUS :’ $adapter.Location
    Write-Host ‘MAC Address :’ $adapterName.MACAddress
    Write-Host ‘GUID :’ $adapterName.GUID
    Write-Host ‘Adpater Index :’ $adapterName.Index
    Write-Host ‘Hardwarename :’ $adapterName.Name
    Write-Host ‘DHCP enabled :’ $adapterConfiguration.DHCPEnabled
    Write-Host ‘IP Address :’ $adapterConfiguration.IPAddress
    Write-Host ‘Subent :’ $adapterConfiguration.IPSubnet
    Write-Host ‘Default Gateway :’ $adapterConfiguration.DefaultIPGateway
    Write-Host   
 
}

For the next step I go to my second host. There I have my other Windows PowerShell script (Set-IPAddressfromXML) and a XML file (networkconfig.xml).

dir

I edit the networkconfig.xml file with the correct network information. Important here are the id=”" parameters. They are showing the order of the NICs so with Get-NICInformation I can see the Management interface is the first one, so it gets id=”1″, VMNET is the second one it gets id=”2″ and so on. You also set the correct IP Address information for the second host. Most of the time you just have to change the last number.

You can also set non static IP Addresses (DHCP), in my case I did this for the VMNET adapter which will be used by the Hyper-V Virtual Switch and does not need a IP address.

networkconfigxml

<?xml version="1.0" encoding="utf-8"?>
<config>
  <networkadapters>
    <nic id="1" name="Management" static="true" ip="10.0.20.1" subnet="255.255.0.0" gateway="10.0.0.1" />
    <nic id="2" name="LiveMigration" static="true" ip="192.168.21.1" subnet="255.255.255.0" gateway="" />
    <nic id="3" name="CSV" static="true" ip="192.168.22.1" subnet="255.255.255.0" gateway="" />
    <nic id="4" name="TeamedAdpater01" static="false" ip="" subnet="" gateway="" />
    <nic id="5" name="TeamedAdpater02" static="false" ip="" subnet="" gateway="" />
    <nic id="6" name="TeamedAdpater03" static="false" ip="" subnet="" gateway="" />
    <nic id="7" name="ISCSI01" static="true" ip="10.10.21.1" subnet="255.255.255.0" gateway="" />
    <nic id="8" name="ISCSI02" static="true" ip="10.10.22.1" subnet="255.255.255.0" gateway="" />
  </networkadapters>    
</config>

After you have done this, you can now simply run the Set-IPAddressfromXML script. This will use the Information from the networkconfig.xml file and will rename all network adapters and will set the correct IP addresses.

set-ipaddressfromxml

# ---------------------------------------------------------------------------------------------- #
# Powershell Set-IPAddressfromXML $Rev: 748 $																 	 
# (c) 2011 Thomas Maurer. All rights reserved.											     
# created by Thomas Maurer	
# www.thomasmaurer.ch
# www.itnetx.ch																     
# last Update by $Author: tmaurer $ on $Date: 2012-02-24 14:07:36 +0100 (Fr, 24 Feb 2012) $		 
# ---------------------------------------------------------------------------------------------- #

#region [INFO BLOCK]
# INFO
Write-Host "                                 " -BackgroundColor Black -ForegroundColor White
Write-Host " PowerShell Set-IPAddressfromXML " -BackgroundColor Black -ForegroundColor White
Write-Host "                                 " -BackgroundColor Black -ForegroundColor White
Write-Host "  done by Thomas Maurer          " -BackgroundColor Black -ForegroundColor White
Write-Host "  www.thomasmaurer.ch            " -BackgroundColor Black -ForegroundColor White
Write-Host "                                 " -BackgroundColor Black -ForegroundColor White
#endregion

#region [CONFIG BLOCK]
# Get XML Information
[Xml]$global:xmlData = Get-Content ".\networkconfig.xml"
# Set NIC number starting value
[int]$global:nicNumber = "1"
#endregion

#region [MAIN BLOCK]
#Get NIC list
$Adapters = Get-WMIObject Win32_PNPSignedDriver | where { $_.DeviceClass -eq “NET” -and $_.HardWareID -like “*PCI*”} | Sort-Object location
 
foreach ($Adapter in $Adapters ) {
    # Get Adapter Info
    $AdapterName = Get-WMIObject Win32_NetworkAdapter | where { $_.PNPDeviceID -eq $Adapter.DeviceID }
    $nic = $xmlData.config.networkadapters.nic | Where-Object {$_.id -eq $nicNumber}
    
    # Write NIC Info
    Write-Host ‘Adapter Name :’ $AdapterName.NetConnectionID
    Write-Host ‘PCI BUS :’ $Adapter.Location
    Write-Host ‘MAC Address :’ $AdapterName.MACAddress
    Write-Host ‘GUID :’ $AdapterName.GUID
    Write-Host ‘New Name :’$nic.name
    Write-Host
    
    # Change NIC Name
    Invoke-Expression ('netsh interface set interface `"' + $AdapterName.NetConnectionID + '`" newname=`"' + $nic.name + '`" | out-null')
    Write-Host ('netsh interface set interface "' + $AdapterName.NetConnectionID + '" newname="' + $nic.name + '"') -BackgroundColor Green -ForegroundColor Black
    
    # if true set IP Address
    if ($nic.static -eq "true"){
        Invoke-Expression ('netsh interface ipv4 set address `"' + $nic.name + '`" static ' + $nic.ip +' ' + $nic.subnet + ' ' + $nic.gateway + ' | out-null')
        Write-Host ('netsh interface ipv4 set address "' + $nic.name + '" static ' + $nic.ip +' ' + $nic.subnet + ' ' + $nic.gateway) -BackgroundColor Green -ForegroundColor Black
    }
    else {
        Write-Host "No IP set" -BackgroundColor Green -ForegroundColor Black
    }
    
    # Count +1 for next Adapter
    $nicNumber++
}
#endregion


I can now copy the Set-IPAddressfromXML.ps1 and the networkconfig.xml to each Hyper-V hosts and edit the IP Addresses in the xml file, run the PowerShell file and I am done.

Lets recap:

  1. Rename the NICs of the first hosts
  2. Run the Get-NICInformation.ps1 on the first host and check the NIC order
  3. Edit the networkconfig.xml on the second hosts with the right order of the NICs
  4. Run the Set-IPAddressfromXML.ps1
  5. Do this for all Hyper-V Hosts.

I hope this will make life easier :)

You can download the Scripts from my Skydrive

Some other things:

  • I have tested this with Windows Server 2008 R2, Hyper-V Server R2, Windows Server 8 beta, Hyper-V Server 8 beta
  • It works for both because it’s not done with PowerShell v3, maybe I will update it to get it even better.
  • I do not support this script, and you are running it on your own risk.

Automated Active Directory Deployment with PowerShell

Powershell

For a small presentation at KTSI I created a PowerShell script will automatically will deploys Active Directory Servers, adds other member servers, creates Organization Units and adds users via Powershell Remoting. As source there is a XML configuration file and CSV files for User Data.

Install AD with Powershell

This script is just for Lab deployments not for production, and it is not perfect, but I think maybe some people will enhance this script with their own code.

I do not support this script. it is just something I need to deploy my test environments and nothing more. More it shows diffrent

You can find more information about it works in this document.

XML Config file:


<?xml version="1.0" encoding="utf-8"?>
<lab>
<config>
<servers>
<server name="ADS01" ip="192.168.100.11" id="1" adminpw="passw0rd"/>
<server name="ADS02" ip="192.168.100.12" id="2" adminpw="passw0rd"/>
</servers>
<ad>
<domain name="ktsi.local" netbiosname="ktsi" forestlevel="4" domainlevel="4" safemodepw="passw0rd" />
</ad>
<ous>
<ou name="UserAccounts" path="DC=KTSI,DC=LOCAL" />
<ou name="BASEL" path="OU=USERACCOUNTS,DC=KTSI,DC=LOCAL" />
<ou name="CHICAGO" path="OU=USERACCOUNTS,DC=KTSI,DC=LOCAL" />
<ou name="NEWYORK" path="OU=USERACCOUNTS,DC=KTSI,DC=LOCAL" />
<ou name="SALES" path="OU=BASEL,OU=USERACCOUNTS,DC=KTSI,DC=LOCAL" />
<ou name="IT" path="OU=BASEL,OU=USERACCOUNTS,DC=KTSI,DC=LOCAL" />
<ou name="ADMINISTRATION" path="OU=BASEL,OU=USERACCOUNTS,DC=KTSI,DC=LOCAL" />
<ou name="PRODUCTION" path="OU=BASEL,OU=USERACCOUNTS,DC=KTSI,DC=LOCAL" />
<ou name="SALES" path="OU=CHICAGO,OU=USERACCOUNTS,DC=KTSI,DC=LOCAL" />
<ou name="IT" path="OU=CHICAGO,OU=USERACCOUNTS,DC=KTSI,DC=LOCAL" />
<ou name="ADMINISTRATION" path="OU=CHICAGO,OU=USERACCOUNTS,DC=KTSI,DC=LOCAL" />
<ou name="PRODUCTION" path="OU=CHICAGO,OU=USERACCOUNTS,DC=KTSI,DC=LOCAL" />
<ou name="SALES" path="OU=NEWYORK,OU=USERACCOUNTS,DC=KTSI,DC=LOCAL" />
<ou name="IT" path="OU=NEWYORK,OU=USERACCOUNTS,DC=KTSI,DC=LOCAL" />
<ou name="ADMINISTRATION" path="OU=NEWYORK,OU=USERACCOUNTS,DC=KTSI,DC=LOCAL" />
<ou name="PRODUCTION" path="OU=NEWYORK,OU=USERACCOUNTS,DC=KTSI,DC=LOCAL" />
</ous>
<users>
<file name="users.csv" path="OU=ADMINISTRATION,OU=BASEL,OU=USERACCOUNTS,DC=KTSI,DC=LOCAL" />
</users>
<members>
<member name="PC101" ip="192.168.100.21" />
<member name="PC101" ip="192.168.100.22" />
<member name="PC101" ip="192.168.100.23" />
</members>
</config>
</lab>

The PowerShell Script:

Continue reading

Powershell: Working with XML part 2

Powershell Header

After my first post (Powershell: Parsing XML part 1) about working with XML and Powershell, I have create this second post which describes how to create a XML file, Add content to the XML file, remove content from the XML file and save the XML objects as a file.

While I was writing a script which communicates with a webserver, I realized that I need some error handling if the server can not anwser a request from my script. For example if the webserver is down or has to much load.

I created a little retry part (Powershell: Simple retry logic) which retries several times. But if the Server is down for several hours or days your script hangs in a retry loop. Obviously this cant be the solution. After a little bit of thinking a decided to write the data, which I was trying to send, down in a XML file. And the next time the script runs it reads the XML file and tries to send the data again.

Thats the story behind my idea for saving data in a XML file.

Creating a XML object

[XML]$FruitList = "<Box>
<Fruit>
<Name>Banana</Name>
<Color>yellow</Color>
</Fruit>
</Box>"

Save a XML object as a XML file

$FruitList.Save("./myfruitlist.xml")

XML:

<Box>
	<Fruit>
		<Name>Banana</Name>
		<Color>yellow</Color>
	</Fruit>
</Box>

Open a saved XML file

[xml]$FruitList = Get-Content ./myfruitlist.xml

Add data to XML object and save it in a XML file

# Copy Object from Banana
[Object]$CopyFruit = FruitList.Box.Fruit | Where-Object {$_.Name -eq "Banana"}
$NewFruit = $CopyFruit.Clone()
# Add Fruit to new Object
$NewFruit.Name = "Apple"
$NewFruit.Color = "green"
# Add Fruit to XML Object
$FruitList.Box.AppendChild($NewFruit)
#Save to XML object ot XML file
$FruitList.Save("./myfruitlist.xml")

XML:

<Box>
	<Fruit>
		<Name>Banana</Name>
		<Color>yellow</Color>
	</Fruit>
	<Fruit>
		<Name>Apple</Name>
		<Color>green</Color>
	</Fruit>
</Box>

Change data from XML Object and save it as XML file

# Change Apple Color
$FruitList.Box.Fruit | Where-Object {$_.Name -eq "Apple"} | ForEach-Object { $_.Color = "red" }
#Save to XML object ot XML file
$FruitList.Save("./myfruitlist.xml")

XML:

<Box>
	<Fruit>
		<Name>Banana</Name>
		<Color>yellow</Color>
	</Fruit>
	<Fruit>
		<Name>Apple</Name>
		<Color>red</Color>
	</Fruit>
</Box>

Remove data from XML Object and save it as XML file

# Remove Banana from Object
$RemoveFruit = $FruitList.Box.Fruit | Where-Object {$_.Name -eq "Banana"}
$FruitList.Box.RemoveChild($RemoveFruit)
#Save to XML object ot XML file
$FruitList.Save("./myfruitlist.xml")

XML:

<Box>
	<Fruit>
		<Name>Apple</Name>
		<Color>green</Color>
	</Fruit>
</Box>

Powershell: Parsing XML part 1

Powershell Header

In my company we started to use XML files as configuration files. So we use it for some configurations of servers or automation for our robots. In Powershell there is a pretty easy way for parsing XML. In Powershell there is an object type for XML, so you just can use the get-content Cmdlet to read the XML file into the object.


$xmldata = get-content "C:\XMLFiles\mydata.xml"

When you create a function for reading XML files you also can set the XML object to global.


$global:xmldata = get-content "C:\XMLFiles\mydata.xml

Now $xmldata is a object which includes all the data of the mydata.xml.

Lets view the content of the mydata.xml file. We need this to understand the following commands.

<TodoList ID = “Week21″>

<Task action=”create” ID=”1″>
<Name>Peter</Name>
<Dept>Administration</Dept>
<email>peter@contoso.com</email>
</Task>

<Task action=”create” ID=”2″>
<Name>Thomas</Name>
<Dept>Administration</Dept>
<email>thomas@contoso.com</email>
</Task>

<Task action=”delete” ID=”3″>
<Name>Steve</Name>
<Dept>IT</Dept>
<email>steve@contoso.com</email>
</Task>

</TodoList>

Now we wanna get all unique Accounts listed

$xmldata.TodoList.Task | %{$_.Name} | select-object -unique

Peter
Thomas
Stefan

We can also create a new object for a specific Task

[Object]$xmltask2 = $xmldata.TodoList.Task | Where-Object {$_.ID -eq "2"}

Now we have a new object with data from Task ID 2. If we wanna see the name from this we just use the same command with the new object

$xmltask3 | %{$_.Name}

Thomas

We can do a lot more with this, but I will bring this up in the next blog posts.