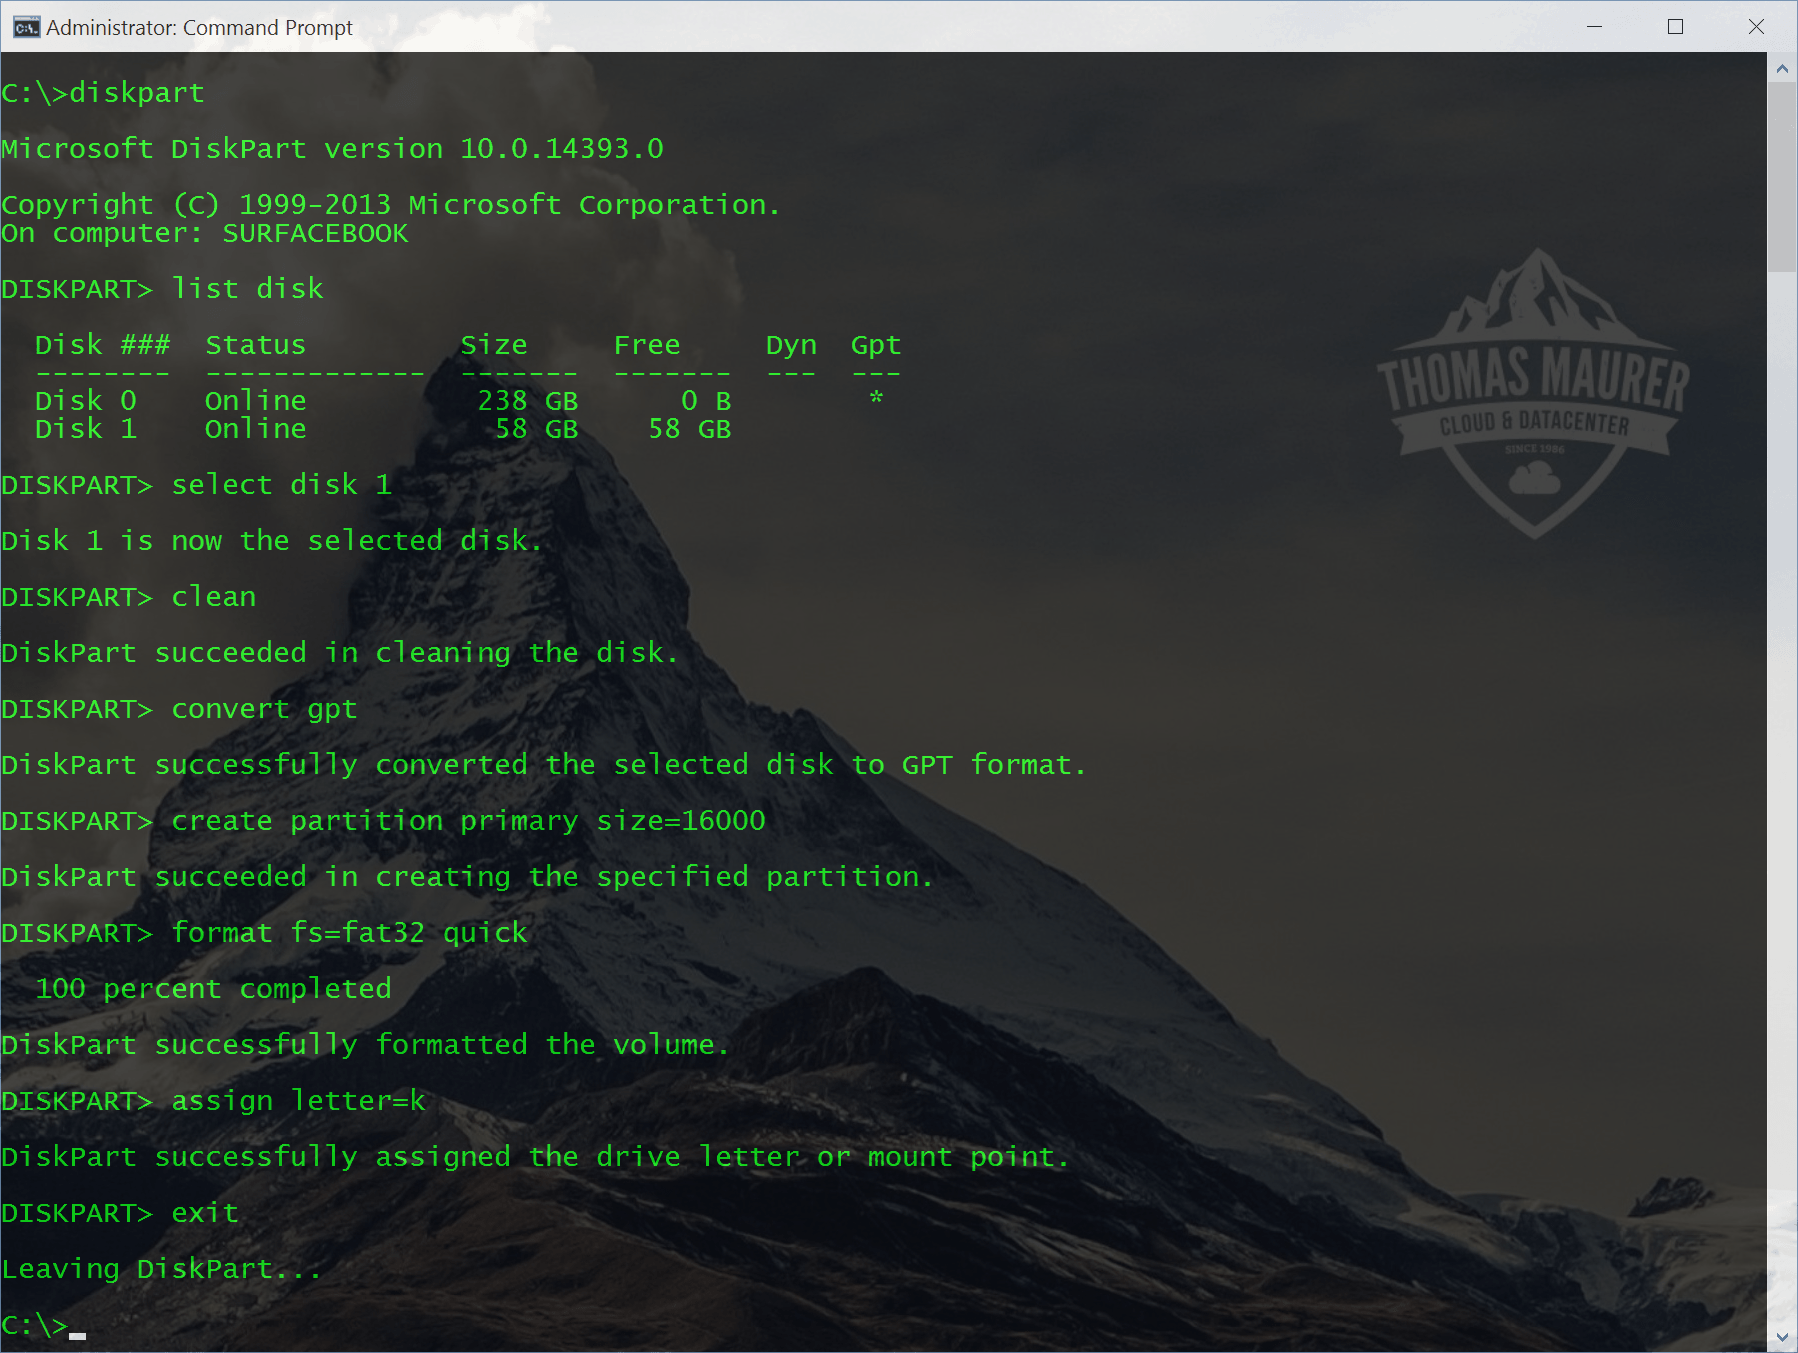
Replace Diskpart with Windows PowerShell – Basic Storage cmdlets

Windows Server 8

Last week I made a blog post about how you can create a USB drive for Windows To Go. In my post I used diskpart.exe to format the USB drive. Now we don’t live in the stone age anymore, so I did the same with the new version of Windows PowerShell coming in Windows 8 and Windows Server 8.

Now here some basic cmdlets to do some simple storage operations, like clean a disk, create a partition and so on.

Lets start simple

List all disks

Get-Disk

get-disk

Now get all partitions

Get-Partition

get-partition

Now get all partitions of disk 0

Get-Partition -DiskNumber 0

get-partitiondisk

Clear a Disk

Get-Disk 1 | Clear-Disk -RemoveData

clear-disk

Create a new partition

New-Partition -DiskNumber 1 -UseMaximumSize

new-partition

Format this volume

Get-Partition -DiskNumber 1 -PartitionNumber 1 | Format-Volume -FileSystem NTFS

format-volume

Create new partition and format it with the label “USB”:

New-Partition -DiskNumber 1 -UseMaximumSize | Format-Volume -FileSystem NTFS -NewFileSystemLabel USB

format-volume1

Change driveletter

Set-Partition -DriveLetter E -NewDriveLetter T

set-partition

Set a partition active

Set-Partition -DriveLetter T -IsActive $ture

set-partition1

Remove a partition

Remove-Partition -DriveLetter T

remove-partition

Bring a disk online

 Set-Disk 1 -isOffline $false 

Remove Readonly flag

 Set-Disk 1 -isReadOnly $false 

Initialize Disk with GPT

 Initialize-Disk 1 -PartitionStyle GPT 

online disk

This is some basic knowledge about the storage module in PowerShell v3. Lets see how we can change the commands from using diskpart to Windows PowerShell.

Diskpart.exe

select disk 1
clean
create partition primary
format fs=ntfs quick
active
assign letter=e

PowerShell:

Get-Disk 1 | Clear-Disk -RemoveData
New-Partition -DiskNumber 1 -UseMaximumSize -IsActive -DriveLetter E | Format-Volume -FileSystem NTFS -NewFileSystemLabel USB

replace-diskpart

Windows 8: How to create a Windows To Go USB drive

Windows 8 Logo

Microsoft released a new feature called “Windows To Go” with Windows 8. With this feature it is possible to boot your Windows 8 from a USB drive on any PC. In this post I show you how you can do this.

Requirements

Step-by-Step

First let me show you my setup to begin with.

I have my System Drive (C:), the USB drive I want to use (E:) and the Windows 8 ISO mounted (F:)

Windows To Go


  1. Run diskpart
    Windows To Go
  2. With “list disk” you can list all your disk
    Windows To Go
  3. Now select your usb drive (select disk 1) and clean it. After that you can create a new partition and format that and close diskpart.
    select disk 1
    clean
    create partition primary
    format fs=ntfs quick
    active
    assign letter=e
    exit
    

    WindowsToGo05 Diskpart

  4. Now in my case the ISO is mounted as drive F:. Now with dism I can apply the Windows Image to my USB drive (E:)
    dism /apply-image /imagefile=f:\sources\install.wim /index:1 /applydir:e:\
    

    WindowsToGo

  5. Now you have to make this drive bootable
    bcdboot e:\windows /s e: /f ALL
    
  6. now you are done. You can now boot your USB drive. The first boot will take some time to setup.

If you want to know more about Windows To Go I recommend you the Microsoft session from the BUILD conference.


Extending a Microsoft Hyper-V R2 Cluster Shared Volume

Hyper-V

This quick blog post shows you how you can simply extend a Hyper-V R2 or Windows Server 2008 R2 Cluster Shared Volume without any downtime. First you expand your LUN in your OEM SAN management software. This is mostly of the time nothing special. But after that you have to expand the Cluster Shared Volume.

  • In your OEM SAN Management Software expand the size of the LUN or disk
  • Open the Microsoft Failover Cluster Manager and check the CSV coordinator for the disk or LUN you have expanded. The CSV coordinator is the disk owner in the cluster
  • Login to the CSV coordinator machine
  • If you are using the GUI version you can use the Disk Management under Storage in the Server Manager. You can now rescan for disks and then expand the Disk or LUN.
  • If you are using Hyper-V or Windows Server Core you can use diskpart
  • First start the cmd and open diskpart
  • type rescan
  • now type list volume, to list all volumes
  • Use select volume IDNumber, the IDNumber is the number you could see with list volume in the previous step.
  • now you can type extend
  • with list volume you can see the results

In some environments sometimes if you need to expand a Cluster Shared volume it makes more sense to create a new one and move the Virtual Machines with Storage Migration but this cannot be done without downtime.

Boot from VHD

If you need to run multiple instances of Windows on your computer, you have different options. First you could use software like Microsoft Virtual PC or VMware Workstation to run a virtual instance. But if you need more performance, or you have to run for example Microsoft Hyper-V you need a native installed Operating System. Until Microsoft added the feature “boot from VHD”, you had to create different partitions for each installation. Since Microsoft allowed you to use VHD to boot you won a lot of flexibility.

This guide should show you how you can install a new operation system in a VHD, which you can boot from.

  1. First boot from a Windows Setup DVD or USB Stick
  2. On the screen where you could click “Install now” you have also a “Repair your computer” option in the bottom left corner. Click on this option or use the short cut “Shift + F10” to boot in to the command line mode.
  3. Enter diskpart
    Capture1
  4. Create a new VHD file
    create vdisk file=”filepathandfilename” type=”expandable” maximum=maxsiize
    Capture2
  5. Now you have to attach this VHD
    select vidsk file=”filepathandfilename”
    attach vdisk
    Capture3
  6. Now you can switch back to the “Install now” screenby pressing “ALT+TAB” and now do the setup on the new create vdisk.
  7. If you start Windows the next time you will see the new and the old Windows in the boot menu.

If you want to add a already existing VHD to the boot menu you can use bdcedit to edit the boot menu.

bcdedit /copy {originalguid} /d "New Windows 7 Installation" 
bcdedit /set {newguid} device vhd=[D:]\Image.vhd 
bcdedit /set {newguid} osdevice vhd=[D:]\Image.vhd 
bcdedit /set {newguid} detecthal on

You can get more information here.

Cisco UCS Hyper-V Cluster – Configure Blade Servers – Part 4

After we have installed the Cisco Blade Servers we now have to do some configuration on the Hosts.

  1. First I activate Remote Management like Remote Desktop, Remote MMC and Powershell.
  2. I add a Firewall rule for Remote Disk Managment
     netsh advfirewall firewall set rule group="Remote Volume Management" new enable=yes 

    Firewall Rule

  3. After adding this firewall rule, I install the Multipath I/O feature
     ocsetup MultipathIo 
  4. Now you can use the MPclaim command-line tool to manage Multipath I/O
    To view all detected enterprise storage:

     Mpclaim -e

    Add MPIO support for Fibre Channel devices:

     mpclaim.exe -r -i -d < _VendorID> < _ProductID>

    Important: Note that the vendor string length is 8 characters, the product string length is 16 characters, and both fields are padded with spaces as needed.
    More Information about the MPclaim command-line tool
    MPclaim

  5. With diskpart you can now see the disks. And you can format the disks with NTFS. Important after that you should take the disks offline to use them in the cluster.
    Diskpart
  6. In the Configuration Menu enable the Cluster Feature.
  7. On each note the all Cluster disks offline.
    select disk 2
    disk offline

In the next post we will configure the Network Adapters of the Cluster notes and create the virtual networks.

Howto Attach / Detach VHD in Windows Server 2008 R2

This little HowTo shows you how you can attach or detach VHDs (Virtual Hard Disk) in Windows Server 2008 R2 or Windows 7. Basically you can use the Disk Management in the Server Manager to do that.

  1. Open Disk Management
    Disk Management Windows Server 2008 R2
  2. Now click on “More actions” and “Attach VHD”
    Disk Management Windows Server 2008 R2
  3. Now you can choose the VHD you want to attach
    Attach VHD
  4. As you can see you have now a new Virtual Hard Drive in your Disk Management
    Attach VHD Windows Server 2008 R2
  5. To Detach the VHD right click on it and click on “Detach VHD”
    Detach VHD Windows Server 2008 R2

You can also attach and detach VHD’s via diskpart.exe

Attach VHD with Diskpart.exe

Attach VHD via Diskpart.exe

diskpart
select vdisk file="D:\Users\Public\Documents\Hyper-V\Virtual Hard Disks\data.vhd"
attach vdisk

Detach VHD via Diskpart.exe

diskpart
select vdisk file="D:\Users\Public\Documents\Hyper-V\Virtual Hard Disks\data.vhd"
attach vdisk

Cheatsheet: Using Diskpart on a Server Core installation #4

Using Diskpart on a Server Core installation. Disk Administration or Partition a disk.

Create a new partition and format a partition

SELECT DISK 0
CREATE PARTITION PRIMARY
ASSIGN LETTER=E
SELECT PARTITION 1
FORMAT FS=NTFS LABEL="New Volume" QUICK
EXIT

Commands you may then issue at the DISKPART prompt:

LIST Disk
LIST Partition
LIST Volume

SELECT Disk n
SELECT Volume n
SELECT Partition n

DETAIL Disk
DETAIL Partition
DETAIL volume

HELP
REM (remark/comment)
EXIT

Commands to Manage Basic Disks:

(set the current in-focus partition to be the system partition)

ASSIGN (allocate the next free drive letter)
ASSIGN LETTER=l (Choose a free letter)

CREATE PARTITION Primary Size=50000 (50 GB)
CREATE PARTITION Extended Size=25000
CREATE PARTITION logical Size=25000

DELETE Partition

EXTEND Size=10000

REMOVE letter=l (Remove drive letter l from the in-focus partition)
REMOVE /ALL (Remove ALL current drive letters and mount points)

Commands to Manage Dynamic Disks:

(set the current in-focus partition to be the system partition)

ASSIGN (allocate the next free drive letter)
ASSIGN LETTER=l (Choose a free letter)

ADD disk=n (Add a mirror to the in-focus SIMPLE volume on the specified disk.)

BREAK disk=n (Break the current in-focus mirror)

CREATE VOLUME Simple Size=n Disk=n
CREATE VOLUME Stripe Size=n Disk=n,n,...
CREATE VOLUME Raid Size=n Disk=n,n,...

DELETE DISK
DELETE PARTITION
DELETE VOLUME

EXTEND disk=n [Size=n]
IMPORT
ONLINE

REMOVE letter=l (Remove drive letter l from the in-focus volume)
REMOVE /ALL (Remove ALL current drive letters and mount points)
RETAIN

Commands to Convert Disks:

CONVERT mbr
CONVERT gpt
CONVERT dynamic
CONVERT basic

CLEAN ALL (remove all partition and volume info from the hard drive)
RESCAN