For using the same system image for different virtual machines or physical computer, Microsoft created a tool called sysprep.exe. This blog post covers Most people should be already familiar with that tool. If not here is the description:
Sysprep prepares a Windows installation (Windows client and Windows Server) for imaging, allowing you to capture a customized installation. Sysprep removes PC-specific information from a Windows installation, “generalizing” the installation so it can be reused on different PCs. With Sysprep you can configre the PC to boot to audit mode, where you can make additional changes or updates to your image. Or, you can configure Windows to boot to the Out-of-Box Experience (OOBE).
This is great so you can sysprep a virtual machine copy the VHD or VHDX file and use it for the first boot of different VMs. In Windows Server 2012 and Windows 8, Microsoft added an addition to sysprep called the mode switch “/mode:vm”. The mode:vm switch allows you to identify the Windows as a Virtual Machine and sysprep.exe will generalize a Virtual Hard Disk (VHD or VHDX) so that you can deploy the VHD as a VHD on the same Virtual Machine (VM) or hypervisor. You must deploy the VHD on a Virtual Machine (VM) or hypervisor with the same hardware profile. For example, if you created VHD in Microsoft Hyper-V, you can only deploy your VHD to Microsoft Hyper-V VMs with a matching hardware profile, and you can only run VM mode from inside a VM.
This will boost the performance and time for the virtual machine for the first startup and installation. This also work of course with virtual machines running on other hypervisors such as VMware or Xen.
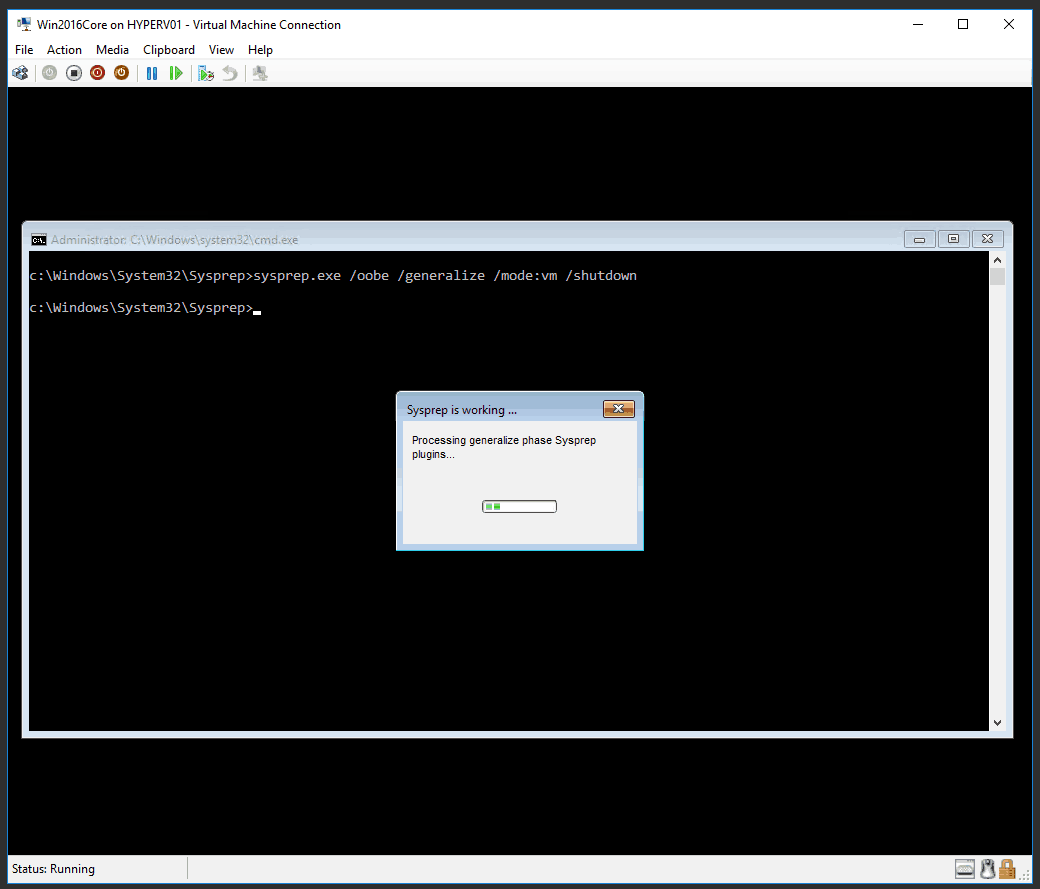
Run the following command inside the Virtual Machine (You find sysprep.exe in the C:\Windows\System32\Sysprep folder):
sysprep.exe /oobe /generalize /shutdown /mode:vm
Now you can copy the VHD or VHDX file from that virtual machine and use it for other VMs. Also check out my post about automating VM creation using an unattend.xml file.
Tags: Hyper-V, Microsoft, Sysprep, Sysprep.exe, VHD, VHDX, Virtual Machine, Virtualization, VMware, Windows, Windows 10, Windows 8, Windows 8.1, Windows Server, Windows Server 2012, Windows Server 2012 R2, Windows Server 2016 Last modified: January 28, 2019


Great info Thomas,
Many Thanks,
Best Regards, Jeff/
From what I understand, all it’s doing is adding the PersistAllDeviceInstalls element to the unattend.xml used by sysprep. PersistAllDeviceInstalls should work on Windows 7 and above.
Should I use model on vmware env?
haven’t tested it, but yes it should also work with VMs running on VMware
Tried the mode:vm switch today on a vmware template (vSphere 6 with vmware tools 10.0.9). Does work without any problems.
is it possible this capture install physical machine ???
Can VMware Workstation 14 Pro also be used to sysprep a Windows 10 image, for deployment on a physical computer?
With Hyper-V sysprep failed somehow, but since VMware is another known piece of virtualization software, i’m wondering if i can use that instead. Thanks!