In my Lab I don’t have a good storage which I can use for my Hyper-V Clusters. But with Windows Server 2012 Microsoft added a lot of new storage features and included a iSCSI Target Server. With the new Storage Pooling / Storage Spaces features this allows me to use a Windows Server as a great storage replacement.
This offers features like:
- Thin provisioning
- Data Deduplication
- Disk aggregation
- Storage Spaces
- and a lot more
Overview
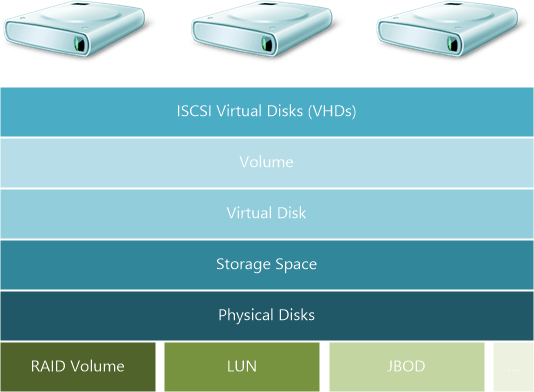
- We will aggregate physical disks to a Storage Pool
- On this Storage Pool we will create a Virtual Disk. Here we have to option to use Data Deduplication, Thin provisioning, Reliability options (Simple, Mirror, Parity), etc.
- On the Virtual Disk we will create a NTFS volume
- On this Volume we will create iSCSI Virtual Disks (LUNs)
Hardware
I am using a Windows Server with 3 network ports. The first is used for Management and the others are used for iSCSI traffic.
In my Case I have a disk which I use for the Operating System and 4 disk which I use as Storage Pool.
Add Roles and Features
- Add the File Service Role ISCSI Target Server. I also added the Data Deduplication role.
- Add the iSCSI Target Storage Provider (VDS and VSS hardware providers). They enable ISCSI target and disk management by using the Virtual Disk Service (VDS) hardware provider, and enable Microsoft Volume Shadow Copy Services (VSS) snapshot creation and management by using the VSS hardware provider.
- This takes a short moment to complete
Configure Storage Pools and Storage Spaces
- First create a New Storage Pool (This can be done by using the Server Manager or Windows PowerShell.
- Choose name for your Storage Pool
- Choose the disks which should be in this new storage pool. In my case I only see one right volume. But you could also add simple disks via JBOD, which is great to save money and be fexible.
- Create the Storage Pool
Create a Virtual Disk on the Storage Pool
- Open the New Virtual Disk Wizard.
- Choose the storage pool you want to place the Virtual Disk on.
- Enter a name fo the new virtual disk. I will use the name “iSCSI Volumes” because I will later add iSCSI volumes on this virtual disk volume.
- Now choose the storage layout. Because I use a RAID 5 array on my physical raid controller I choose “Simple”. When you are adding disk JBOD style, you can use Mirror or Parity to get reliability.
- Choose a Provisioning type. I use Thin so I can create a virtual disk up to 64TB without having the capacity at the moment. I still can only use the disk capacity I have at the moment, but I can add disks to the storage pool later without having to change the Virtual Disksize.
- Now specify the size of the virtual disk. If you have chosen the Provisioning type to be “Fixed” you cannot create a virtual disk bigger than your free space.
- wait for the virtual disk to be created
Create a Volume
- Now you have to create a volume on this Virtual Disk.
- Choose the Virtual Disk
- Choose the options how you want to use the volume
- Now you can see a new volume
Create a new iSCSI Virtual Disk and a new iSCSI Target
- Launch the New Virtual Disk wizard
- Choose the volume where the iSCSI Virtual Disk should be created. In my case I choose the Volume which I created on my storage pool.
- Choose a name for the iSCSI Virtual Disk
- Specify the size of the iSCSI Virtual Disk
- Create a new iSCSI Target
- Specify a target name
- Specify the iSCSI initiators (Access Server) which can access the ISCSI Virtual Disk. If this are Windows 8 or Windows Server 8 machines you can do a directory search.
- You can enable Authentication if you need
- Now you can create the iSCSI Virtual Disk
- Now you have a new iSCSI Virtual Disk on your Virtual Disk, which you have created on your Storage Pool, which is an aggregation of your physical disks
.









OK sounds nice. But be sure to checkout Microsoft Windows Storage Server 2012 Standard as it does not need CALs in most use cases but is nearly as capable. We saved a lot money using WSS instead of a regular license. But there is one drawback, it is only available through OEMs together with hardware. Here is an example of Windows Storage Server hardware bundle>
Thomas, I really like your blogs and especially the many screen captures you use. Very helpful! But I have two issues I keep running into.
1. Create a new iSCSI Virtual Disk and new iSCSI Target: #2: I’m having trouble in that whenever I put two 2012 servers into a Failover Cluster, when I go to use the New iSCSI Virtual Disk Wizard, it always says “no eligible servers are available”. If I take it out of the cluster, I can see the available server. But I want it clustered. Am I missing something?
2. Create a Virtual Disk on the Storage Pool: #5: Sometimes when I go through this, the “Provisioning: Thin or Fixed” shows up and sometimes it does not. I’m trying to put my finger on what I do that makes the difference. Any thoughts?
Thank you very much for your time.
Bill Branham
#2 You need to use Cluster Manager!
#5 Dynamic is NOT always supported! The option of RAID choosen influence the possible use of “Thin” .